Let’s talk about email lists. They’re really useful for any business. They’re a key part of email marketing, giving you a direct line to people interested in what you offer.
Social media followers and people you reach through ads are different. With your own list, you get better results because you’re talking to people who chose to hear from you. This helps you build real relationships with your customers.
Your email list is a great way to boost sales, find new customers, and make people stick with your brand.
So, whether you’re just starting out or already have a list and want to make it bigger, having good strategies for building that list is essential if you want your business to grow.
Promote newsletter sign-ups on your social media channels.
Include a newsletter signup link in your email signature.
Feature a prominent newsletter signup button in your email campaigns.
Run a contest or giveaway to collect newsletter sign-ups.
Provide valuable content (like an ebook or checklist) in exchange for newsletter sign-ups.
Create an engaging quiz to capture leads and newsletter sign-ups.
Host webinars to build your audience and collect newsletter sign-ups.
Integrate newsletter signup forms across your website.
Run a challenge or program to engage your audience and drive newsletter subscriptions.
Expand your reach and gain subscribers by guest blogging or contributing to other newsletters.
Each of these strategies has its own details and methods. In this article, we will discuss one of the most effective of these methods, which is growing the email list via Popups using the Depicter plugin.
Installing Depicter:
Access Plugins: In your WordPress dashboard, navigate to the “Plugins” section.
Install Depicter: Click “Add New,” search for “Depicter,” and click “Install Now.”
Activate: Activate the Depicter plugin after installation.
Here is the video tutorial for this process:
Creating Your First Popup:
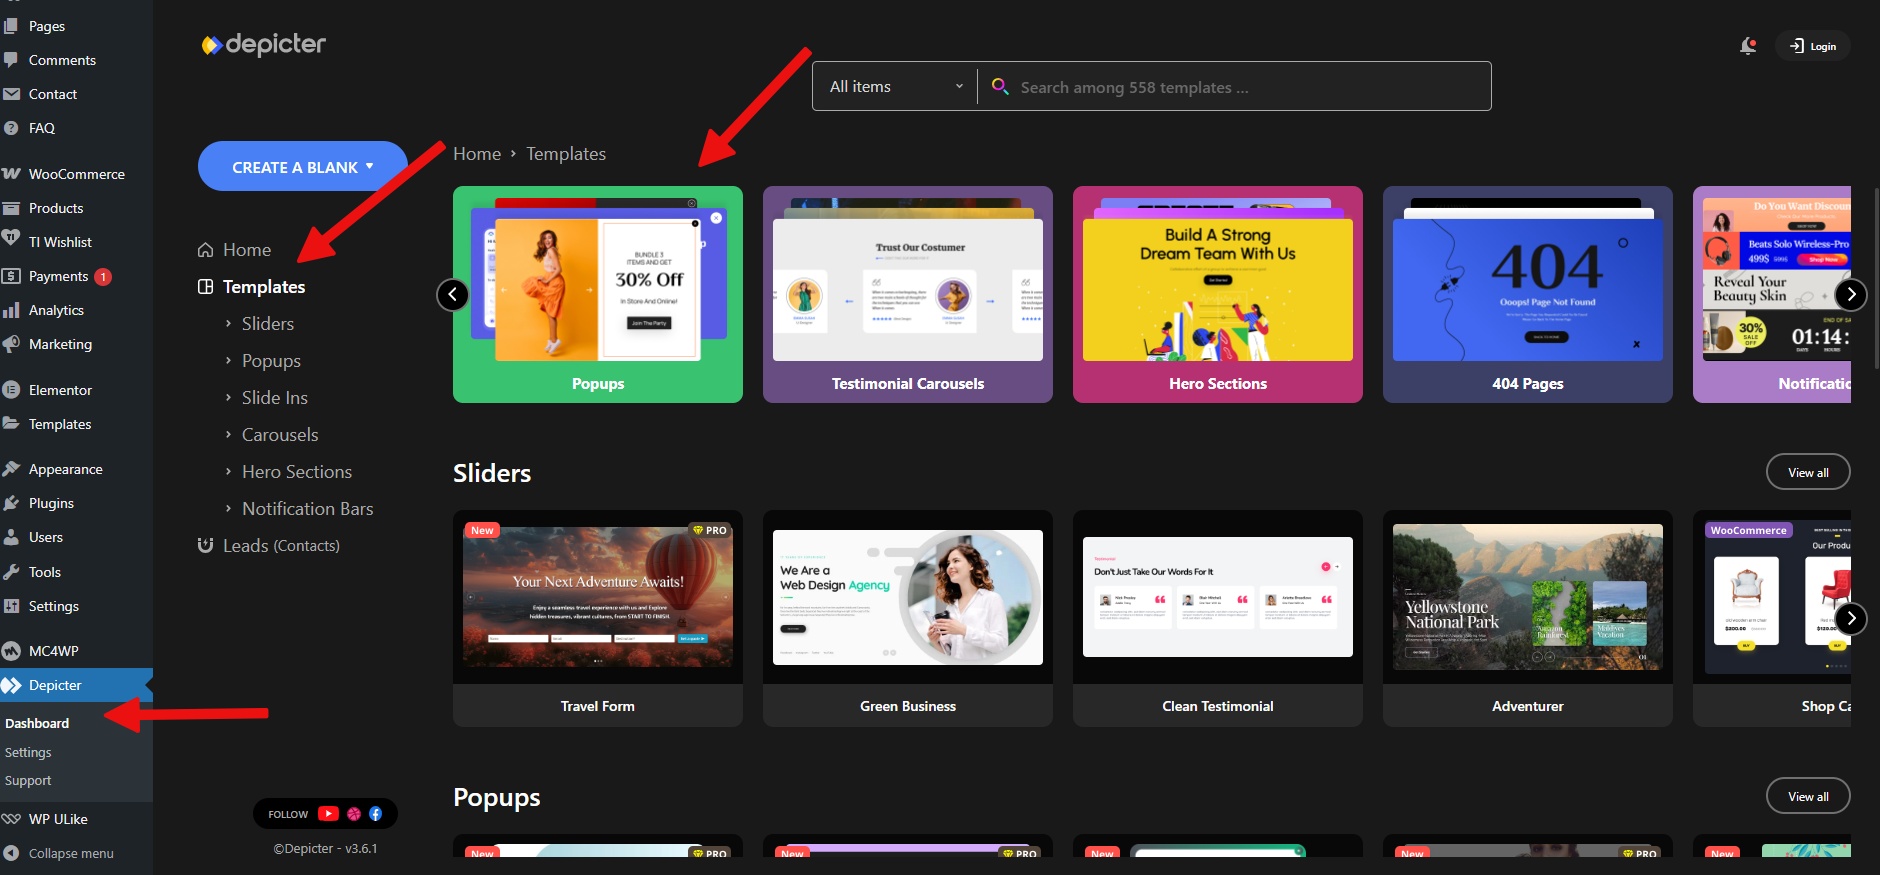
Open Depicter Dashboard: After activating Depicter, access its dashboard and go to Templates > Popups:
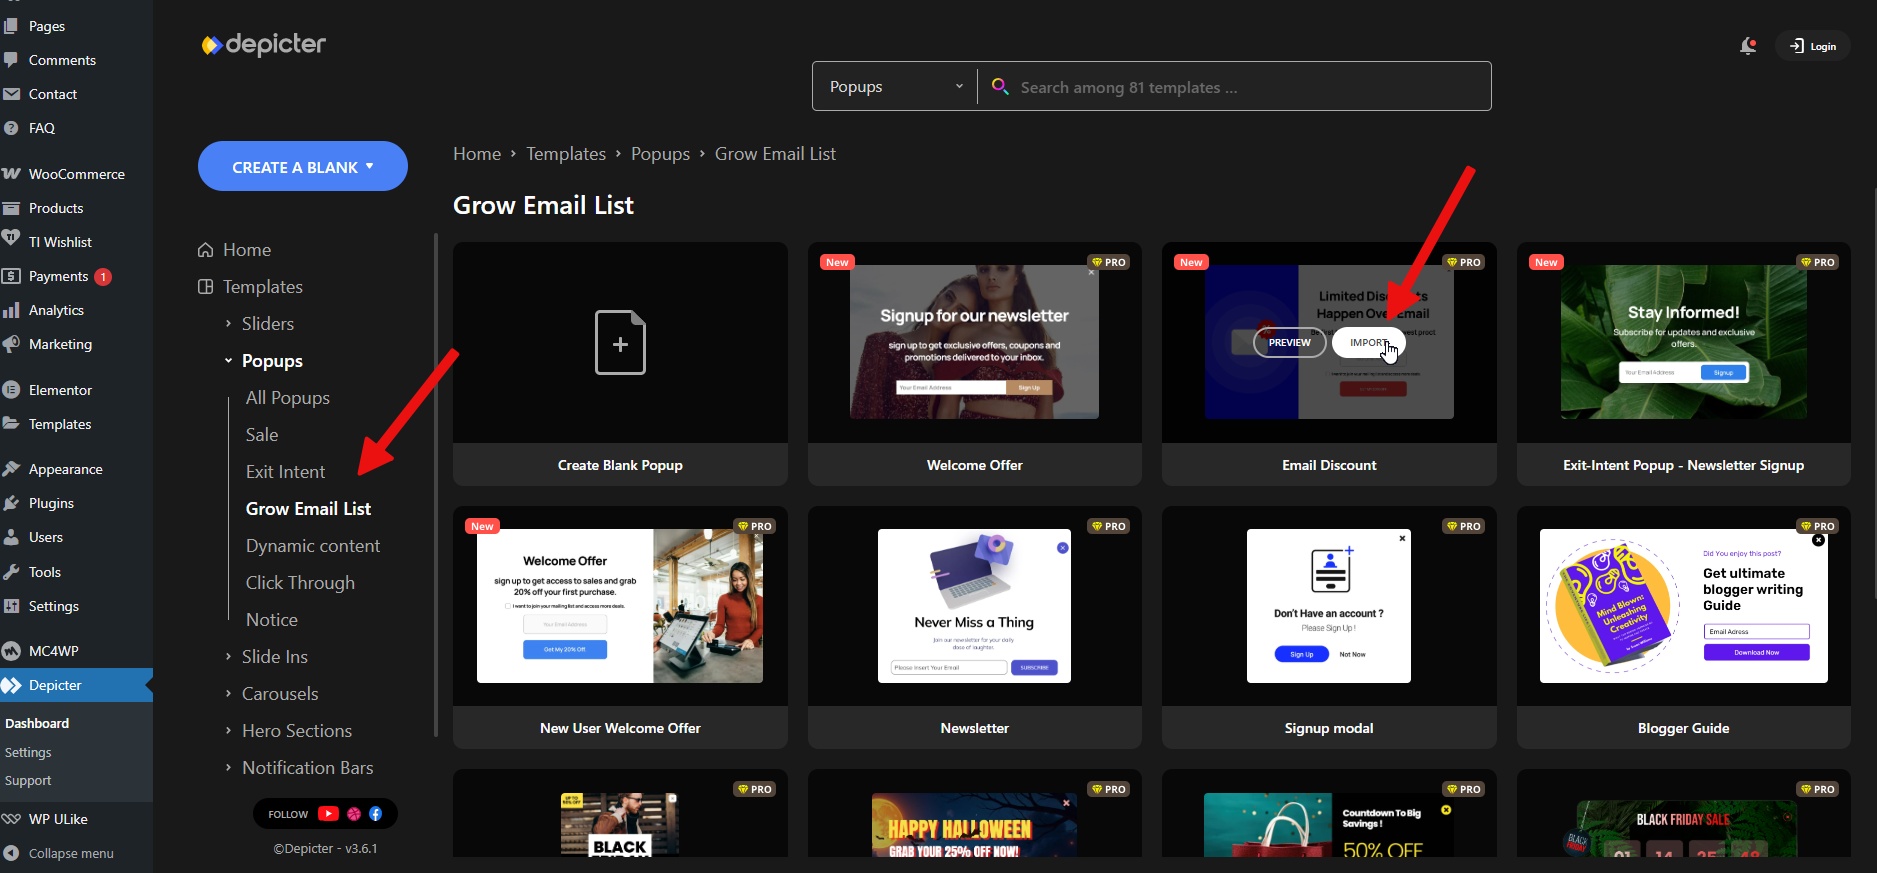
Select a Template: Choose a pre-designed popup template from the available options.
Preview templates by clicking “Preview” before importing. Click “Import” to add the selected template to the Depicter editor for customization. There is a specific category of Popups for this called “Grow Email list” that you can use.
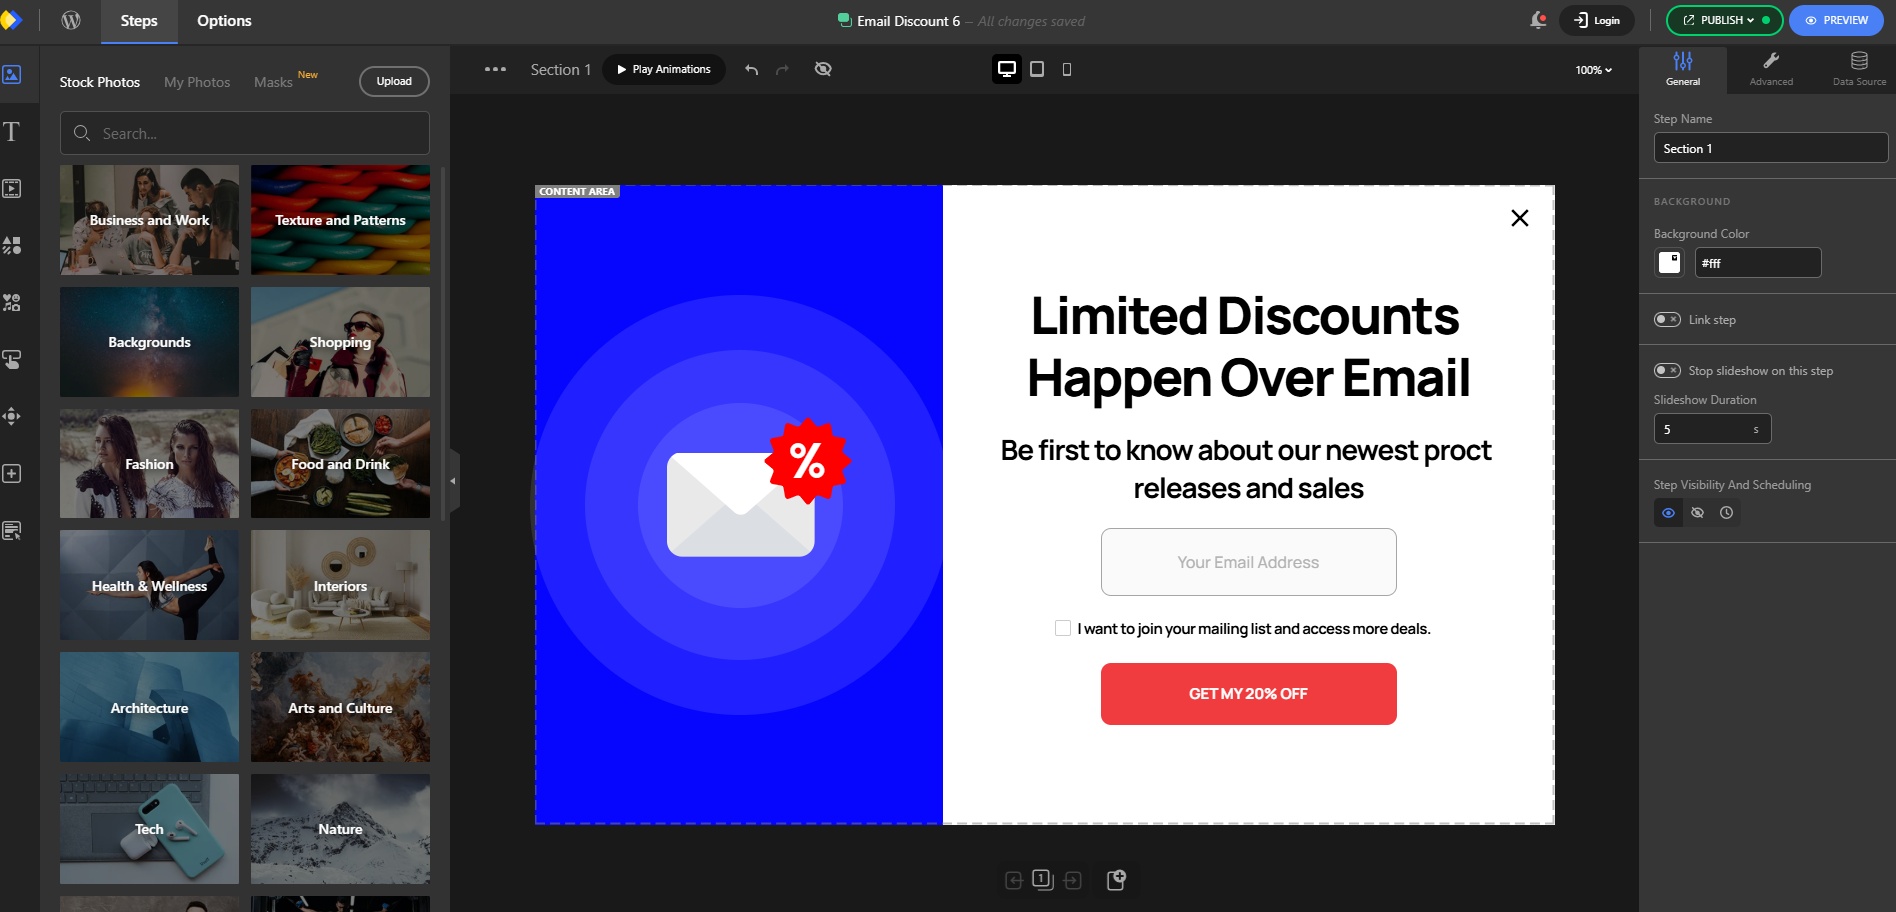
Your chosen template is now imported and ready to be customized. Use Depicter’s tools to make any desired changes. For a detailed walkthrough, watch this video.
Customizing and Configuring Your Popup
After the import is complete, you’ll enter the Depicter Popup Builder. Here, you can adjust the style and other settings for the popup. Depicter has specific options for each element and part of the popup’s details. You can personalize these by simply selecting the element and going to the options panel.
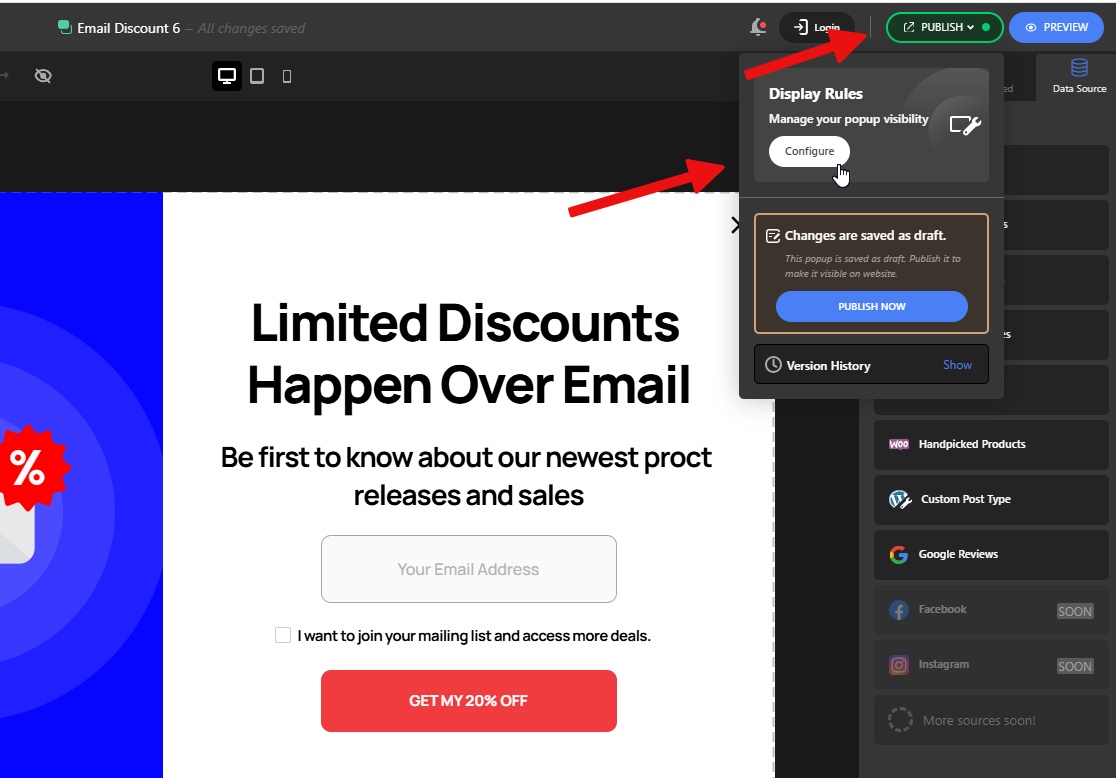
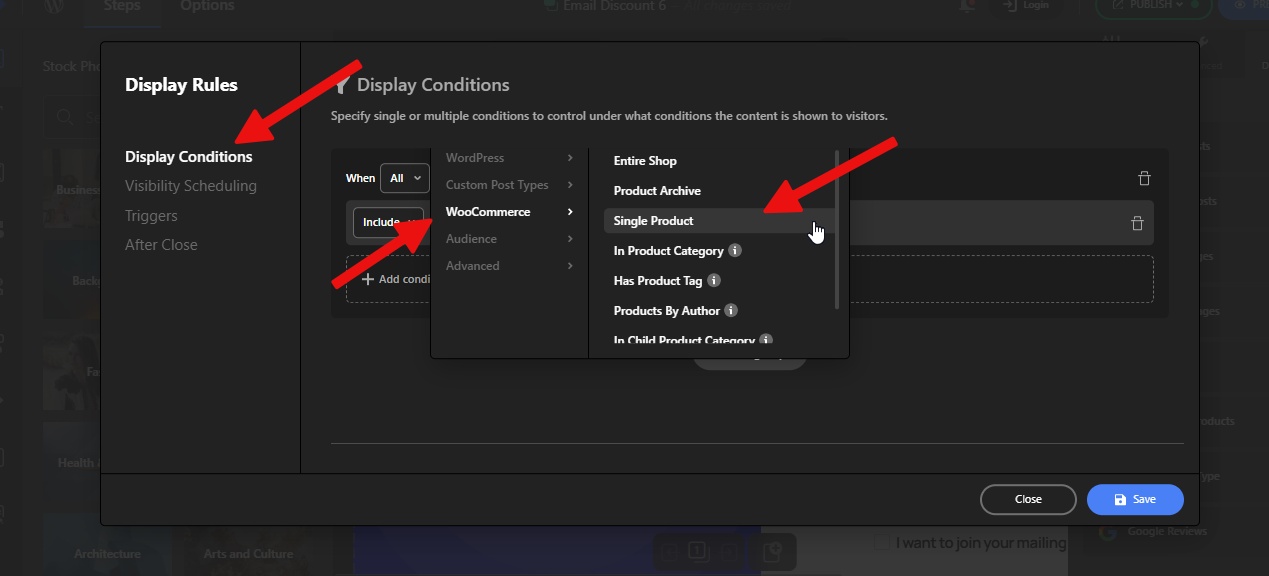
Next, we need to specify where and under what conditions our popup will appear. We do this in the Display Conditions section:
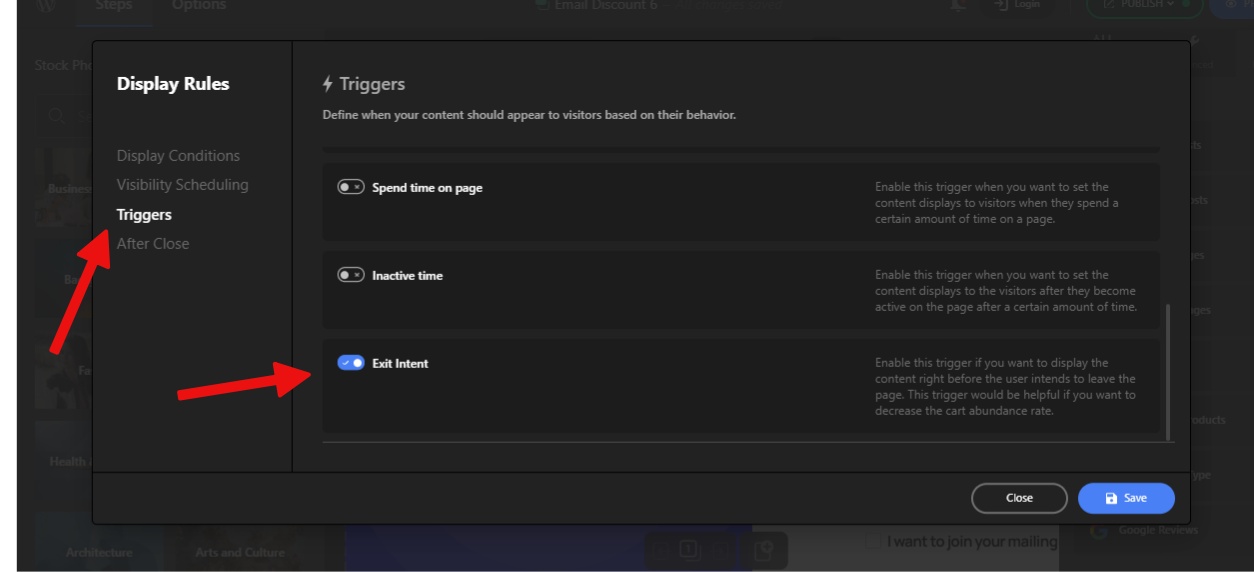
Depicter, with its various options for displaying the Popup in the right place and time, allows you to customize these settings however you like. Here we want our Popup to be displayed on the Single Product Page and when the user is leaving this page. This type of display is also called “Exit Intent“.
First, from the Display Conditions section, select WooCommerce and then Single Product.
And then from the Triggers section, select the Exit Intent option, then click the Save and finally Publish button.
Here our work is done.
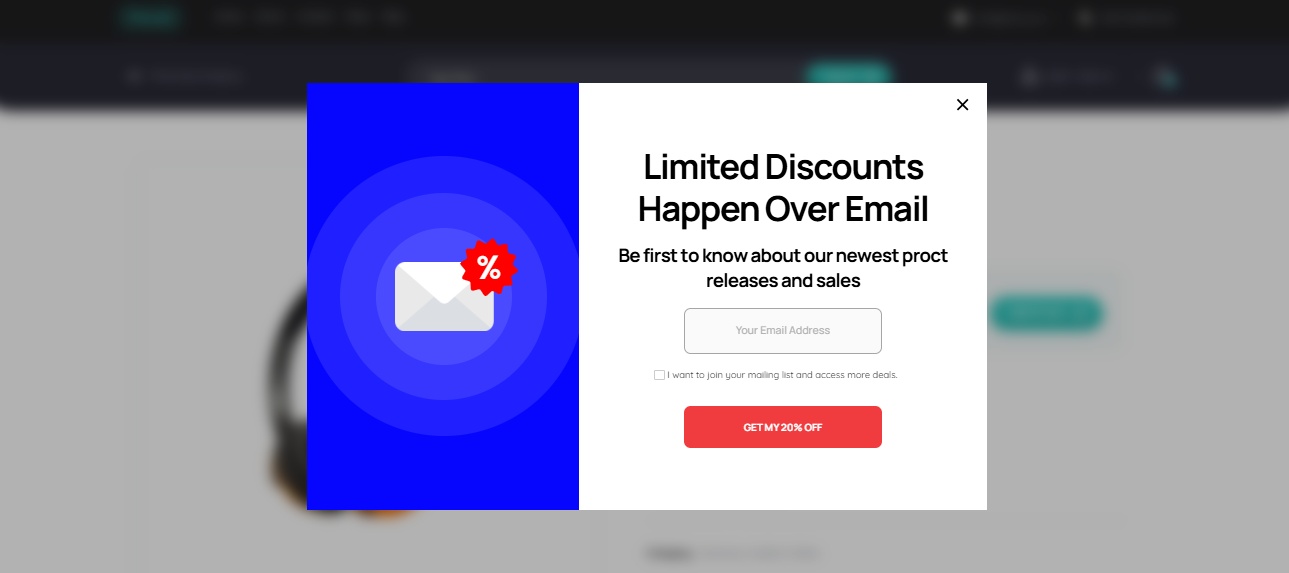
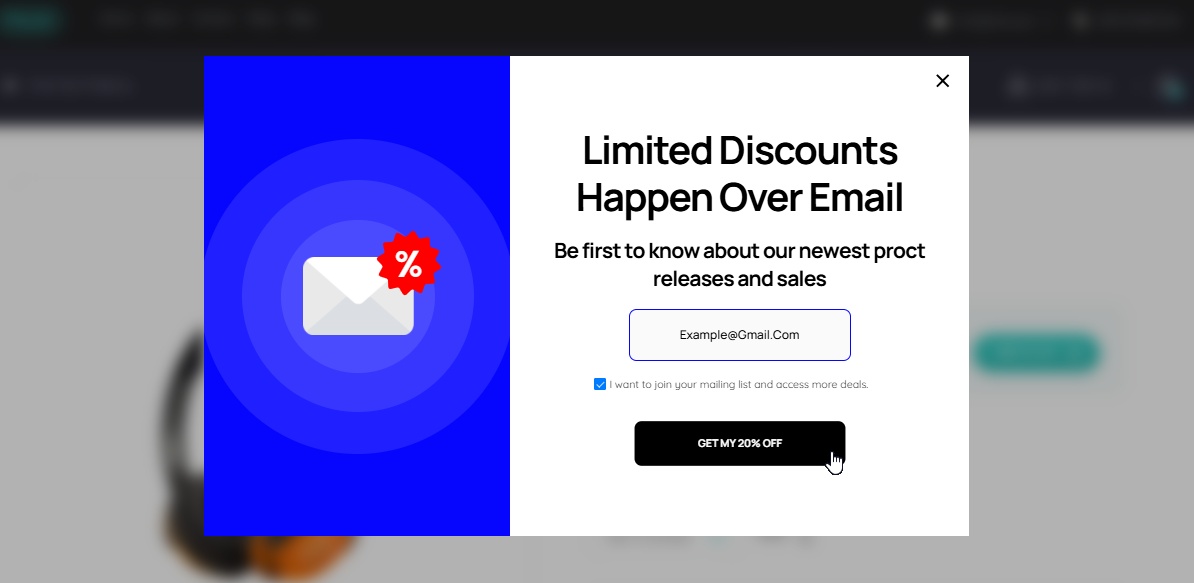
Now, whenever a visitor opens a Single Product Page, this popup will be displayed when they exit the page, and they can enter their email in the designated field to receive a special offer.
Collecting and Managing Email Data
When a user submits the form, they’ll see a confirmation message.
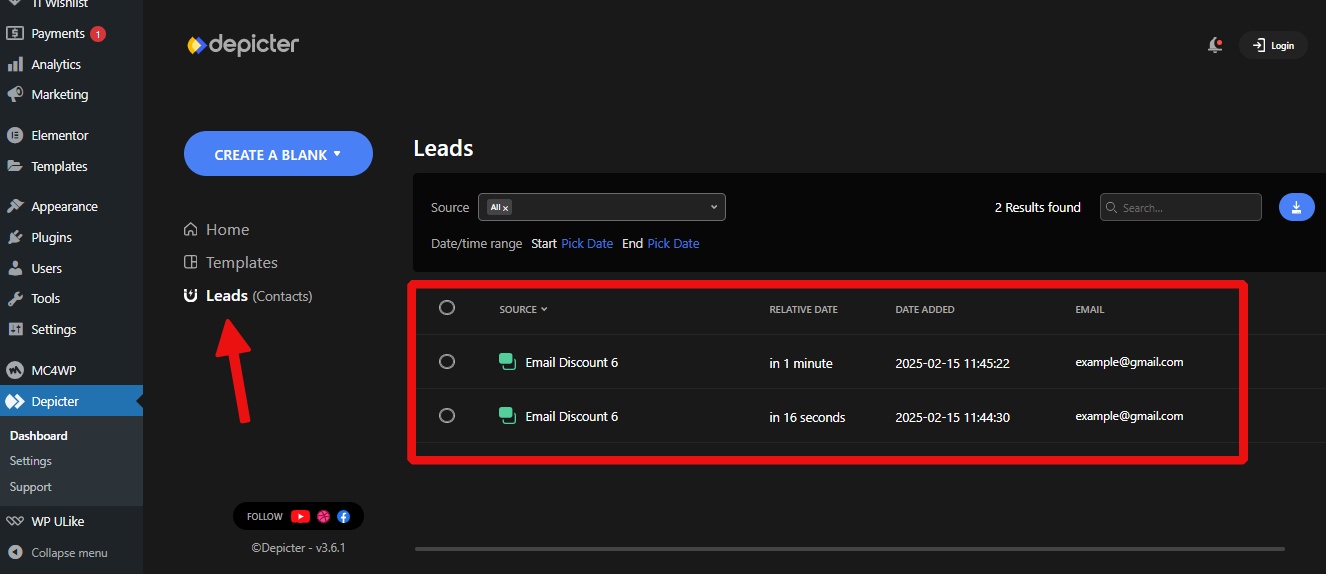
To access the collected data, go to the “Leads” menu in the Depicter dashboard.
Here, you can view, filter, search, and export the submitted information as a CSV file for email marketing or other purposes.
Conclusion
This guide demonstrated how to use Depicter to create popups and collect email addresses, a valuable tool for growing your email list and increasing sales. It covered understanding your customers, designing effective popups, and tracking results.
Black Friday and Cyber Monday are the perfect opportunities to supercharge your WordPress website with incredible deals on premium themes, plugins, and services. With so many options out there, it can be tough to find the best deals.
That’s why we’ve curated a list of top WordPress Black Friday and Cyber Monday offers to help you save big. Whether you’re a seasoned WordPress pro or just starting out, these deals will help you take your website to the next level.
Get ready to explore the best WordPress deals of the year.
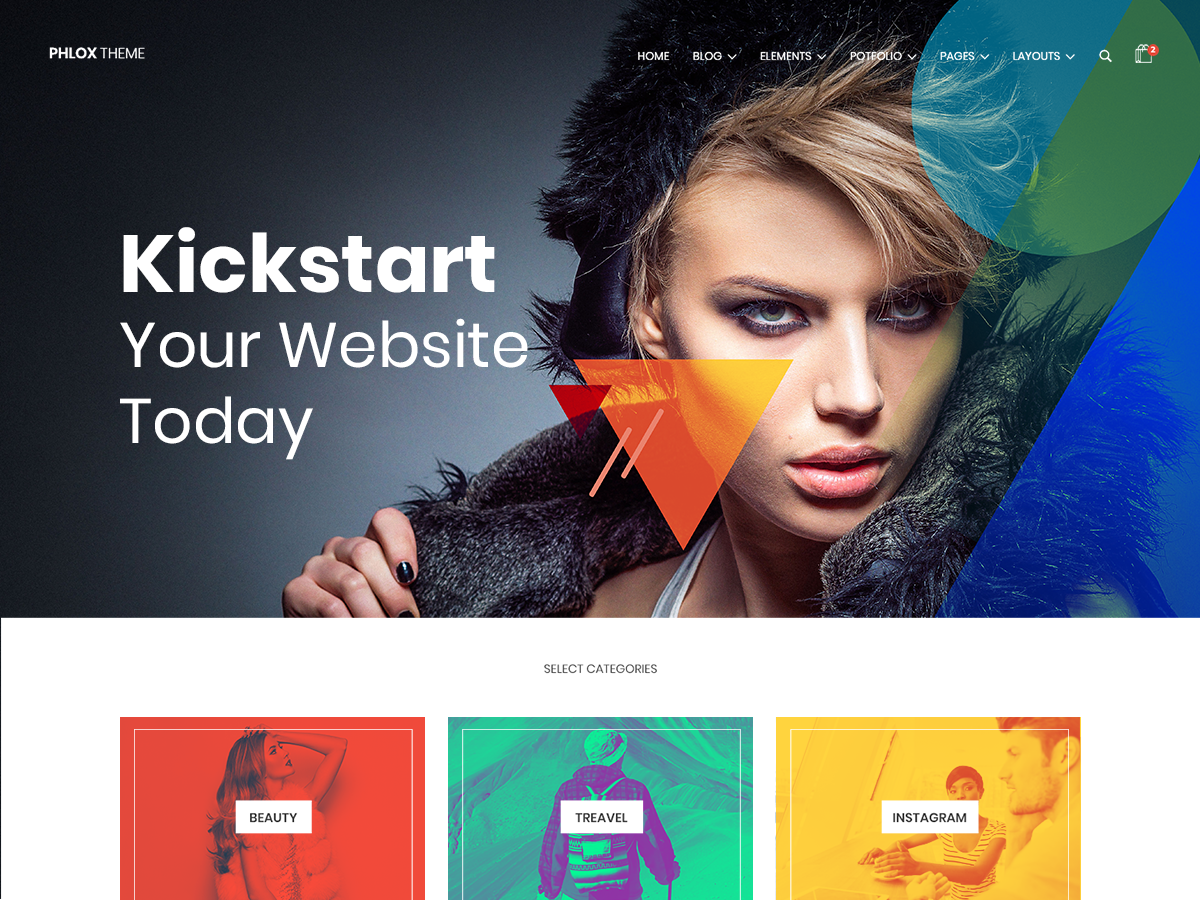
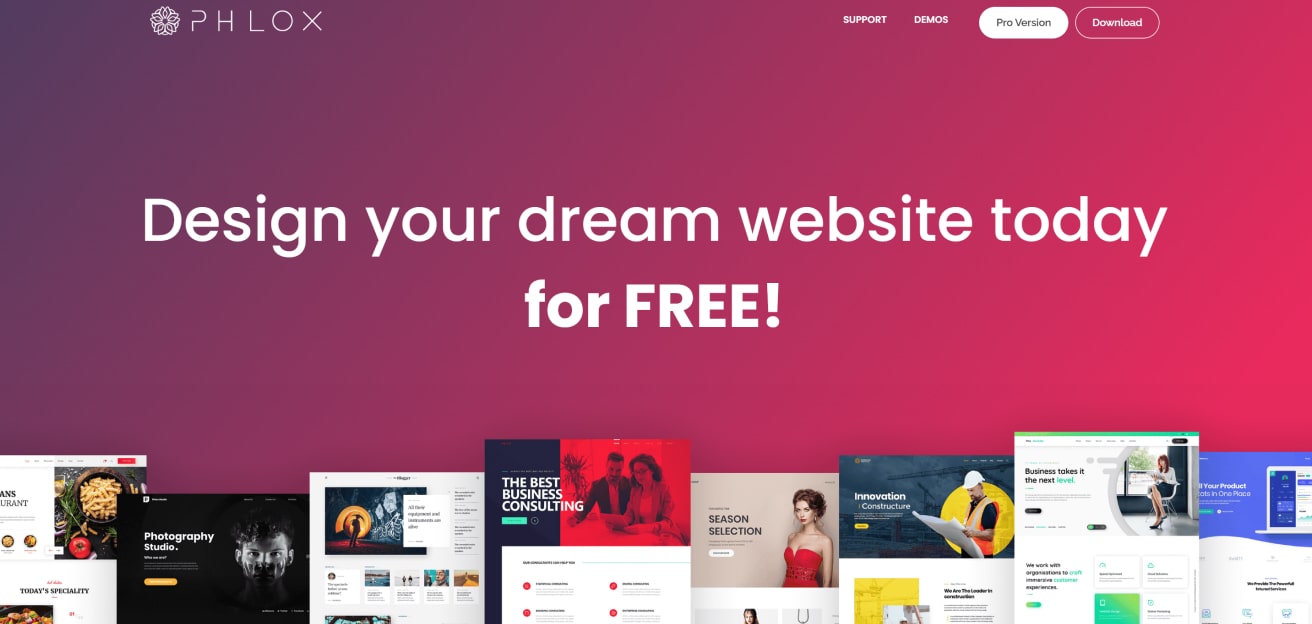
Phlox is the best Elementor multipurpose theme with over 100,000 active installations. It has more than 250+ Complete Elementor demos that can be imported in 3 clicks and edited on Elementor. Simply find any templates you like, import it, replace the images and text with yours and it is done. If you are looking for a professional design Phlox would be a perfect option with 45000+ sales on ThemeForest!
Coupon code: Auto-applied
Save 30%
Validity: November 19 to December 3
Discount: 30% Off
Built by Artbees, WPDone is a white-label custom development service for WordPress and WooCommerce offering a variety of solutions to meet specific client needs in areas such as Custom WP & Woo Development, Converting Design to WP, Theme Customization, Security & Performance Optimization, and Custom Design. Short Desc: Elevate your WP and WooCommerce projects with expert development, customization and optimization services.
Best WordPress Popup, Slider, Notification Bar, Carousel, and Hero section Builder. The best lead generation tool for marketing agencies. Simply create a popup or notification bar, with coupons, counter, forms, and a lot more to increase sales or grow your email list. The best slider, carousel, and hero section for web agencies to create engaging content with ease. With 500+ pre-built templates for almost any purpose.
Coupon code: Auto-applied
Save 70%
Validity: November 18 to December 7
Discount: Up to 70% Off
This Black Friday & Cyber Monday, WP SMS is giving you 30% off to supercharge your engagement with timely SMS notifications and powerful marketing messages. Don't miss this chance to connect more effectively for less!
SellKit addresses a range of checkout challenges, such as low order values, slow conversions, and limited engagement. Supercharge your sales with customized checkouts, order bumps, progressive discounts, and intelligent coupons through SellKit. Short desc: Boost WooCommerce conversions with express checkout, sales funnels, order bumps, automated discounts and more.
This Black Friday & Cyber Monday, WP SMS is giving you 30% off to supercharge your engagement with timely SMS notifications and powerful marketing messages. Don't miss this chance to connect more effectively for less!
Responsive theme is a fast, lightweight, and fully customizable theme, which includes 250+ Responsive Starter Templates to easily build any website of your choice.
It’s compatible with all the leading WordPress plugins like Elementor, WooCommerce, form plugins, and many more. Use coupon code BFCM40 and grab a solid 40% discount on all plans across the Responsive theme store.
GetGenie AI — the most advanced WordPress AI tool for SEO-optimized content & copywriting. The AI tool offers 37+ templates and can generate complete blog posts, product descriptions, product ad copies, social media copies, features-benefits, social media bios etc.
On top of generating content, the AI tool lets you optimize your content for SEO with its built-in SERP analysis and keyword research features. One-click Blog Generator, Genie Mode, and Genie Chat are some of the killer features of GetGenie that set it apart from the crowd.
Create amazing image sequence animations with ease using our powerful WordPress plugin. Our freemium tool lets you add professional visual effects to any page or post, making it perfect for dynamic home pages and landing pages. With Scrollsequence, you can take your website to the next level and keep your visitors engaged.
Introducing WP Adminify, the ultimate WordPress dashboard customization plugin that offers a wide range of powerful features within an intuitive and user-friendly platform. With extensive dashboard customization, WP Adminify provides complete control over your dashboard, allowing you to skyrocket your productivity.
LoginPress is the leading login page customizer plugin for WordPress. With LoginPress, you can easily customize your WordPress login pages, adding features like social login, enhanced security, and custom designs to match your brand. Recent updates let you set custom password error messages, enforce password resets, and even add YouTube backgrounds on the free version.
The Radio Player plugin lets you stream live audio on your WordPress site easily. It supports live radio, podcasts, and custom audio streams and is compatible with MP3, Shoutcast, IceCast, Radionomy, and more. With a fully customizable player and playlist management, it's the perfect tool to elevate your site's audio experience.
WP Timetics is an advanced Appointment and Booking Plugin for WordPress that simplifies Online Scheduling. It features Unlimited Meetings, Google Meet and Zoom integration, Visual Seat Plans, Automated Notifications, and many Payment Methods.
WowRevenue is a WooCommerce sales booster plugin designed to maximize your store’s average order value. Using its campaign builder, you can set up, manage, and track multiple discount campaigns such as buy X get Y, product mix and match, frequently bought together, and more.
BookingPress is the ultimate WordPress booking plugin, making the appointment booking process effortless. This Black Friday 2024, BookingPress is offering up to a 62% discount on its annual plans and introducing lifetime deals at very affordable rates. Additionally, BookingPress includes 45+ free add-ons with your purchase. Don't waste any time; grab this deal now!
Meet ThumbPress, your all-in-one solution for simplifying image and thumbnail management in WordPress.
With its intuitive features like disabling unnecessary thumbnails, regenerating missing thumbnails, advanced image compression, detect and deleting unused images, and WebP conversion to boost your WordPress site’s speed and improve user experience.
Fluent Forms is the smartest and most lightweight drag-and-drop WordPress form builder with tons of features and functionalities.
Fluent Forms allows you to create contact forms, product order forms, calculator forms, conversational forms, quizzes, surveys, and more.
WholesaleX is here to make your regular WooCommerce store into a B2B (or B2B+B2C hybrid) powerhouse. It has features like user role creation, registration form builder, dynamic rules for pricing and discount management, private store, request a quote, subaccounts management, and more.
The feature that sets WholesaleX apart is the dynamic rules system.
No matter the size of your business, User Registration for WooCommerce is designed to elevate your WooCommerce store with cutting-edge features and functionality. Grab this exclusive BFCM deal Now!
Revolutionize your WordPress membership site with User Registration Pro this Black Friday! Score an incredible 35% off on the ultimate user registration plugin that turns visitors into engaged members. Create stunning custom registration forms with zero coding - just drag and drop! From modern frontend profiles to bulletproof spam protection, this all-in-one solution has everything you need.
PowerPack offers 90+ unique modules and 350+ ready-to-use templates that save time and make building websites with Beaver Builder easy. From simple headings to advanced login forms to header-footer, these modules help you create website layouts beyond the basics. Plus, with WooPack’s advanced WooCommerce modules, you can build beautiful, user-friendly eCommerce stores quickly and effortlessly.
GutenKit is a complete page builder for the Gutenberg block editor. Packed with 65+ blocks, 18+ modules, and 500+ ready designs (patterns and templates), GutenKit has everything you need to build a complete website on WordPress. This includes features like Mega Menu, Responsive Breakpoint, Table Builder, Motion effects, Interactivity, Advanced Accordion, Off Canvas, Copy Paste Style and so on. You can also build dynamic websites with GutenKit features like Query Loop Builder, Dynamic Content, and Display Conditions.
Real Cookie Banner is a cookie and consent management plugin. Obtain consent to load services and set cookies for your visitors in accordance with the GDPR and ePrivacy Directive. In addition, content blockers help you to be compliant even if your theme, plugin or content loads styles, scripts or iframes that would transfer personal data. Start now with our guided-configuration and avoid legal risks!
NitroPack is the leading all-in-one performance optimization service for WordPress, helping 180K+ site owners achieve lightning-fast load times, pass Core Web Vitals, and boost their bottom line. This Black Friday only, boost your site speed, Core Web Vitals, and user experience on desktop and mobile for a fraction of our regular prices. Get Up to 35% Off All NitroPack Plans.
Enhance your Elementor experience with over 60 powerful widgets and extensions. Elevate your website with dynamic elements such as animated headlines, progress bars, flip boxes, and image hover effects.
Analytify is the ultimate Google Analytics plugin for WordPress, designed to make website analytics easy and insightful. With seamless Google Analytics integration, real-time data and fully customizable reports are brought to your WordPress dashboard. Analytify empowers website owners and marketers to make data-driven decisions easily.
Beaver Builder is a leading WordPress page builder that helps you create websites and landing pages in minutes. Trusted by over 1,000,000 sites, it’s a reliable tool for your business.
Authorsy is a simple author box plugin for WordPress that enhances author profiles on your site. It supports Multiple Authors, Guest Authors, Customizable Layouts, User Ratings, and Social Media Links.
WP Travel Pro offers advanced features that make managing and customizing your travel website simple. Use an improved itinerary builder to create customized tour packages, accept safe payments via well-known gateways, and take advantage of seamless integration with the best travel themes and SEO plugins.
Get a complete membership website creation and management package with ARMember at a 40% discount. Manage levels, restrict content, integrate payments, and enable marketing, all in one place. Grab the deal of a lifetime and set up your robust membership business with 54+ inbuilt add-ons and 40% off on a premium add-on bundle today!
Essential Addons for Elementor - The best elements library for Elementor with over 2 million+ active users, offering 100+ advanced elements to take your Elementor website-building experience to the next level.
Easily transform your WooCommerce site with Codesigner, the ultimate Elementor-based add-on to enhance every part of your online store.
With over 94+ widgets, 14+ modules, and 15 templates, CoDesigner gives you complete customization control over your store’s design and functionality.
Post SMTP is the most powerful and easy-to-use SMTP plugin for WordPress to enhance WordPress email deliverability. Supports all popular SMTP service providers, with features like email logs, failure notifications, a dedicated mobile app, and much more.
No matter the size of your business, Store Finder for WooCommerce is designed to elevate your WooCommerce store with cutting-edge features and functionality. Grab this exclusive BFCM deal Now!
Unleash the future of online education with Masteriyo LMS - now at an incredible 60% off this Black Friday! Create, manage, and sell courses lightning-fast with WordPress's most intuitive learning management system. Built for speed and simplicity, Masteriyo helps you launch your online course empire in minutes, not hours.
The biggest discount of the year! Take this opportunity to get some amazing deals on DJ-Extensions products – WordPress themes, Joomla templates and powerful extensions/plugins. Get 50% off all Joomla and WordPress products storewide, including themes, plugins, templates, extensions, and the Unlimited Plan.
WPeka is a popular WordPress website that offers premium plugins. Some of the premium plugins by WPeka include WP Legal Pages, WP Cookie Consent, WP Ad Center, and much more.
1. WP Legal Pages: Best plugin for creating pages like privacy policy, terms and conditions, refund policy, and 25 more such legal pages for your website.
2. WP Cookie Consent: Best plugin for adding cookie consent banners for your website.
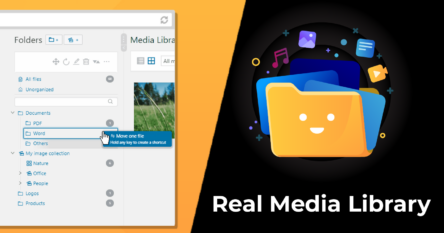
Real Media Library helps you with media management. Organize thousands of uploaded files into folders, collections and galleries. A real file manager that allows you to manage large amounts of files such as pictures, videos or documents in WordPress. Media library folders for everyone!
The WP Ultimate CSV or XML Import & Export plugin is a powerful and versatile data import-export tool, designed to streamline your WordPress website development process., Whether you're looking to migrate content from one WordPress site to another, update product listings, or manage large sets of data efficiently, WP Ultimate CSV or XML Import & Export is the solution you need.
Effortlessly connect Google Drive with WordPress using the Integrate Google Drive plugin. Browse, embed, upload, download, and share your files—all with zero coding. Showcase documents, images, and media on your site in just a few clicks. Save time and get your files in front of your audience fast.
Simple Social Buttons are the go-to solution for effortlessly boosting social media engagement on your website. This lightweight, lightning-fast plugin integrates seamlessly with WooCommerce, enabling easy social sharing of your products and content.
Build and manage a powerful affiliate program with WC Affiliate, the feature-rich WooCommerce affiliate marketing plugin.
WC Affiliate offers all the essential features for creating a robust affiliate program like unlimited affiliate onboarding, referral tracking and etc.
Gutenify helps users create fully customizable websites without coding. It offers a range of pre-built blocks, themes, and samples for simple site design and launch. Important features include a customizable carousel, slider, FAQ, testimonial, service listing, and WooCommerce element blocks.
WowOptin is a comprehensive lead-generation tool designed to maximize conversions through customizable, no-code optins. With features like exit-intent pop-ups, smart triggers, and advanced audience targeting, it lets you engage with customers precisely when they're most likely to convert.
Max Addons is a powerful addon for Bricks Builder, packed with 50+ creative elements to help you build any type of website easily. From personal blogs to professional business sites, you’ll find the perfect elements to match your style and needs.
Every element is created with a focus on ease of use, flexibility, and creativity.
Paymattic is an all-in-one plugin for WordPress payments and donations. With pre-built templates, it’s easy to create forms and process transactions in seconds.
Paymattic offers you 13 payment methods covering 150+ currencies.
With subscription payments, customer management, and eLearning integrations, Paymattic is a must-have plugin for your business.
New User Approve is a WordPress plugin that streamlines user registration by allowing site administrators to approve or reject new users before granting access. It enhances security and control over user access, ensuring only verified users can join your site.
Transform your website's forms from boring to brilliant with Everest Forms Pro this Black Friday! For a limited time, grab the most powerful WordPress form builder at an incredible 50% discount. Say goodbye to complex coding and hello to effortless form creation with intuitive drag-and-drop builder. Create unlimited professional forms with stunning pre-built templates, advanced fields, and a robust entry management system - all in just minutes!
With PowerPack Elementor Addons, you can elevate your Elementor websites using 70+ innovative, advanced, and SEO-friendly widgets. Choose from a wide range of widgets and over 150 beautiful pre-built templates to match your design vision and create stunning, high-performing websites with ease.
The convenience of shopping anytime and anywhere has made online shopping more popular. Setting up an online store opens your business to a global audience. Compared to brick-and-mortar stores, online stores involve low setup and maintenance costs. A physical clothing store requires a building with proper infrastructure, while an online store only requires a user-friendly interface and a responsive website, making it more affordable than the former. To build a successful eCommerce store, adding an excellent responsive theme and high-quality plugins is essential to improve functionality and create a user-friendly experience. Here, we will guide you through opening a clothing store with Phlox and WooCommerce product addons.
Reasons for opening an online clothing store
Low opening and maintenance cost – Compared to a physical store, an eCommerce store can be created at a lower cost, reducing the risk of financial loss. Also, with proper SEO optimization, you can reach a wider audience, reducing advertisement costs.
Global audience – A physical store limits you to a region, whereas an online store gives your clothing store a place in the global market.
Flexibility – the flexibility to operate your store from anywhere in the world allows for a better work-life balance.
How to start an online clothing store
To start an online clothing store, you can either create a website from scratch or use WordPress, a content management system that helps with website building. Choosing a WordPress platform to build a website is preferred for its ease of use and low-cost setup and maintenance. Besides, turning a website into an eCommerce store is easy by installing the WooCommerce plugin.
You are five simple steps away from creating your online clothing store.
Purchase a domain name
Buy a hosting
Install WordPress
Install the theme
Install WooCommerce plugins
Let us guide you through these five simple steps.
Purchase a domain name
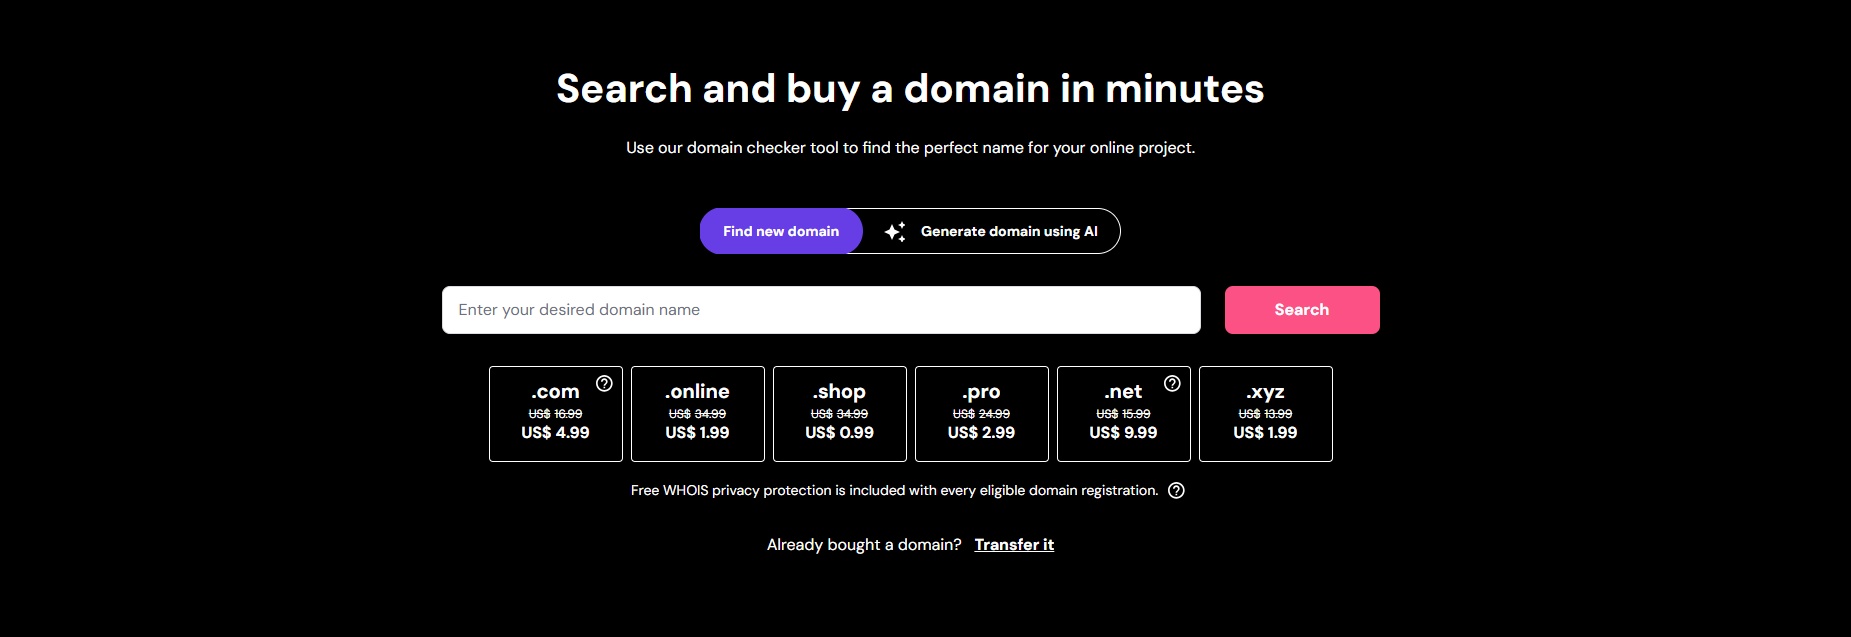
Purchasing a domain is the first step towards creating a website. A domain name is what we enter into a search engine to find a website. Examples of domain names are google.com or Phlox.pro. These are website addresses that humans can comprehend, contrary to the actual IP addresses, which are a string of numbers.
Before choosing a domain registrar, consider its pricing and plans and ensure it is accredited with ICANN (Internet Corporation for Assigned Names and Numbers).
Usually, domain names are the same as the brand name. The popular extensions end with .com. You can search for the availability of a domain name and purchase it from sites like Namecheap or Hostinger. The amount payable to the name can vary according to its popularity. Once you find the ideal name and purchase it, you must renew the name yearly.
Buy a hosting
To host your website on the web server, register it with a hosting provider. Popular hosting providers like Hostinger, GoDaddy, or Bluehost can be used to host the website. When choosing a hosting provider, consider the factors like pricing plans, security and maintenance support, website uptime, etc. Also, look for the ones that provide WordPress hosting to support WordPress websites. Some hosting providers offer free or affordable plans for the initial months and free domains for the initial year.
Install WordPress
You can download WordPress manually or from the hosting dashboard. The former choice can be more difficult. While purchasing the domain, look for the ones that have WordPress already installed or have the option for WordPress download within the dashboard. After registering with your hosting provider, you will find the option to install WordPress in the dashboard. Hostinger provides guided steps for installing WordPress and finishing the setup.
Install the theme
Themes are essential for maintaining the appearance and functionality of your website. WordPress has several free and premium themes from which you can choose one that matches your design ideas. WordPress has default themes that can be customized to fit your preferences and brand identity. We recommend you check out the Phlox theme, which is suitable for almost all websites.
Phlox theme
Phlox is best compatible with Elementor, a page builder plugin on WordPress. The theme is perfect for any website, including a clothing store.
Phlox is a responsive, fast, and free theme optimized for SEO. It has a user-friendly interface and a live drag-and-drop feature for easy page customization. The theme is also compatible with WPML to support language translations. The built-in e-commerce functionalities in the theme simplify product management.
Phlox offers 250+ templates for you to choose from. You can select prebuilt templates for your clothing store from the vast collection. Phlox also has a smart one-click demo importer feature that makes it easy to import demos.
With the Phlox theme, you can design and customize single product pages on your clothing store. You can choose a template from the product options panel and apply different templates for each product page. With this theme, on your product page, you can add functionalities like product ratings, page navigation buttons, product sharing buttons, stock keeping unit section, display wishlist, etc. Also, you can add images in different aspect ratios. When shopping, adding related products to the product page can boost sales. You can customize the appearance, style, label, and other features of the related products section.
After downloading Phlox, go to Appearance > Themes > Add new theme on the WordPress admin panel’s dashboard.
Click on the upload theme button on the page and upload the zip file of the downloaded theme.
Click on the activate button on the Phlox thumbnail image.
OR
On the WordPress dashboard, go to Appearance> Themes > Add new theme
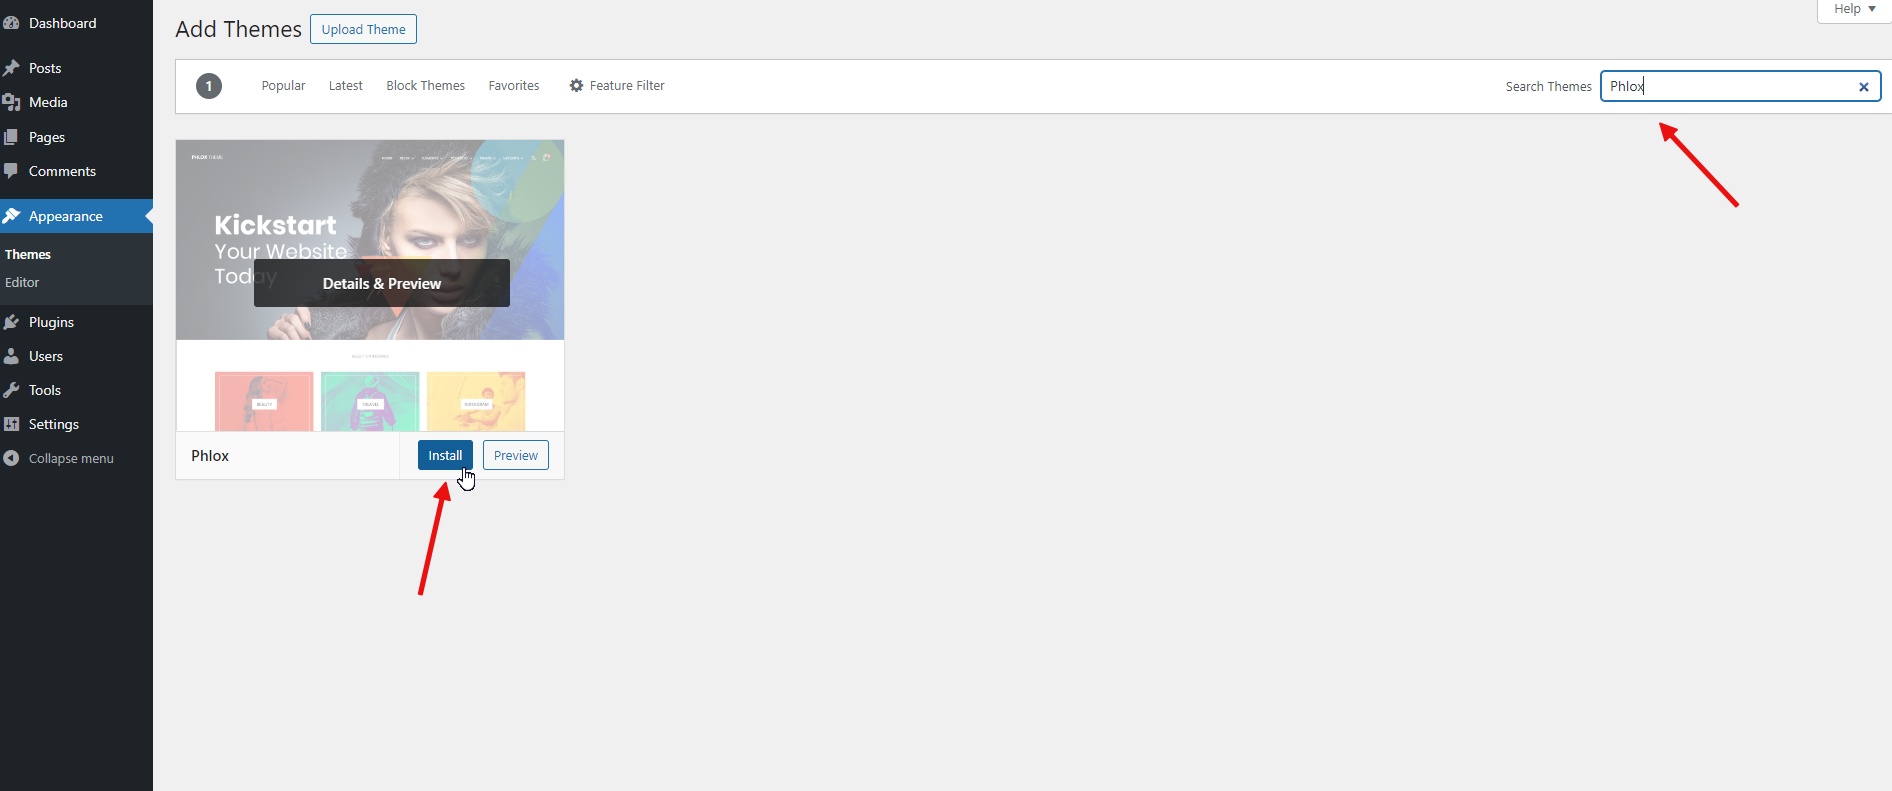
Search for the Phlox theme
Click on Install> Activate.
After activating the theme, you can access the Phlox dashboard in the options to customize the theme.
How to install a template (Demo)
Go to the Phlox dashboard.
Click on Demo Importer. There are several templates to choose from, including free and pro versions.
Select a template, and you can view the template by clicking on the preview button.
Click on Import > Continue > Install the required plugins.
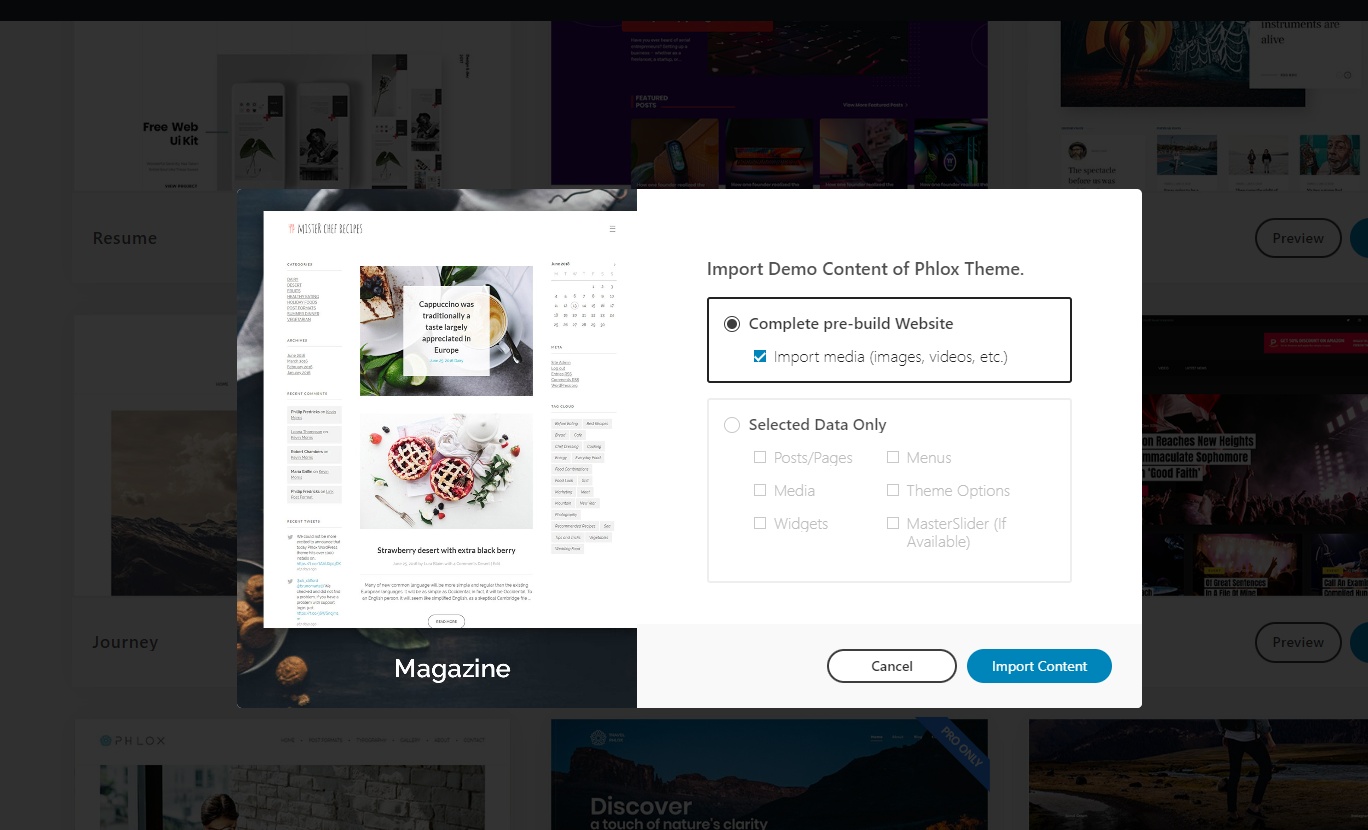
In the next step, you get the option to select either a complete pre-build website or selected data only. Click on the complete pre-build website option and then click on import content.
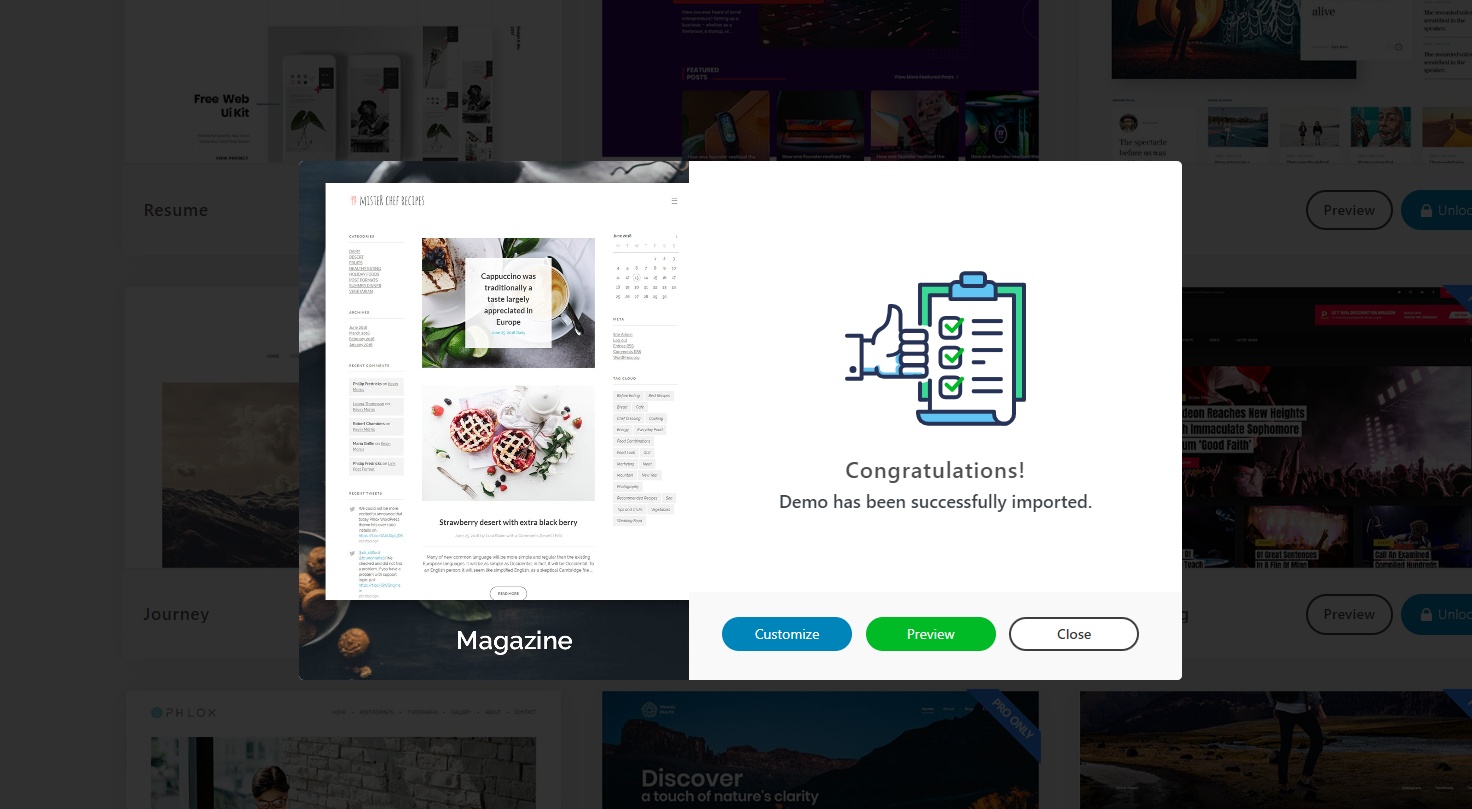
Within a few minutes, the full template will be imported.
Install WooCommerce plugins
To convert your WordPress website into an eCommerce store, download the WooCommerce plugin. It has several features free of cost and is ready to convert your website into a fully functional online store. The WooCommerce plugin allows you to add payment and shipping options to your store, access analytics, manage inventory, display products, and customize your online store with many more features.
To install the WooCommerce plugin, go to the WordPress dashboard and click on Plugins> Add new plugins.
Search for WooCommerce
Click on install > activate.
Click on Let’s Go, where you will be asked to fill in details to finish the setup.
Conclusion
With technological advancements, online shopping has become more popular. As a result, businesses are turning to digital platforms. Website building can be a challenge if you lack technical expertise. However, you can create a user-friendly and responsive clothing store using WordPress. If you carefully follow the above steps, you can create an online store even without any technical expertise. Using a good-quality theme like Phlox can enhance the appearance and functionality of your website. With the right tools, you can effortlessly create your online store.
Ready to scare up some savings? Halloween is here, and the WordPress community is offering some terrifyingly good deals on themes, plugins, hosting, and page builders. Whether you’re a seasoned developer or just starting out, you’re sure to find something that fits your needs. Don’t miss out on these limited-time offers and get ready to celebrate Halloween with a spooktacular new website.
Depicter
The #1 Popup, Notification bar, Slider, Carousel, and Hero section builder in WordPress by Averta (150,000 happy users can’t be wrong!)
Depicter is a powerful WordPress plugin designed to simplify the creation of visually appealing popups, notification bars, sliders, carousels, and hero sections. With over 150,000 active installations, Depicter’s user-friendly drag-and-drop interface and extensive template library empower users of all skill levels to design stunning visuals without any coding knowledge. Experience lightning-fast performance, video support, mobile responsiveness, SEO optimization, and seamless integration with your WordPress website.
Coupon code: HALLOWEEN24 Validity: October 23 to October 31 Discount: 30% Discount on all plans
Astra is the best-selling WordPress theme with over 2.5 million users. The theme is fast, responsive, user-friendly, lightweight, flexible and delivers everything you ever need from a theme. With over 250+ professional Starter Templates and powerful customization options, it offers incredible value!
Coupon code: Auto-applied Validity: October 28 to November 1 Discount: Up to 40% Discount
Kadence is a versatile WordPress theme that lets you create stunning, high-performance websites with ease. With its powerful features and extensive library of templates, you can build a site that loads quickly and looks amazing.
One powerful tool for achieving visual storytelling is the before-and-after slider. This interactive element allows you to showcase dramatic transformations, compare different options, and provide a more engaging experience for your website visitors.
In this guide, we’ll explore the benefits of using a before-and-after slider on your website, and provide a step-by-step tutorial on how to create one using the Depicter plugin for WordPress. Whether you’re a business owner, marketer, or blogger, this guide will equip you with the knowledge and tools to enhance your website’s impact and drive results.
What Is a Before-After Slider?
A before-and-after slider is like a magic trick on your website! It lets people see how something looks before and after a change. For example, you could show how a product looks in different colors or how a service, like makeup or landscaping, can make a big difference. It’s like trying on something virtually, helping people decide if they like it. Plus, it makes your website more fun and interesting. So if you want to show how your products or services can change things, a before-and-after slider is a great way to do it. You could also use it to compare different versions of the same product or to show the progress of a project over time.
Why Should You Use the Before & After Slider on Your Website?
A before-and-after slider is a powerful tool that can make a big difference on your website. It helps people visualize changes and make informed decisions. For example, if you’re selling a hair product, you can show how it transforms hair from dull to shiny. Or, if you’re a contractor, you can showcase the dramatic difference your services can make to a home. This visual evidence can be more persuasive than words alone, leading to increased conversions and sales. Plus, sliders can make your website more engaging and interactive, keeping visitors interested and exploring your content.
Visual persuasion: Showcasing dramatic changes can be more convincing than words alone.
Informed decision-making: Helps visitors visualize the results and make better choices.
Increased conversions: Can lead to more sales and sign-ups.
Engaging and interactive: Makes your website more interesting and enjoyable.
Effective product comparisons: Allows for easy side-by-side comparisons.
Showcase project progress: Demonstrates the evolution of a project over time.
Improve user experience: Provides a more interactive and engaging experience for visitors.
Boost credibility: Can enhance your brand’s reputation and trustworthiness.
How to Create a Before After Slider in WordPress with Depicter?
In this article, we have provided a brief overview of this topic. For a comprehensive guide and more detailed information, please refer here:
Depicter is easy to install. Just go to the ‘Plugins’ menu in your WordPress dashboard, click ‘Add New,’ search for ‘Depicter,’ and click ‘Install Now.’ Activate it, and you’re ready to start creating and customizing your Sliders.
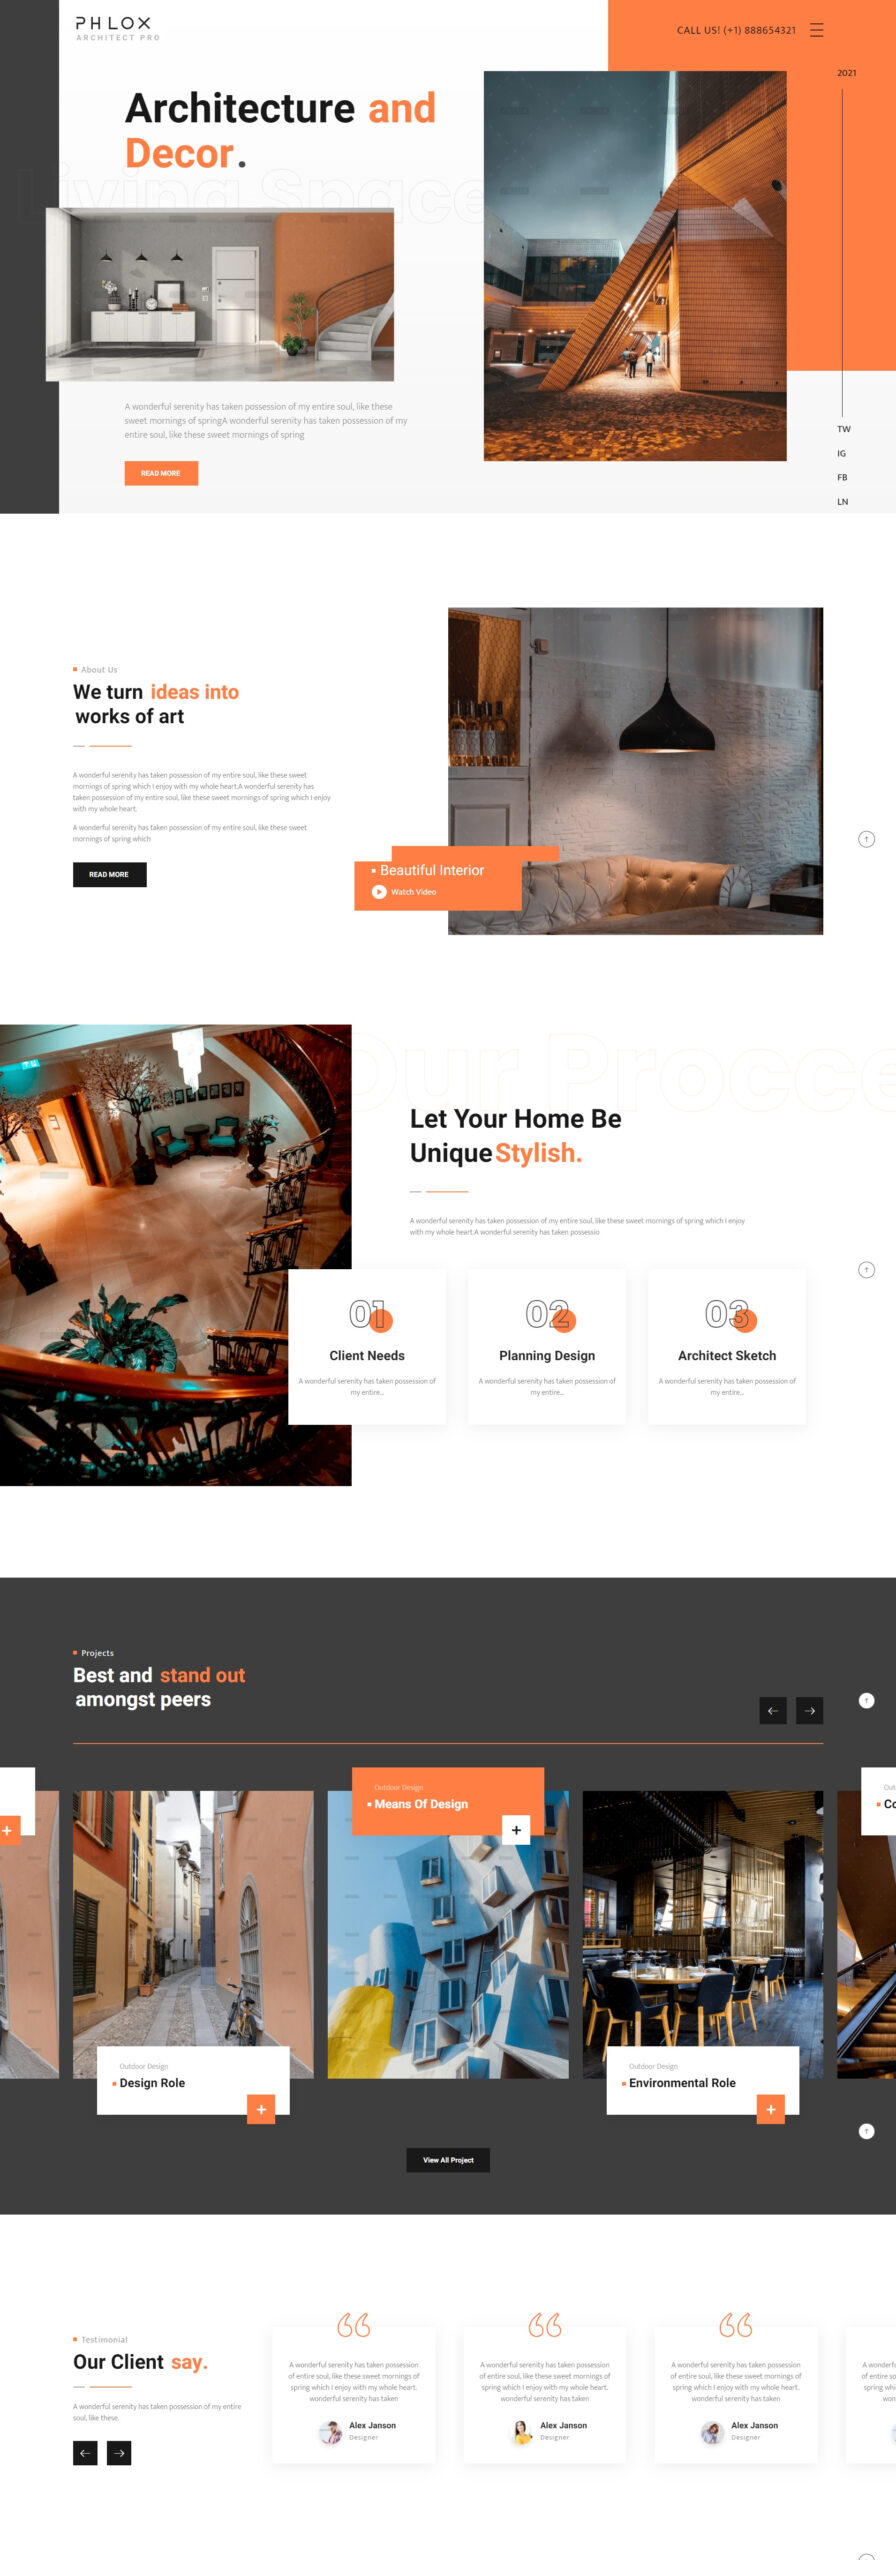
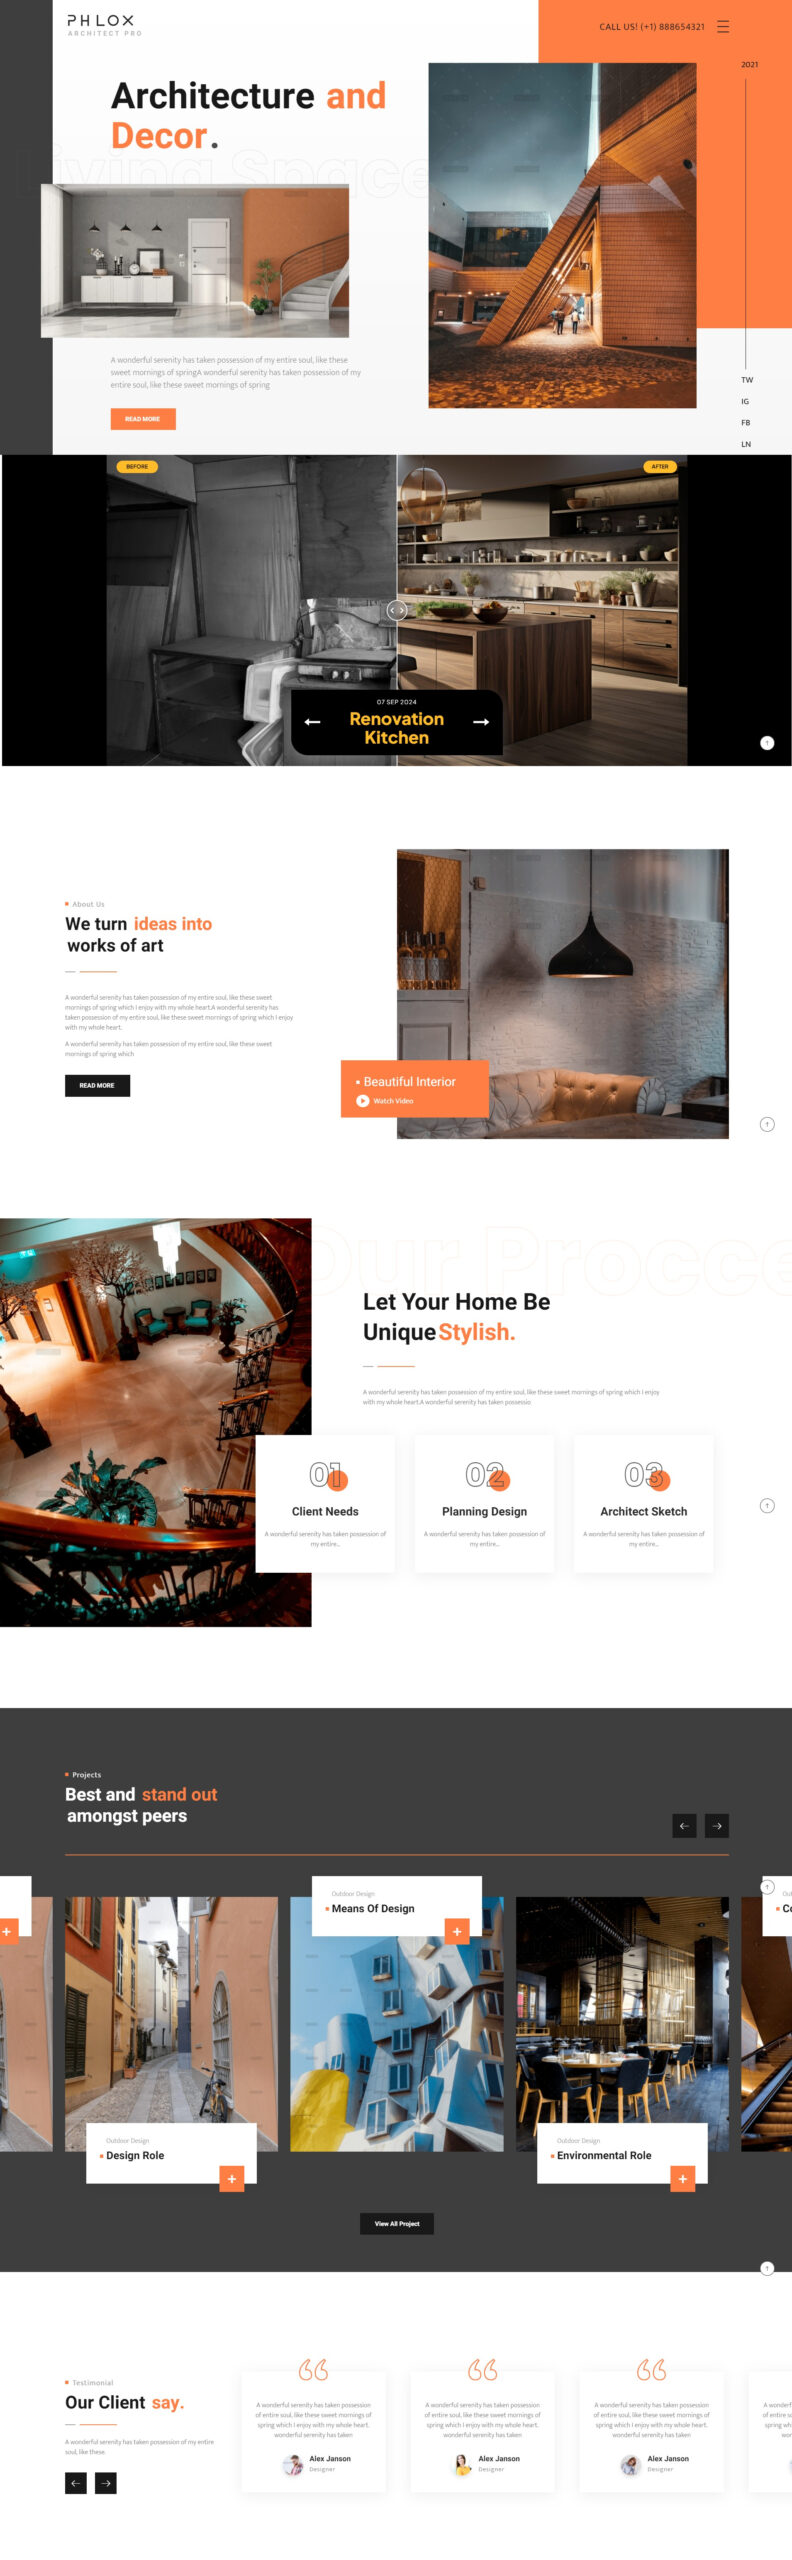
We have an architecture website built via the Phlox theme. We are going to add a Before & After element after the first section. Let’s do that.
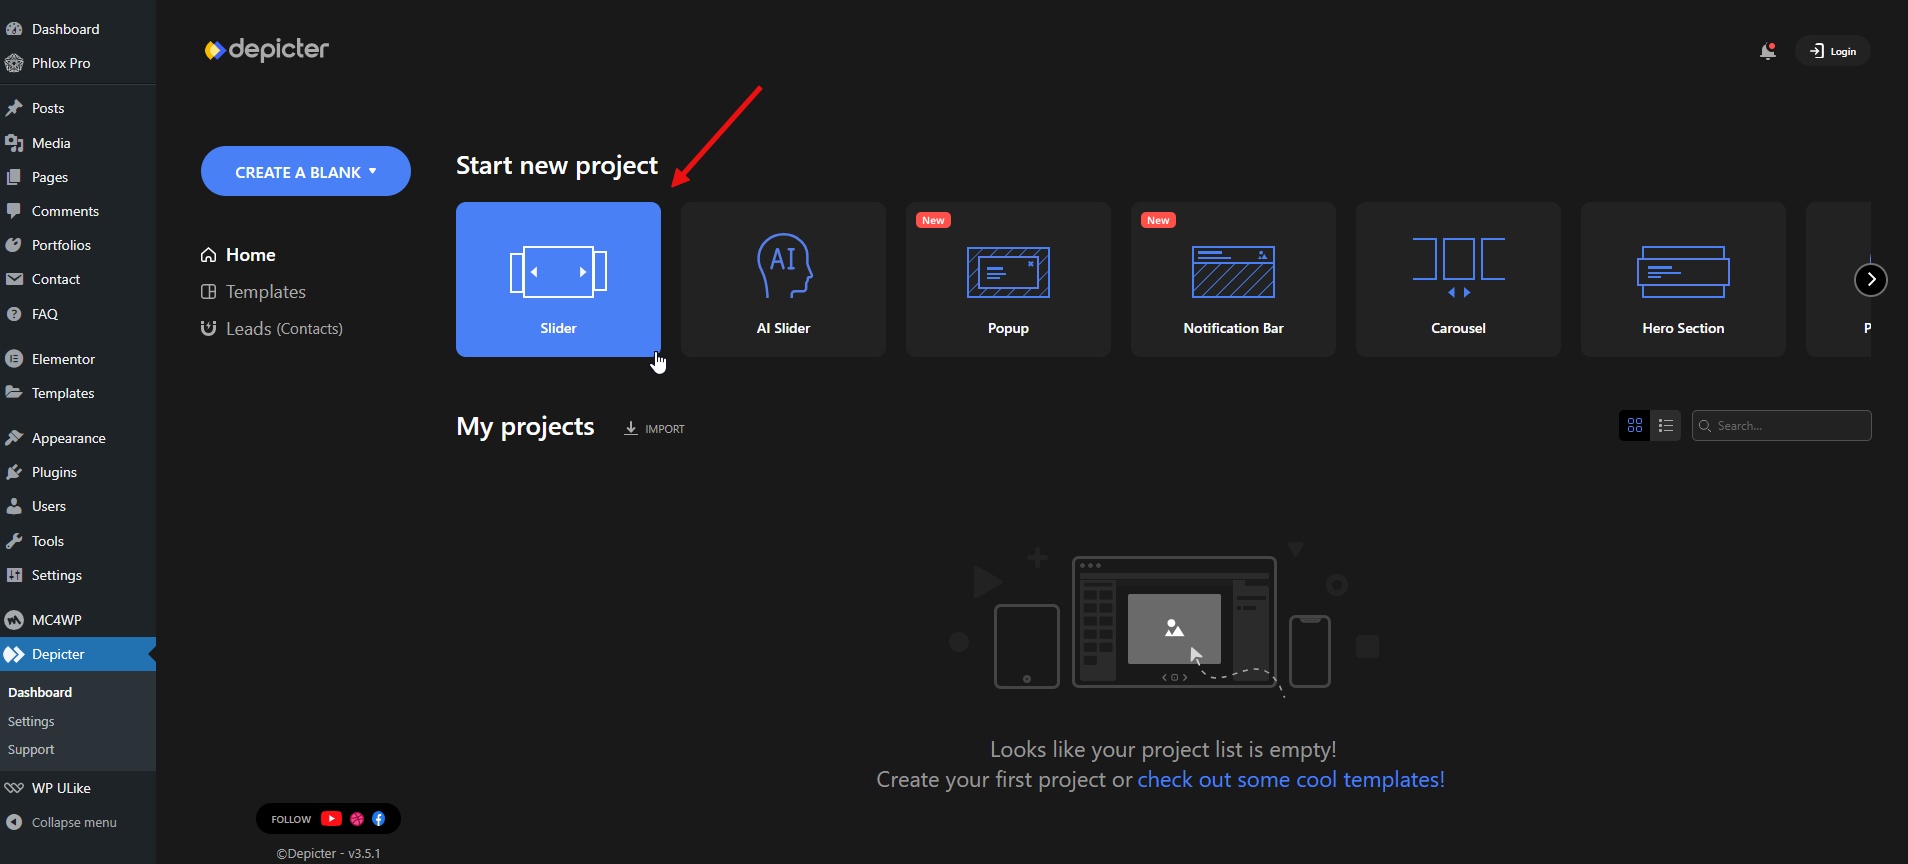
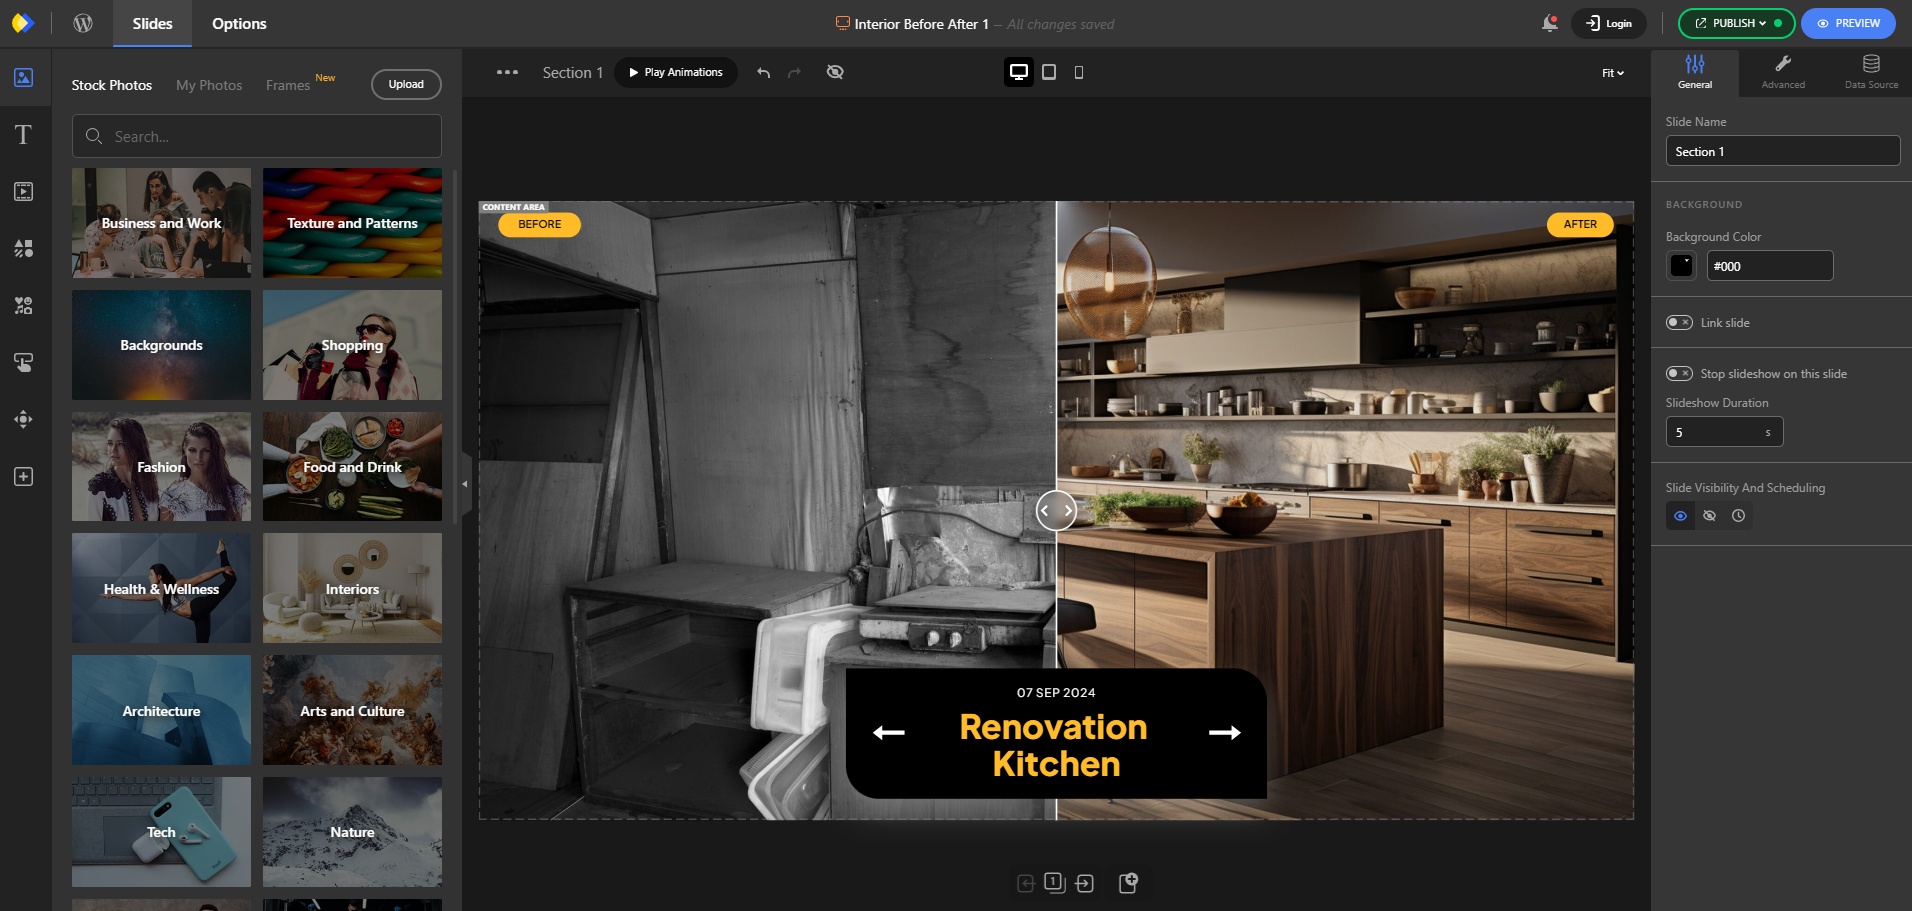
To make things easier, we’re going to use a ready-made template. Once we’re in the Depicter dashboard, we’ll head over to the slider section.
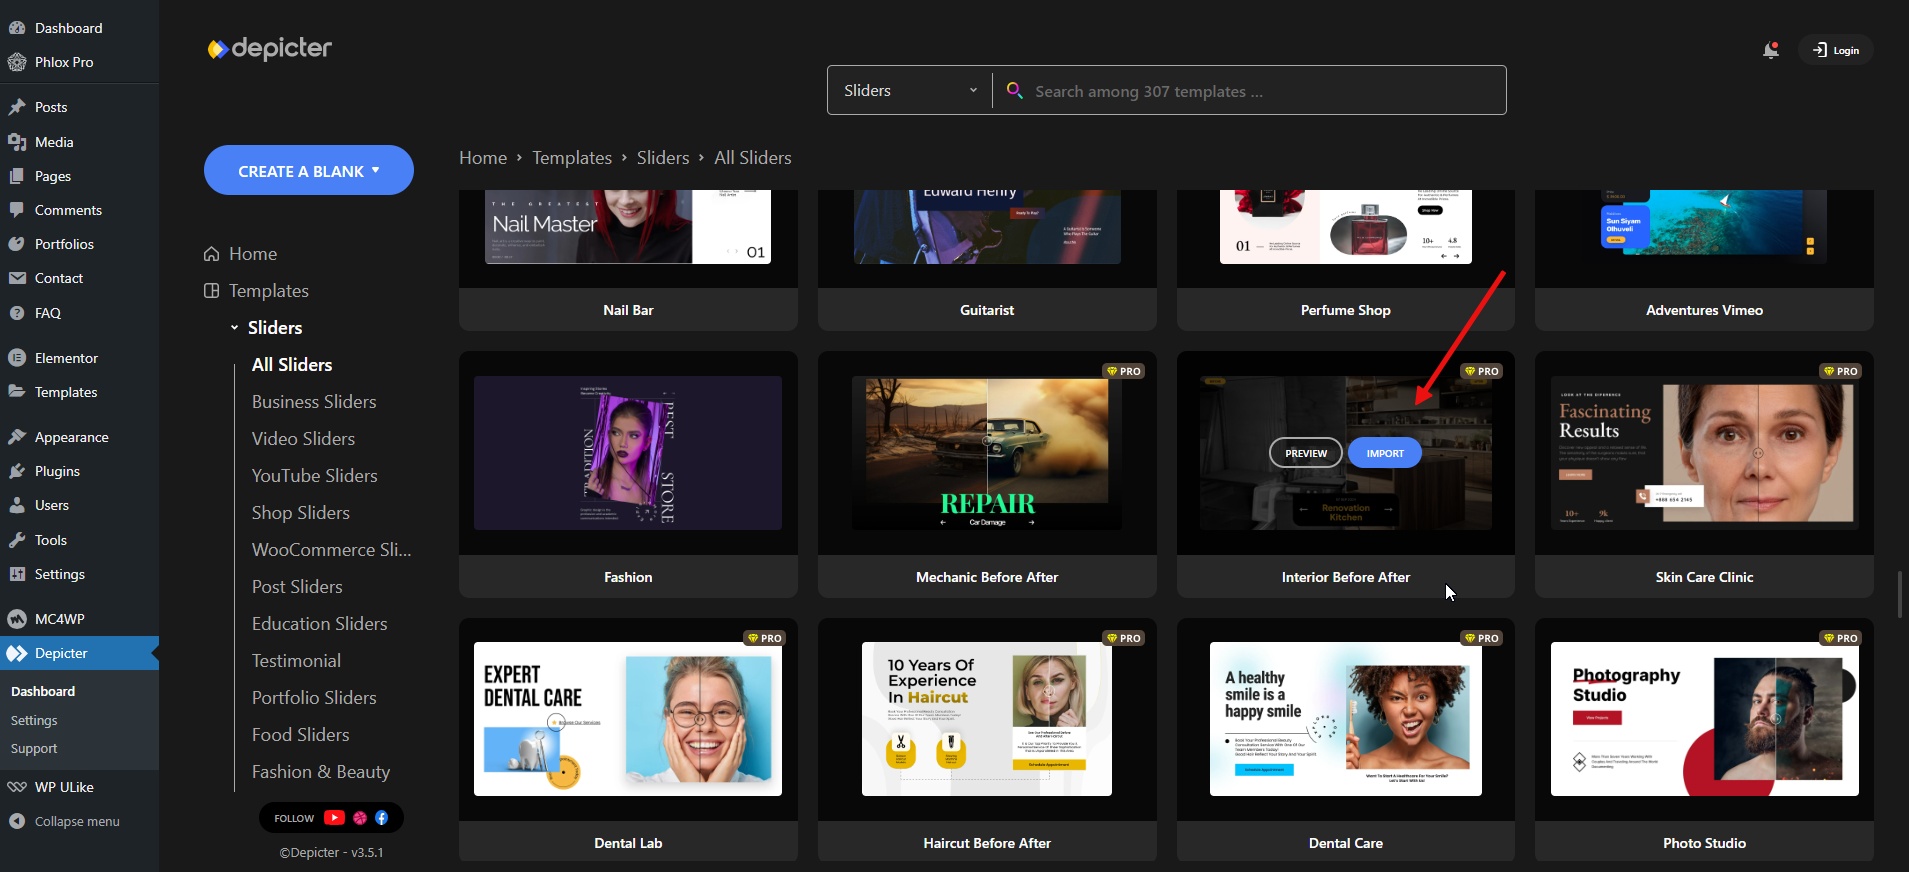
After that, we’ll pick from one of the ready-made before & after slider templates and hit the ‘Import’ button to add it to our projects.
After a few seconds, we’ll be redirected to the Depicter editor where we can customize the slider to our liking. To learn more about how to customize a slider from start to finish, you can watch this video.
Finally, we’ll need to save and publish the slider before adding it to our page.
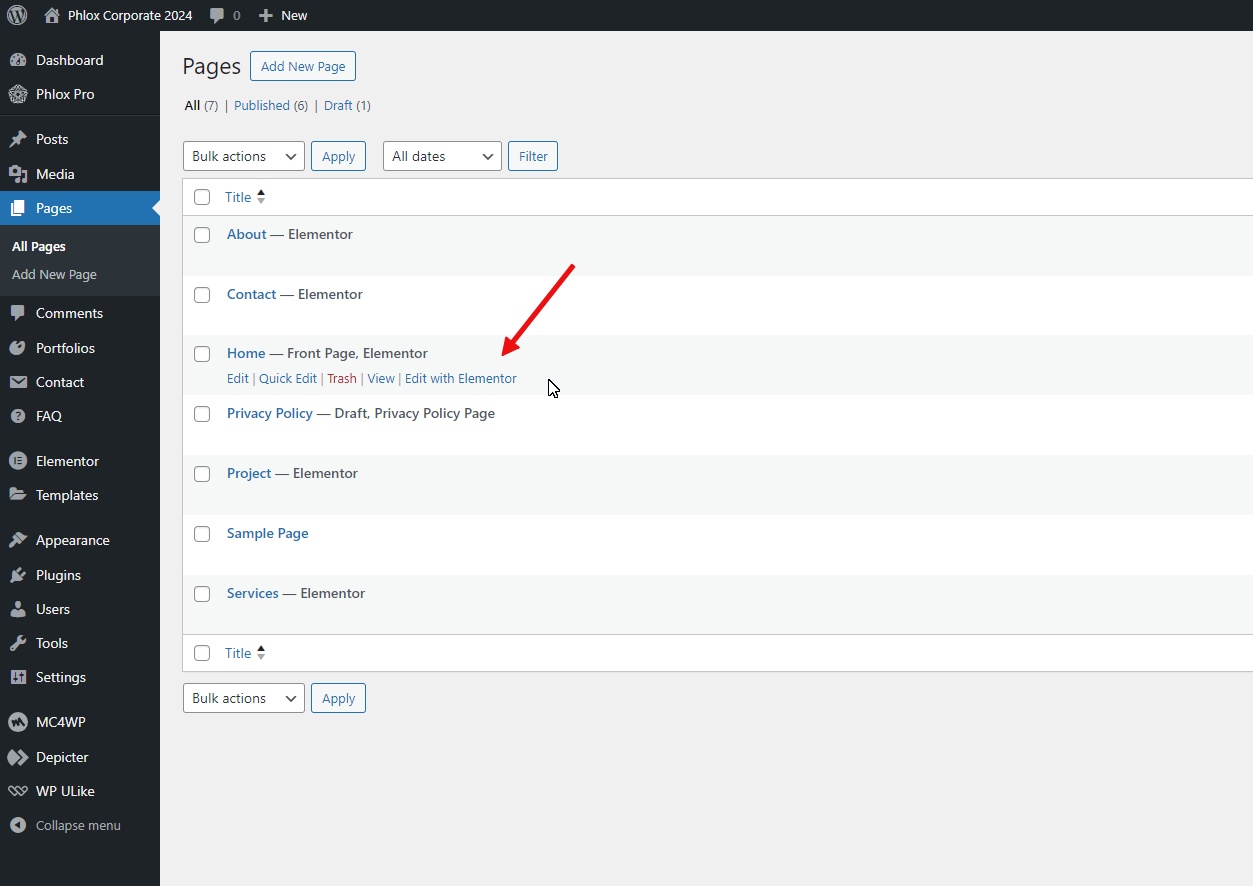
Go to the Pages menu and click ‘Edit with Elementor’ for the page you want to work on which in this case is the Home page.
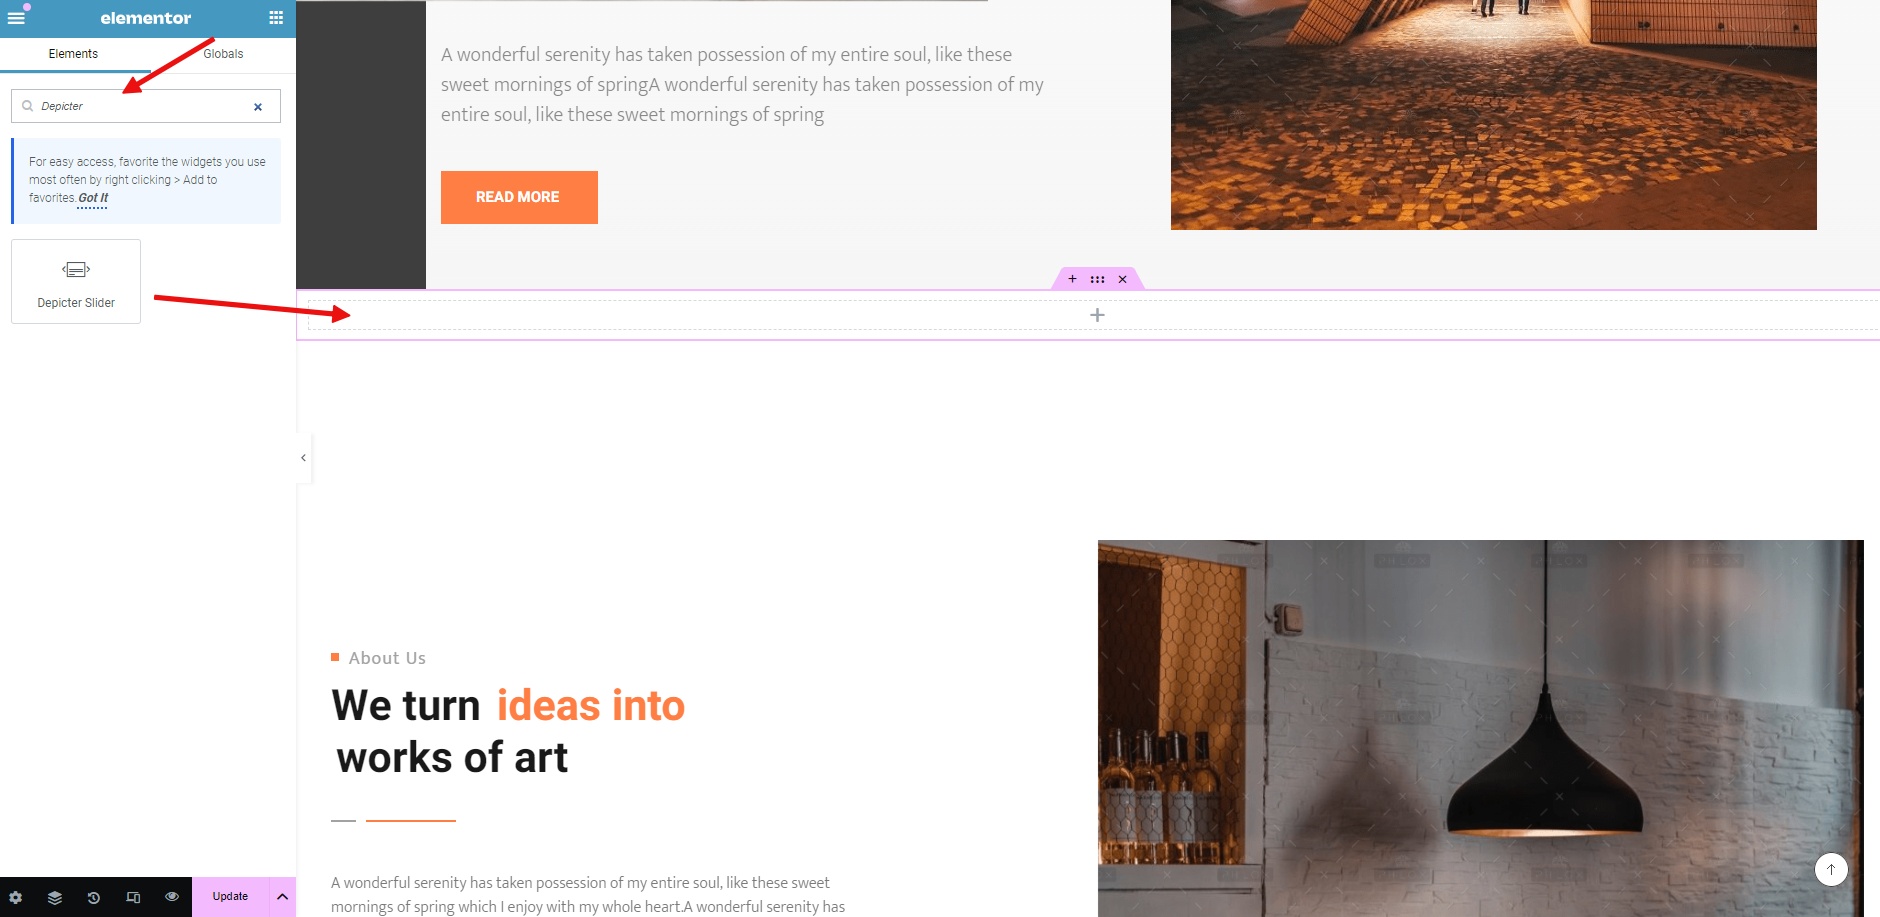
After the page loads in Elementor, find ‘Depicter’ in the widget list and drag and drop it where you want it.
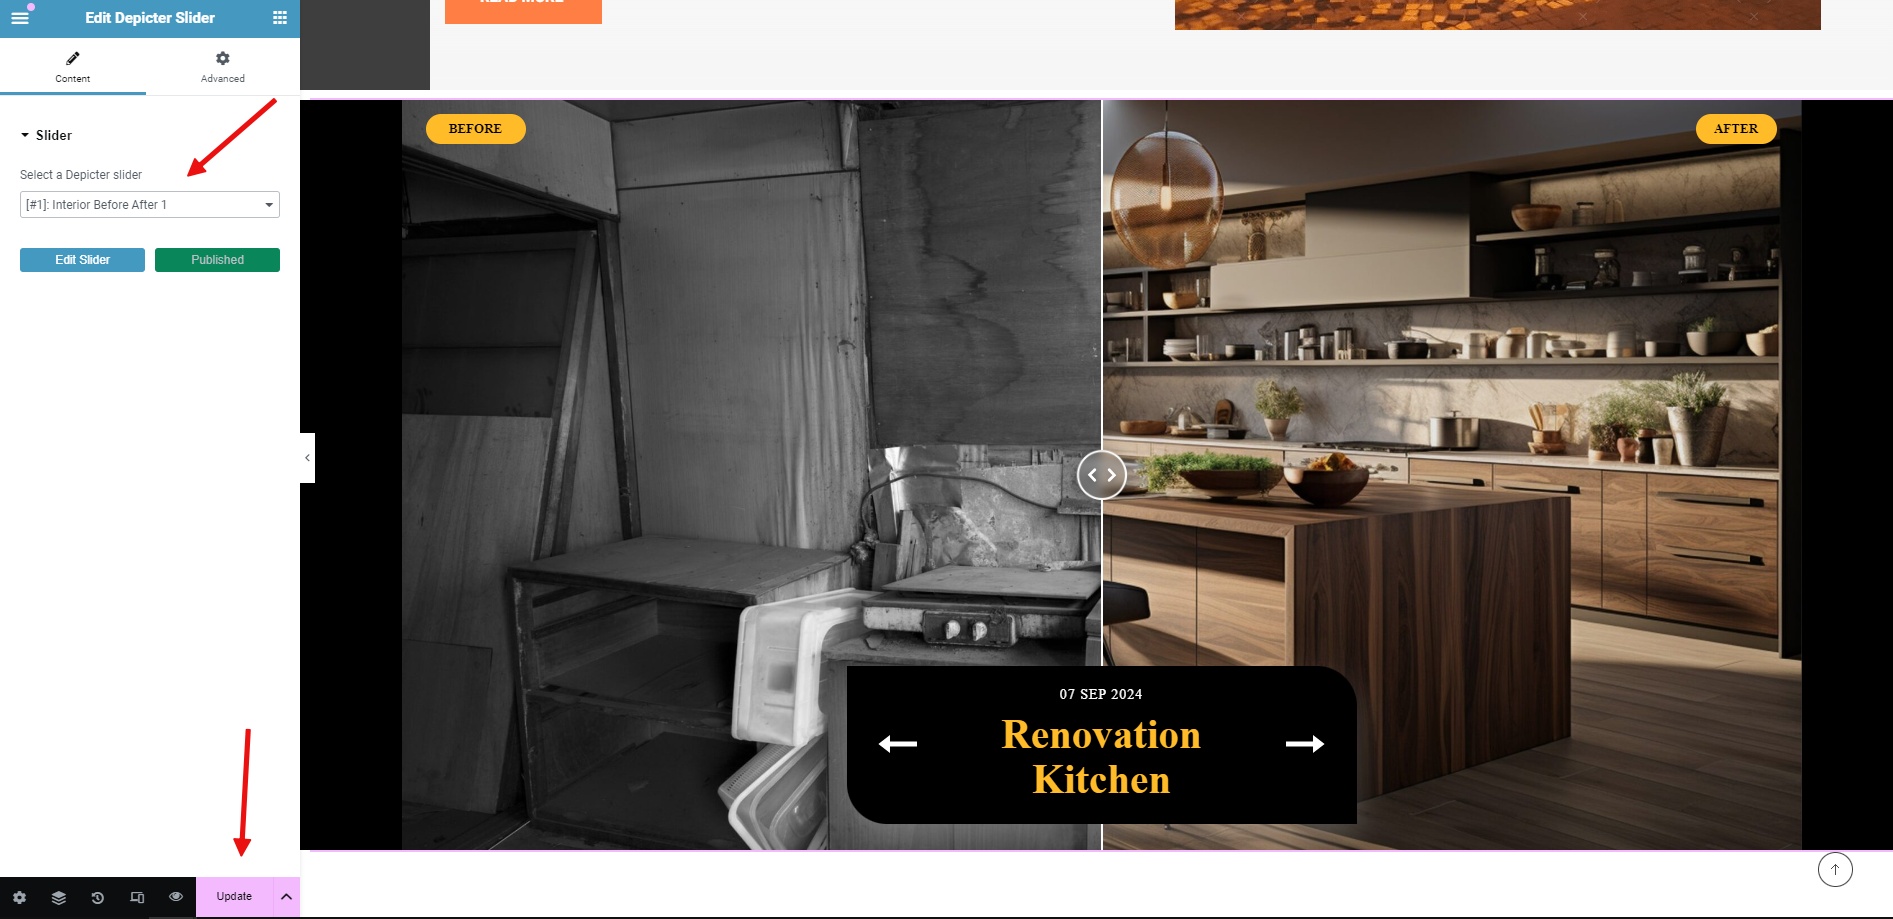
Next, we’ll select the desired slider from the list and then update the page to reflect the changes.
It’s that simple! Our element will be added to the page, and the final result will look like this.
Conclusion
By incorporating a before-and-after slider into your website, you can unlock a world of possibilities. From showcasing product transformations to highlighting project progress, this versatile tool can elevate your content and captivate your audience.
Remember, the key to a successful before-and-after slider lies in choosing high-quality images, crafting compelling captions, and customizing the design to match your website’s aesthetic.
When creating a visually appealing and user-friendly website, having consistent headers across all pages can be beneficial. However, there are times when you may want to differentiate certain pages to enhance their unique identity. This is where using different headers for different pages comes into play. For example, if you have pages with a light-themed design and a homepage with a darker aesthetic, using distinct headers can help visually separate these sections and provide a more immersive experience for your visitors.
Another common scenario is when you want to display a specific call to action (CTA) button on a particular page only. For instance, you might have a “Subscribe Now” button on your homepage to encourage newsletter sign-ups, but on your About page, you might want to feature a “Contact Us” button instead. By customizing your headers, you can tailor the user experience and guide visitors towards the desired action.
Understanding Header Templates in Phlox
Phlox header/footer builder lets you create unique headers and footers with different structures and layouts for desktop, tablet, and mobile. You can add rows and columns by Elementor Page Builder, and customize the look of the header and footer by adding or removing elements. You are able to use all the available elements (such as the horizontal menu, burger menu, search box, social media icons, welcome message, contact numbers, custom icons, call to action buttons, subscription box, shopping cart, …) without any limitation. Also, It is possible to see the changes in real-time.
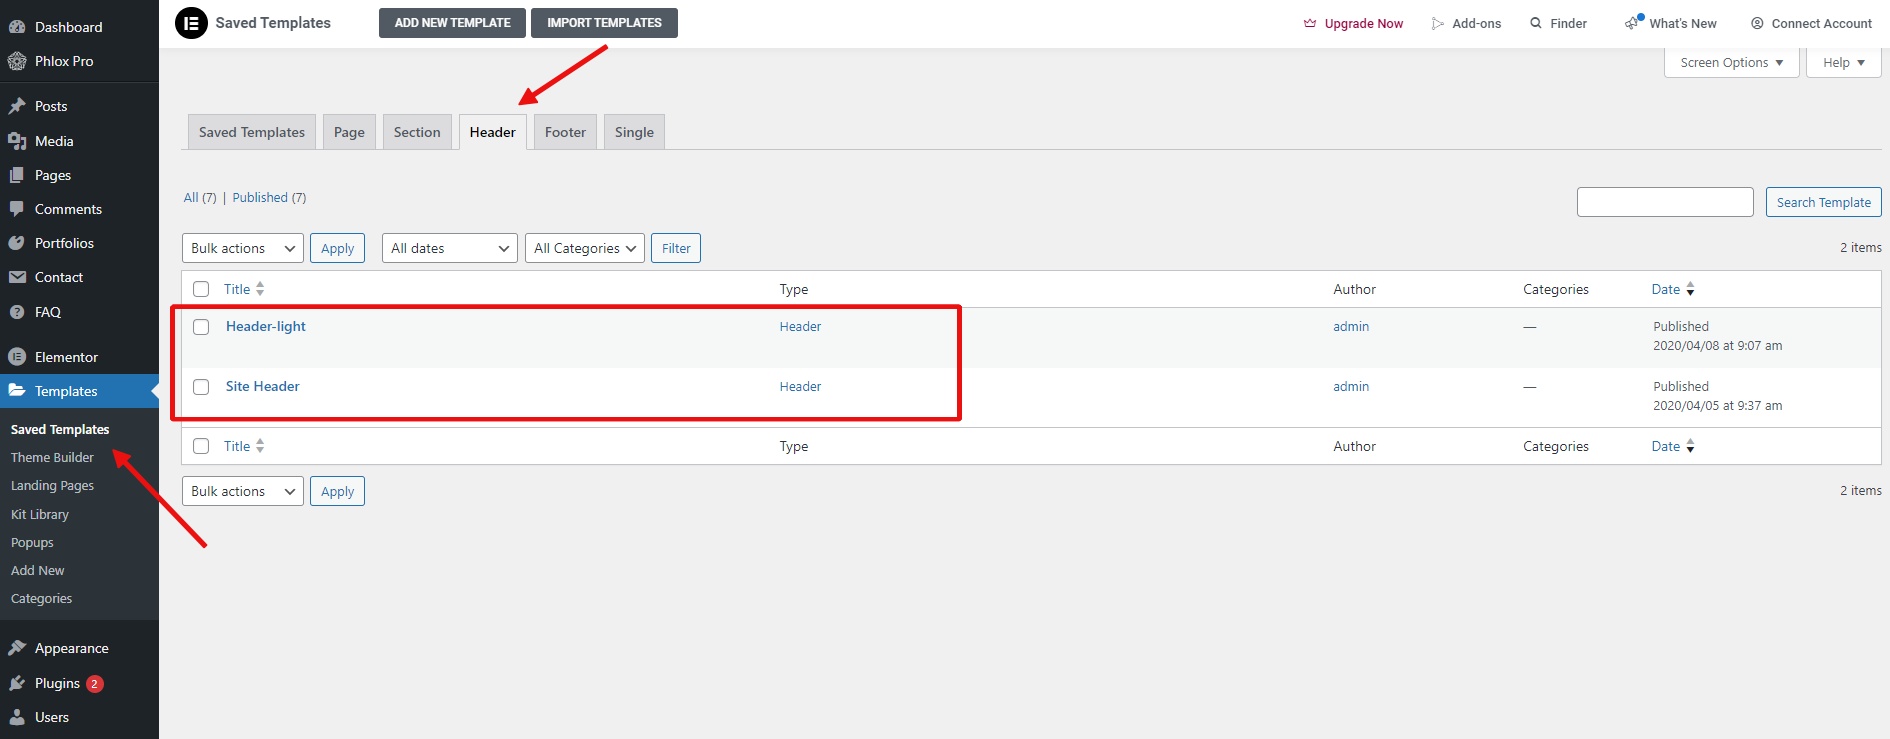
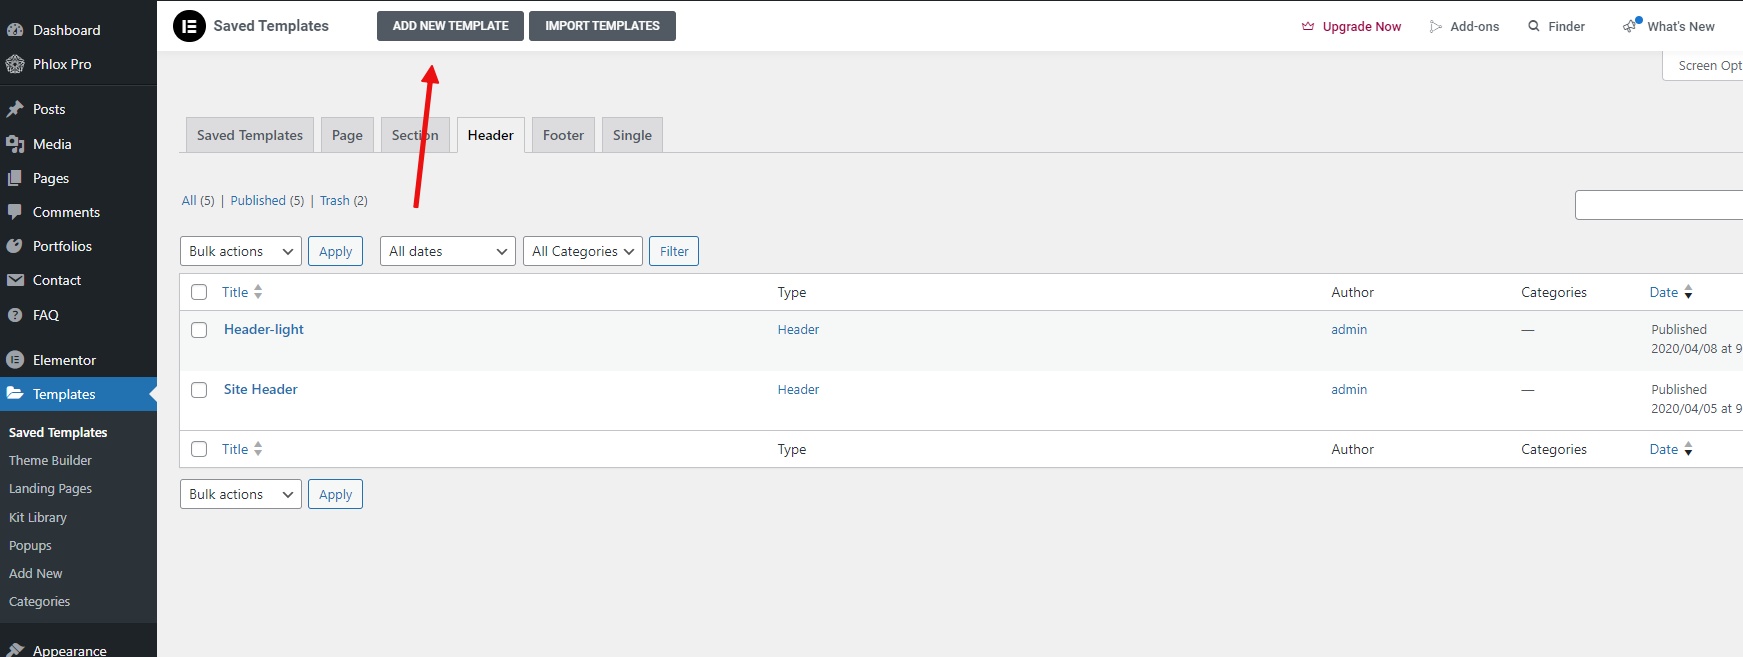
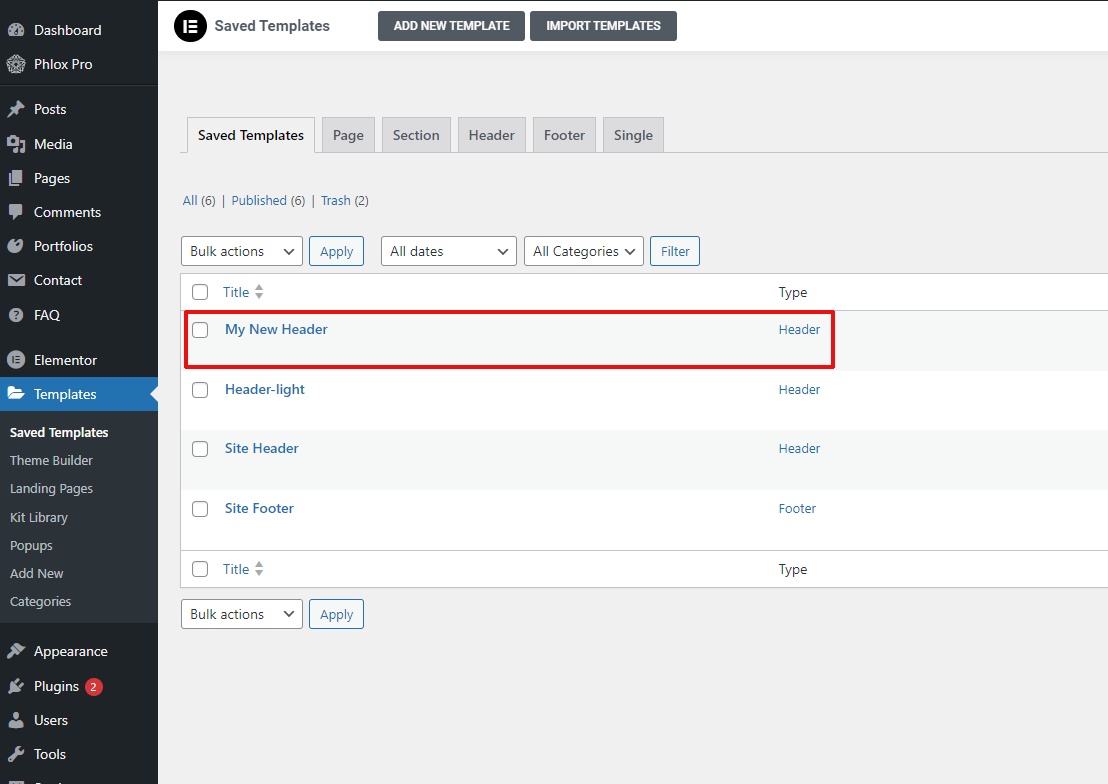
The header builder is an Elementor-based visual builder and to access it, you need to navigate to the Header tab in Templates -> Saved Templates.
Creating and Assigning Header Templates
In this example, we’ve used the pre-built ‘Corporate 2024‘ demo from Phlox, where the Header templates are already prepared.
You can view these pre-designed Header templates by going to the menu: Templates > Saved Templates > Header section.
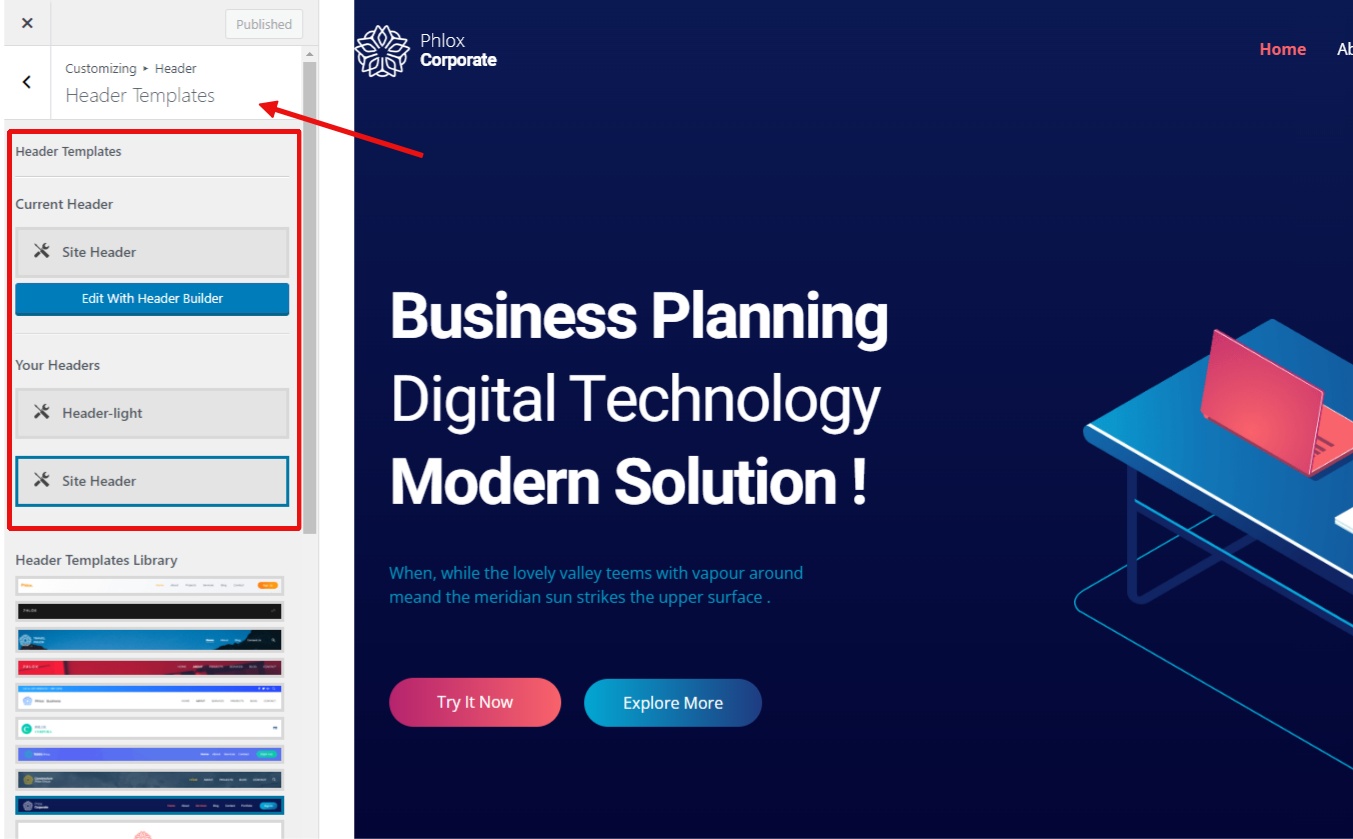
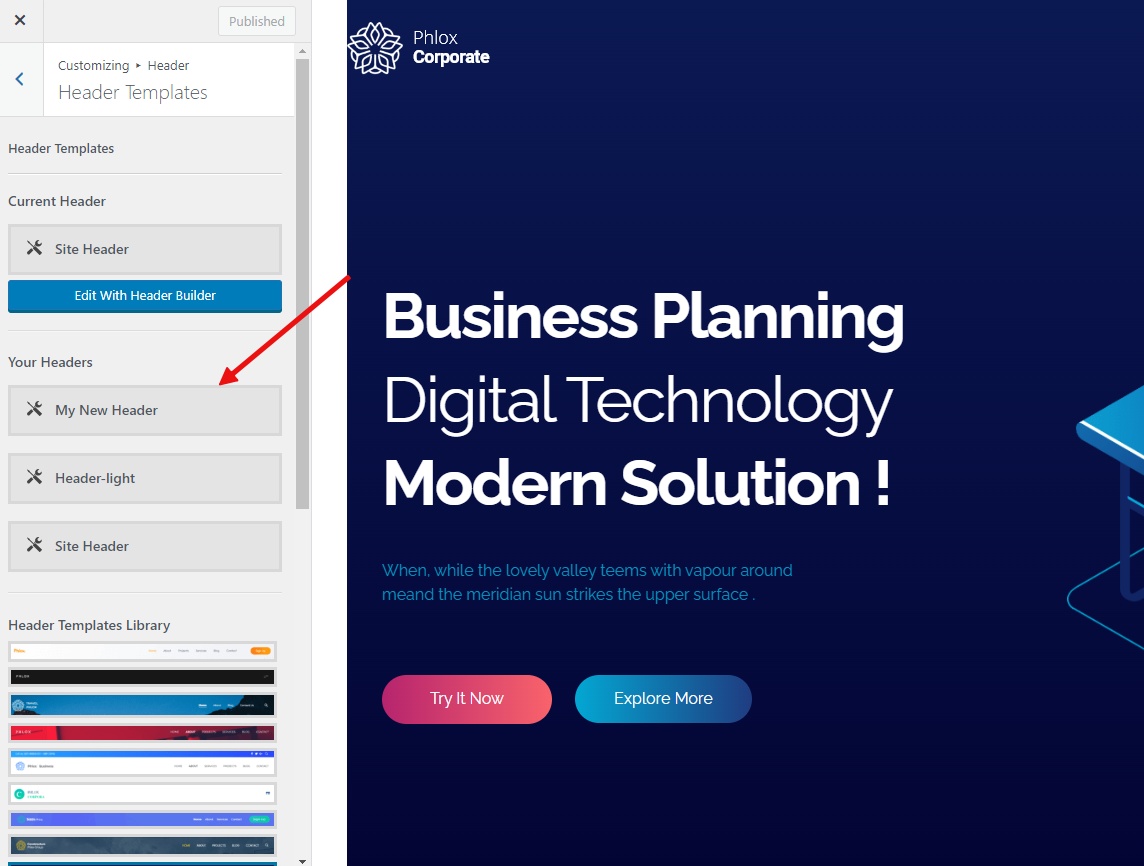
Also in the Customizer, under Header > Header Templates, we can view the available Header templates and identify the current default.
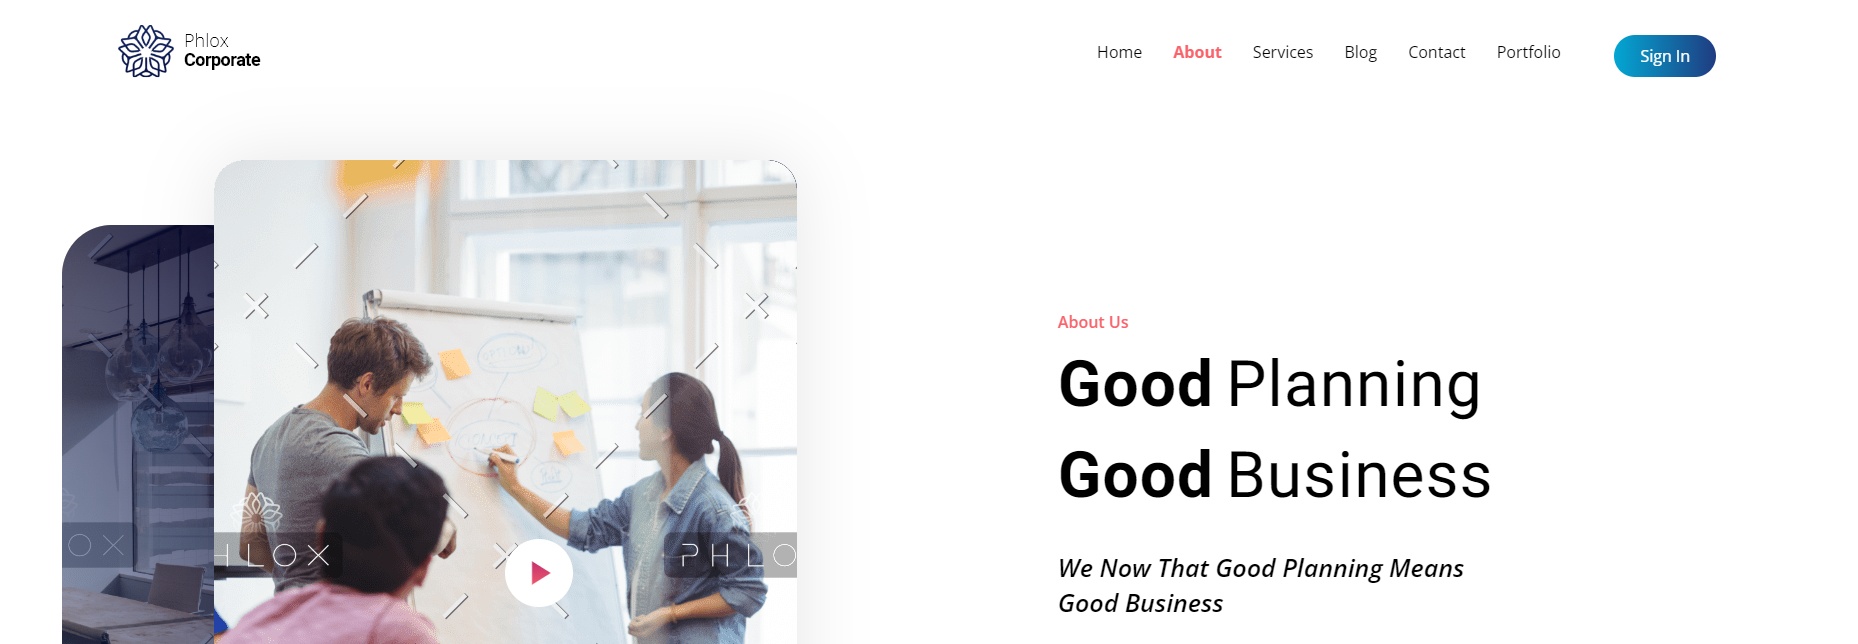
It’s important to note that the template selected as the ‘Current Header’ in the Customizer is displayed for the entire website and all pages; in other words, it’s global. For instance, in this demo, regardless of which page we visit on the website, the template named ‘Site Header’ is displayed, featuring dark font and logo.
However, on the homepage, we see a light-colored logo and font, which is the ‘Header light’ template that we will discuss in the next section.
To create a new header template, simply navigate to the Saved Templates menu and click on the ‘Add New Template’ option.
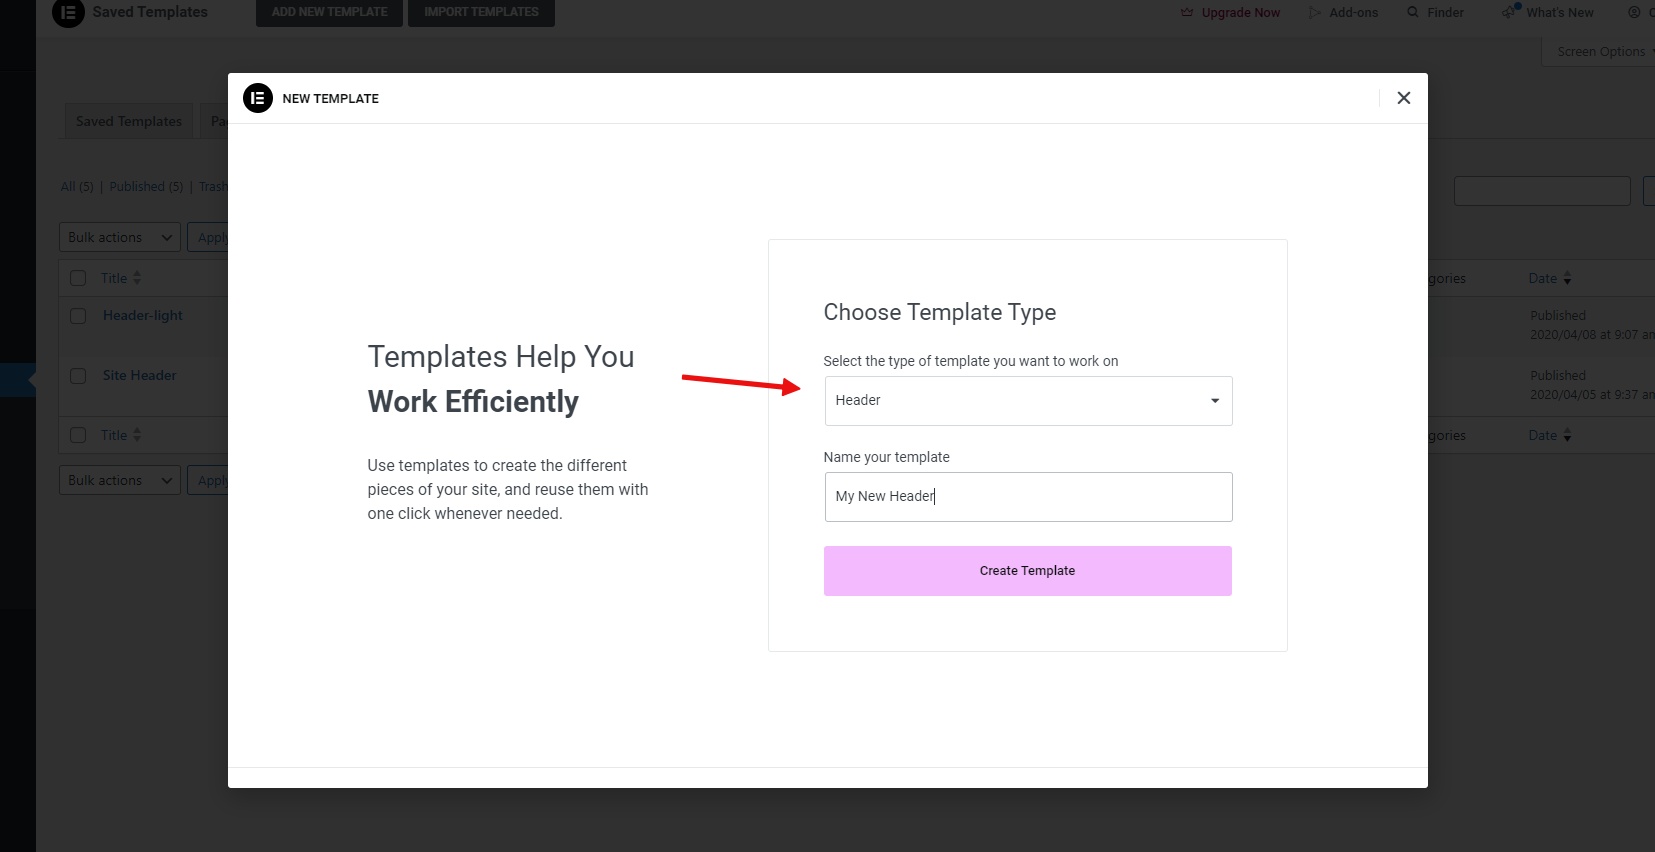
Next, set the ‘Template Type’ to ‘Header’, give it a name, and click the ‘Create Template’ button.
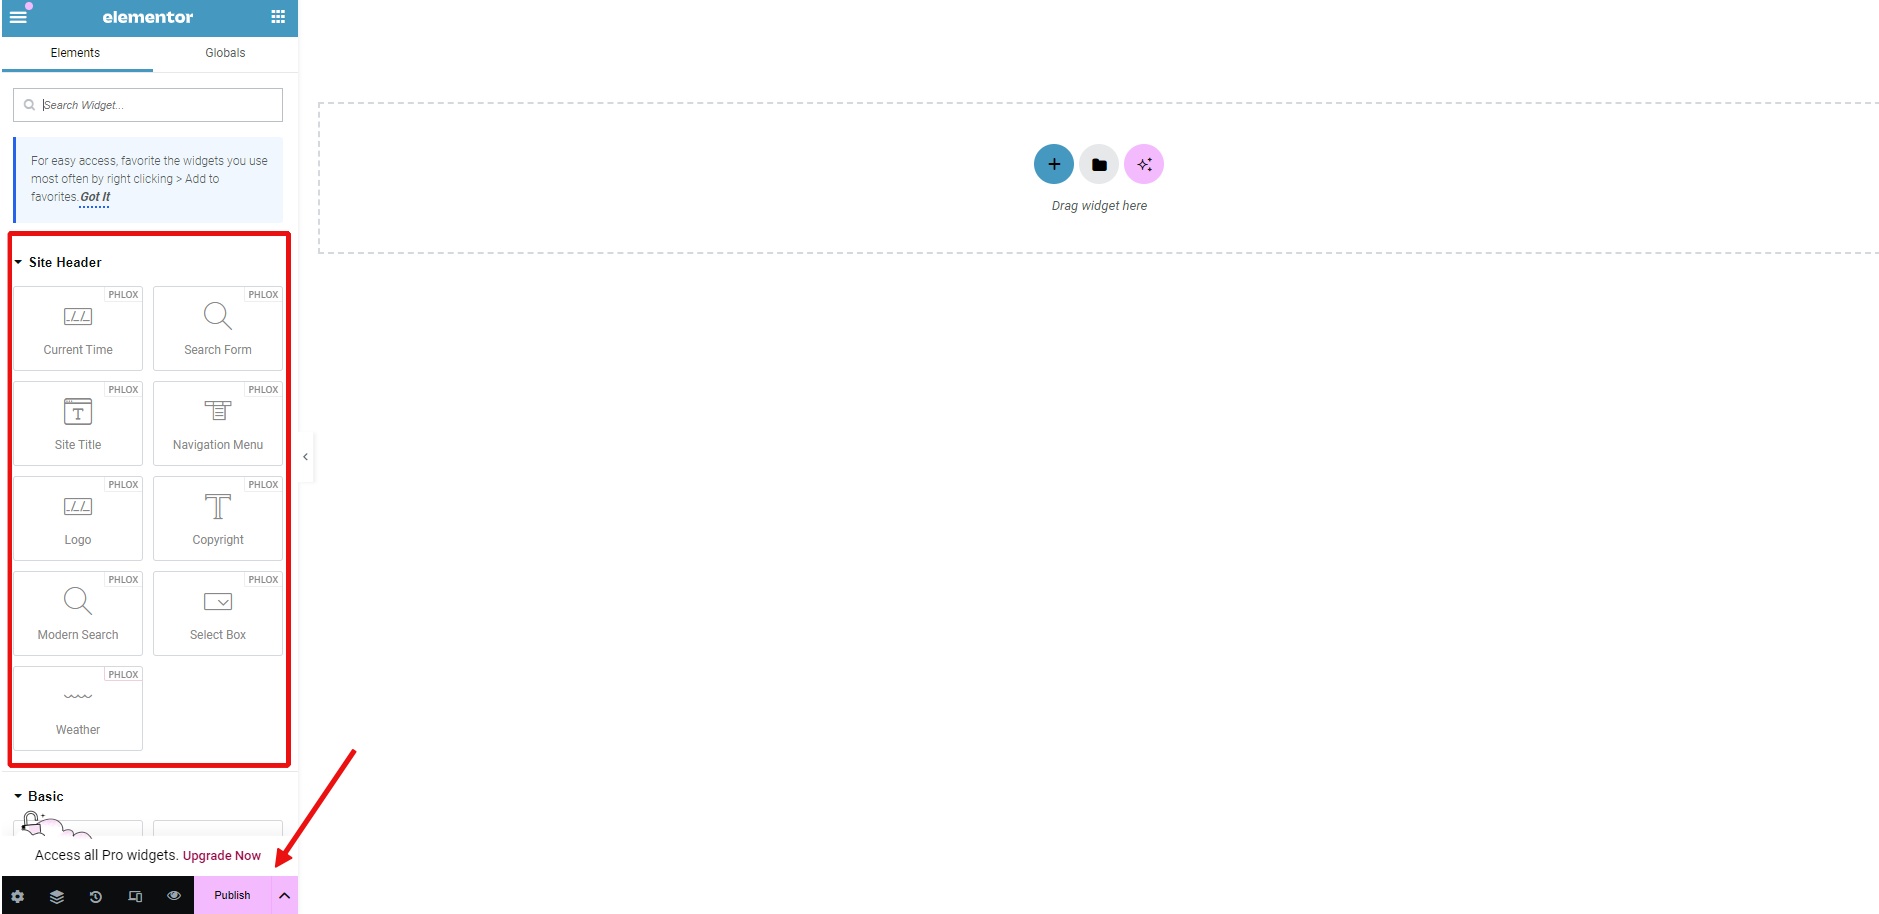
Elementor will then open, allowing you to design and save your custom header template.
[the video]
Your newly created header will now appear in the list when you go back to the Customizer or Header templates section.
Using the Page Options Panel
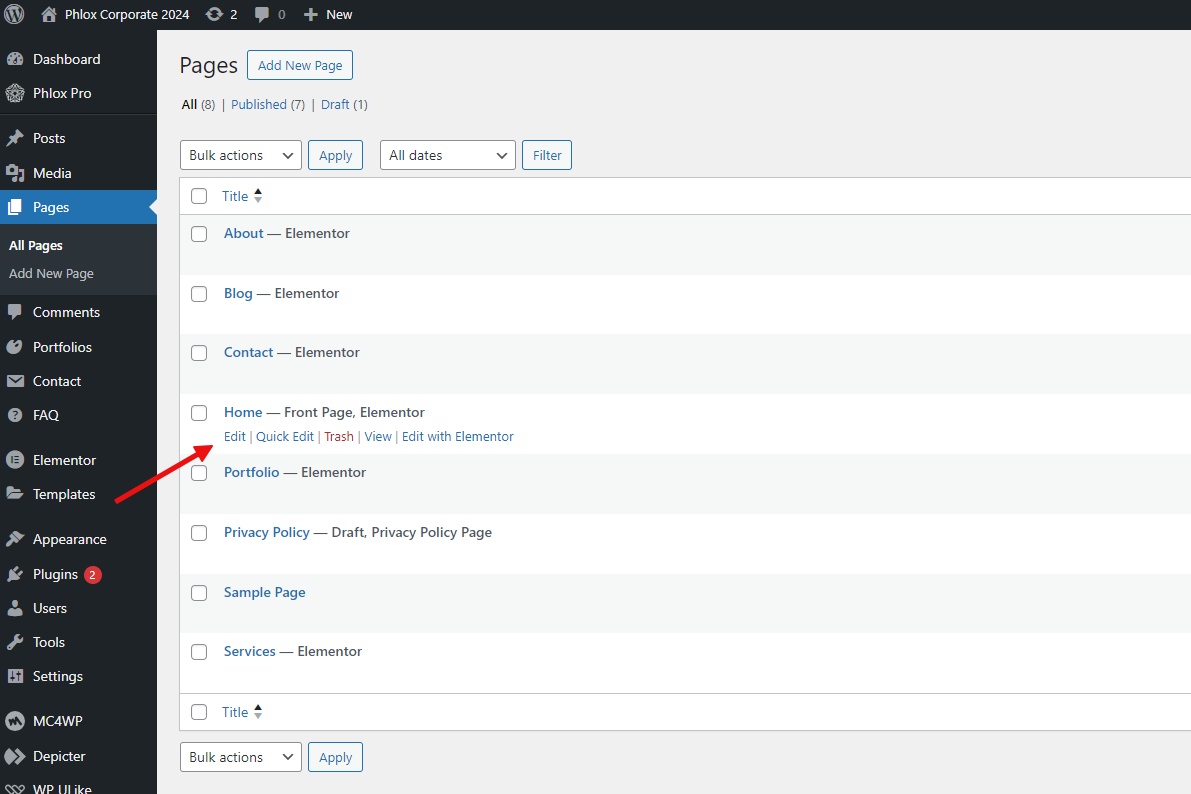
Now, let’s get to the main point. To make one of your pages have a different header than the global header selected in the Customizer, simply edit that page with the default WordPress editor.
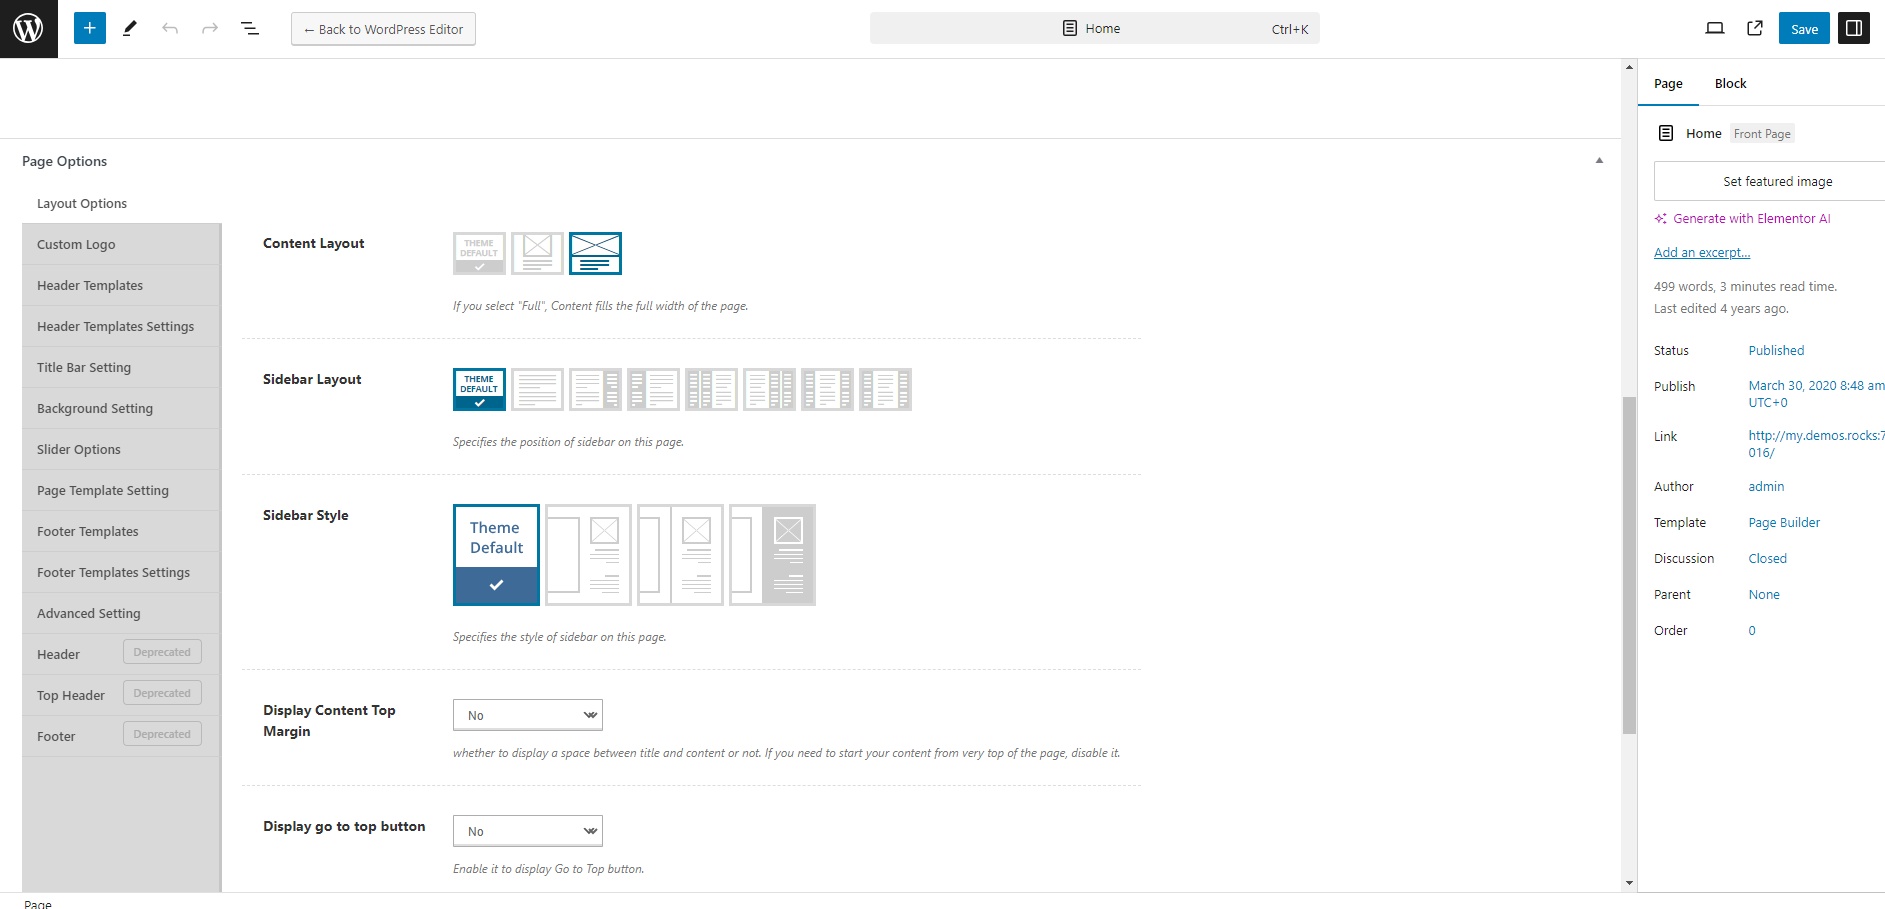
If you scroll down a bit, you’ll encounter the Page Options section of the Phlox theme. Using the options provided in Page Options, you can make changes specific to that page. In fact, by default, Page Options doesn’t make any changes to the options set in the Customizer for all pages, but you have the ability to customize each of these options for this specific page.
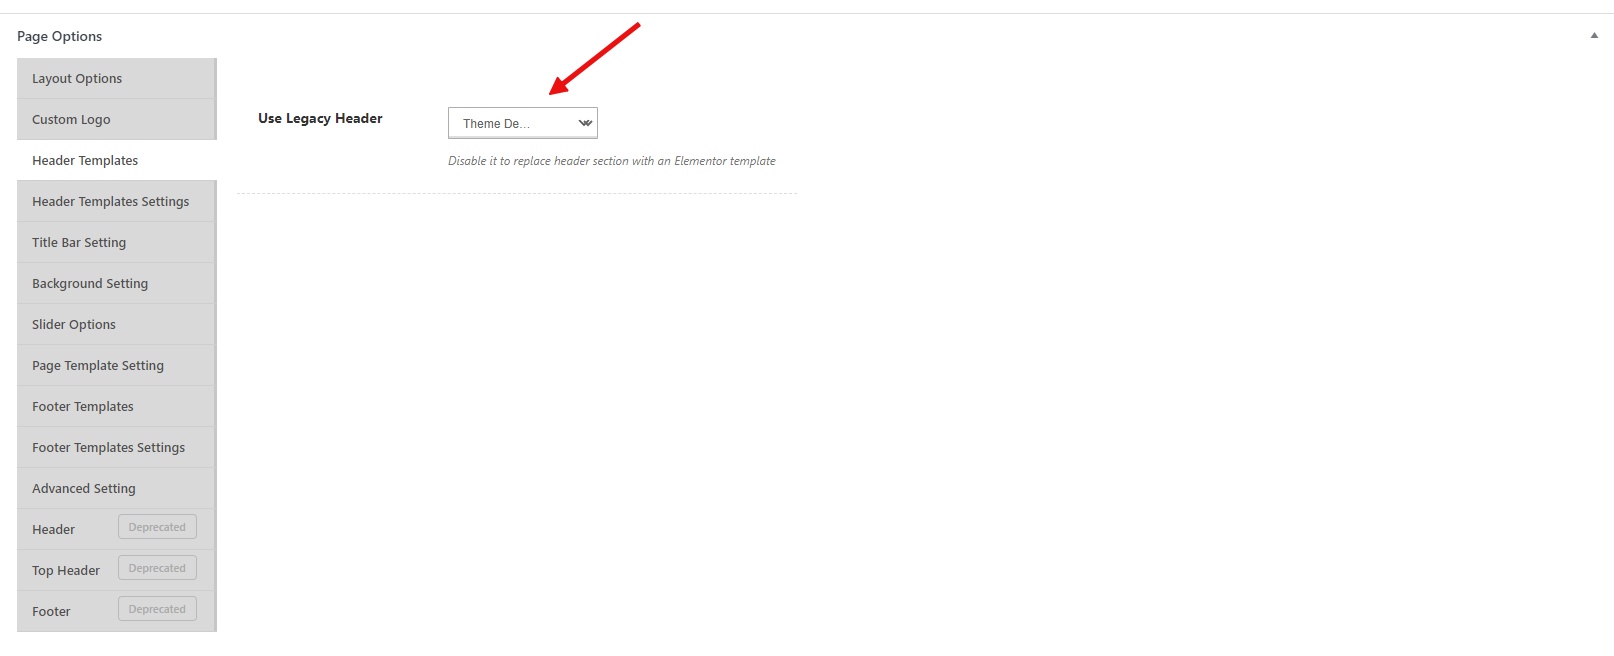
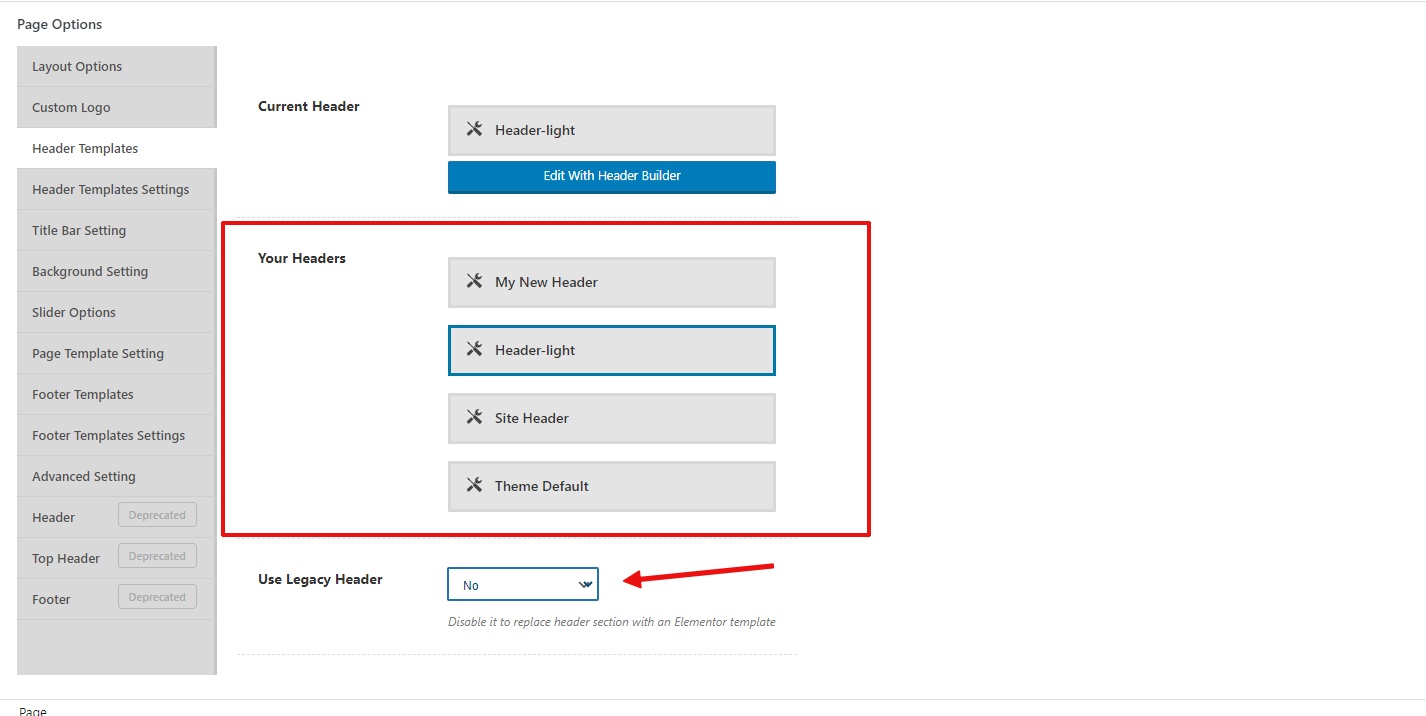
From the Header Templates section, set the ‘Use Legacy header’ option to ‘No’.
Then, select the different header that you want to display for this page only.
After updating the page, this page will load this header template, replacing the one from the Customizer panel.
Conclusion
Understanding and effectively utilizing header templates in Phlox can significantly enhance your website’s visual appeal and user experience. By creating and assigning distinct headers, you can establish a consistent brand identity while also tailoring the content presentation to specific pages. This flexibility empowers you to guide visitors towards desired actions, create visually engaging sections, and ultimately improve your website’s overall effectiveness.
Congratulations on taking the first step towards creating your own online voice! This guide will walk you through the simple process of setting up a free WordPress blog. From purchasing a domain and hosting to crafting your first blog post, we’ll provide you with clear instructions and helpful resources.
Here’s what you can expect:
Setting Up the Foundation: We’ll cover acquiring a domain name and hosting, essential building blocks for your blog.
Installing WordPress: Learn about the straightforward installation process and discover resources for a more in-depth guide.
Picking Your Perfect Theme: Explore the importance of choosing a high-quality theme and get introduced to Phlox, a user-friendly and versatile option.
Customizing Your Blog: We’ll delve into installing Phlox and demonstrate the easy process of importing a pre-designed demo to get you started quickly.
Creating Your First Post: Unleash your creativity by writing and publishing your inaugural blog post.
Building Trust: Learn how to create “About Me,” “Contact Me,” and “Privacy Policy” pages to establish credibility with your readers.
Expanding Your Capabilities: Discover the power of plugins and explore how to install Depicter, a valuable tool for adding visual elements to your blog.
Purchase Domain and Hosting
Before you can launch your WordPress blog, you’ll need two essential components: a domain and hosting. A domain is your website’s unique address on the Internet. For example, “example.com” is a domain.
GoDaddy: One of the largest domain registrars, GoDaddy offers a wide range of domain extensions and additional services.
Hosting is like renting digital space where your website’s files live. It’s the server that makes your site accessible to visitors.
When choosing a host, consider factors like reliability, speed, and customer support. Look for providers offering features such as automatic backups, security measures, and scalability. For your domain, opt for a name that’s memorable, relevant to your blog’s topic, and available in your preferred extension (like .com, .net, or .org). Avoid overly complex or generic names.
Install WordPress
Setting up a WordPress blog is a straightforward process that doesn’t require any technical expertise. With a few simple steps, you can have your own online space up and running in no time.
To learn more about the detailed installation process, refer to our comprehensive guide:
This guide will walk you through each step, providing clear instructions and visual aids to ensure a smooth installation experience.
InstaWP Live Service for Hosting WordPress
If you’re looking for a simplified way to host your WordPress blog, InstaWP Live is an excellent option. This managed WordPress hosting service takes care of all the technical aspects, allowing you to focus on creating and managing your content. With InstaWP Live, you can enjoy fast performance, enhanced security, and easy scalability for your growing blog.
Selecting Your WordPress Theme
Selecting a high-quality WordPress theme is pivotal for the success of your blog. A well-crafted theme not only enhances your blog’s visual appeal but also significantly impacts its functionality and performance. By choosing a theme optimized for speed, SEO, and user experience, you create a solid foundation for your online presence. A battle-tested theme often includes advanced features, dedicated support, and regular updates, ensuring your blog remains secure, efficient, and adaptable to evolving trends. Ultimately, a top-quality theme contributes to a professional image, improved reader engagement, and better search engine visibility.
Phlox is an exceptional choice for crafting a dynamic and engaging WordPress blog. Its sleek design, coupled with a collection of customization options, empowers bloggers to create visually stunning websites without the need for coding expertise. With a focus on speed, SEO, and responsiveness, Phlox ensures your content reaches a wider audience. The theme’s versatile layout options, from classic to modern, cater to diverse blogging styles. Moreover, its seamless integration with popular page builders like Elementor and Visual Composer opens up endless possibilities for creative expression.
Top Features for Blogging with Phlox
Diverse Blog Layouts: Choose from a variety of layouts to suit your blogging style, including classic, grid, masonry, and more.
Customizable Blog Posts: Tailor each post with featured images, excerpts, and multiple post formats.
Fast Loading Speeds: Enhance user experience and improve SEO with optimized performance.
SEO-Friendly Structure: Improve search engine visibility with built-in SEO features.
Responsive Design: Ensure your blog looks great on all devices.
Integration with Popular Page Builders: Create stunning blog posts with Elementor or Visual Composer.
One-Click Demo Import: Quickly set up your blog with pre-designed templates.
Master Slider Pro Included: Showcase featured posts in captivating slideshows.
Regular Updates: Benefit from ongoing improvements and security enhancements.
Excellent Customer Support: Receive assistance and troubleshooting when needed.
Responsive is another perfect all-in-one solution for anyone looking to build a beautiful, high-performing website without breaking the bank. No coding experience is required! Its user-friendly drag-and-drop interface empowers you to personalize your website with ease. Simply drag and drop elements to arrange your layout, customize colors and fonts, and craft a website that reflects your unique vision.
This WordPress theme is built with speed in mind, ensuring your website loads lightning-fast and delivers a seamless user experience for your visitors.
Responsive adapts to any device, thanks to its responsive layout design. Your website will look stunning and function flawlessly on desktops, tablets, and smartphones, guaranteeing a consistent and engaging experience for all your visitors.
Top Features of Responsive Theme
Effortless Design
Drag-and-Drop Editing
Blazing Speed
SEO Friendly
Mobile-Ready
Compatibility
Quick Launch
Installing Phlox
To install Phlox, click on the “Add new theme” option in the Themes menu, then search for “Phlox” and it will appear in the results. After that, click on the “Install” and then “Activate” buttons.
Import a blog demo
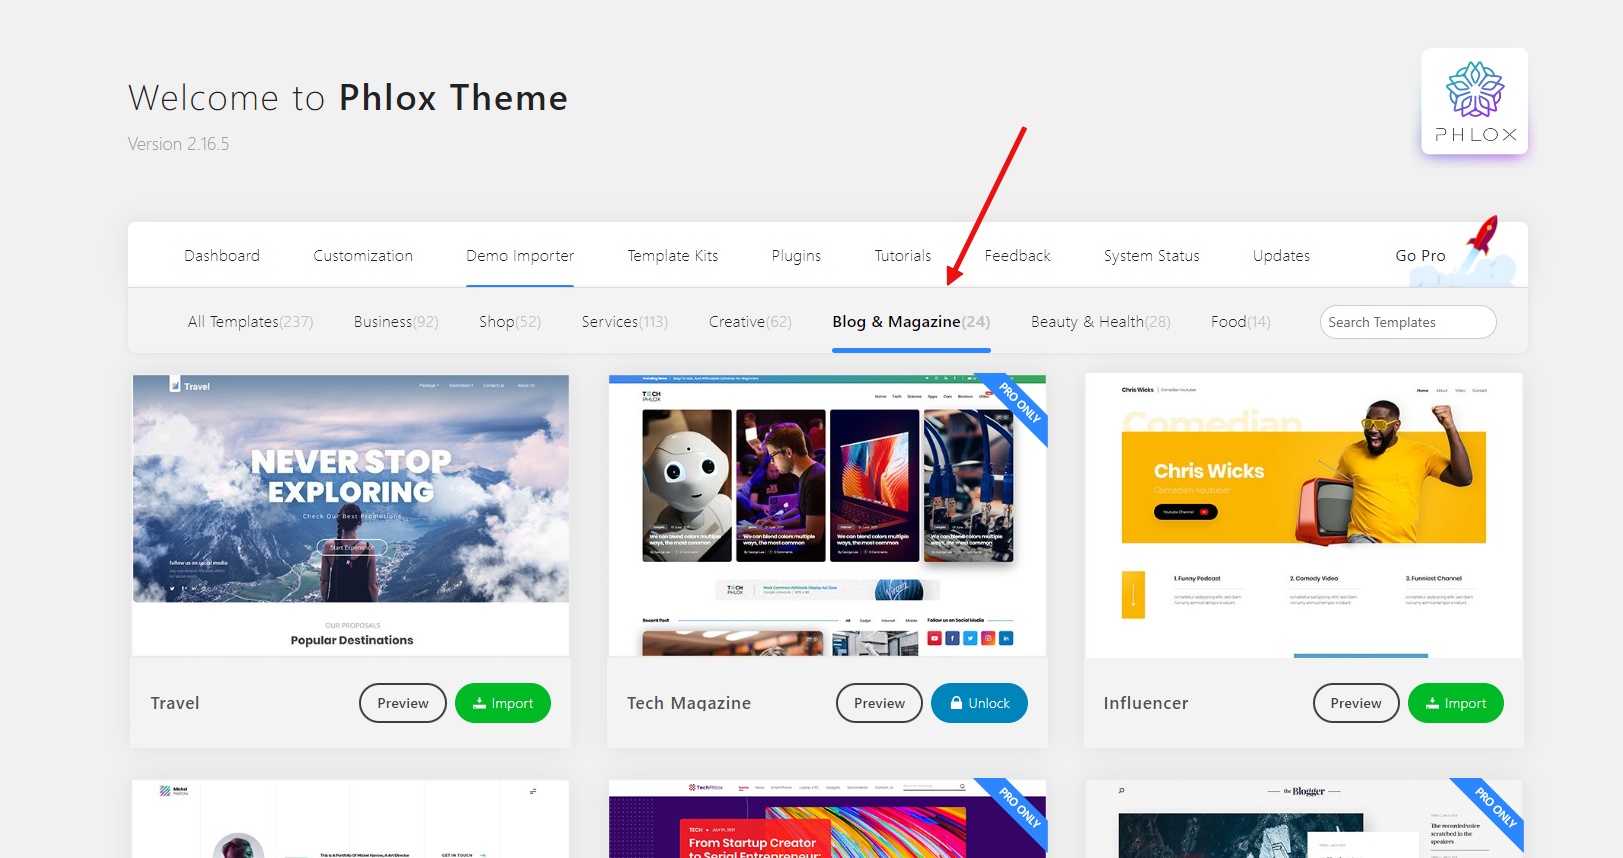
After installing and activating Phlox, you will be automatically redirected to its dedicated dashboard. The next step is to import a ready-made demo. To do this, simply go to the “demo importer” menu in the dedicated Phlox dashboard.
Here, you will find a large number of free and Pro demos available for use.
You can look for blog demos under the “Blog & Magazine” filter at the top of the demo list.
Let’s import the Food Blog demo. Hover your mouse on the demo name and click the “Import button”.
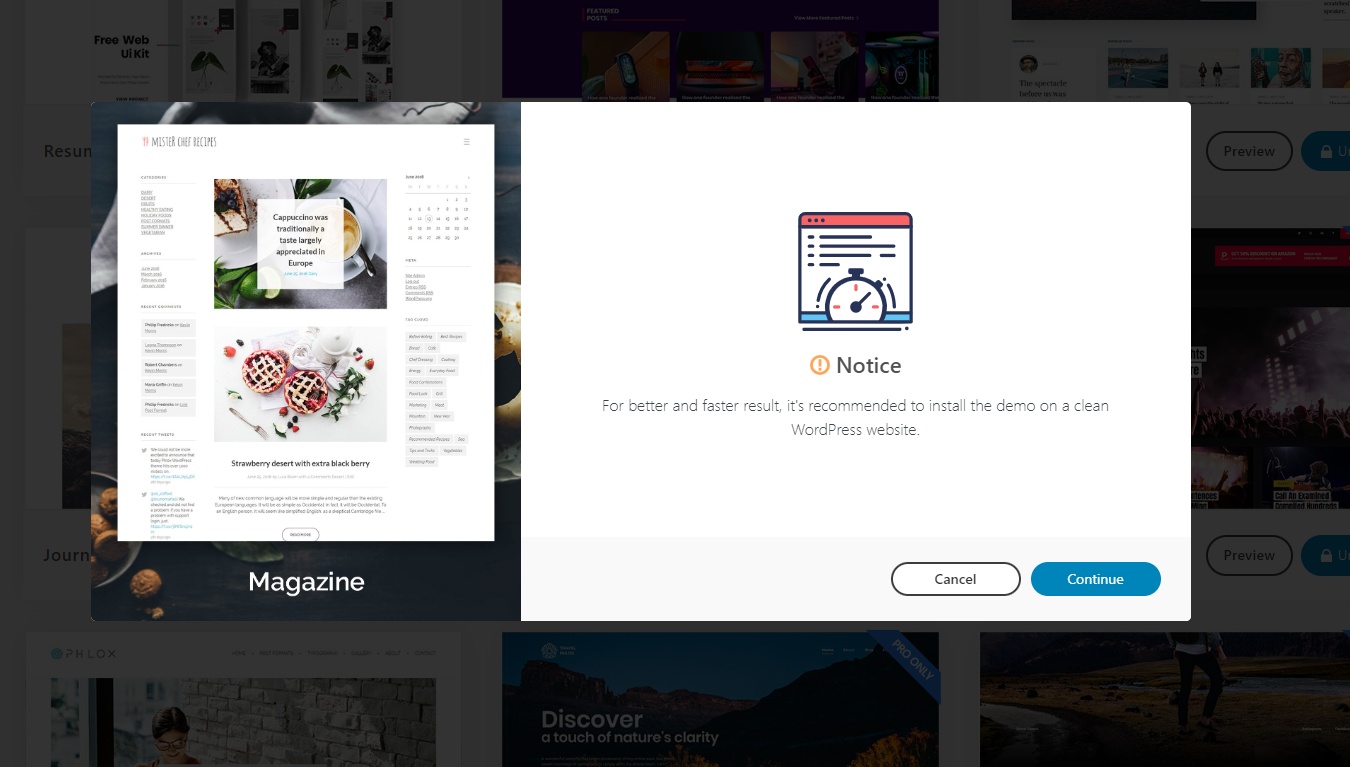
After clicking the “Import” button, the process of importing the demo content begins.
Step 1: Continue. Click the “Continue” button to proceed to the next step.
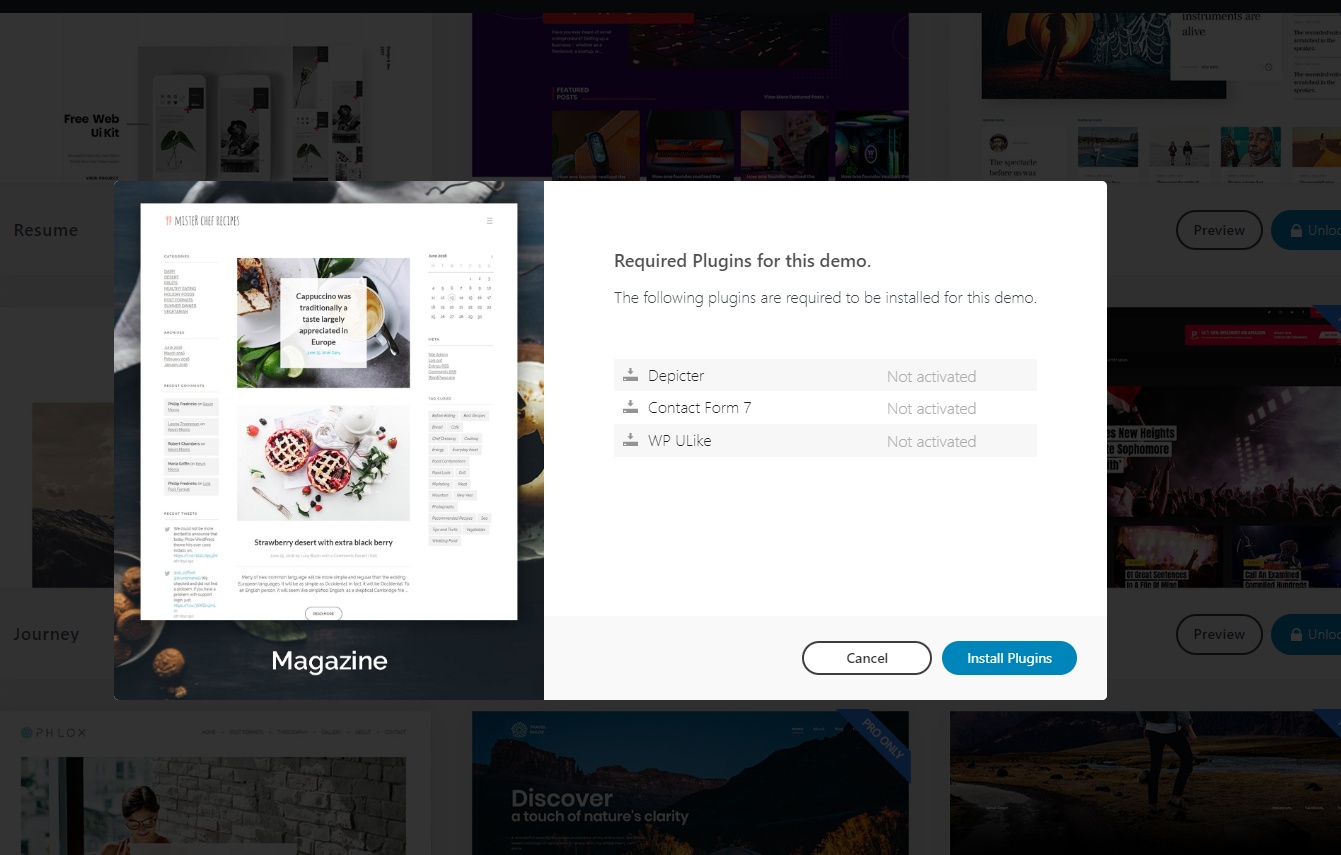
Step 2: Install the required plugins. A list of plugins essential for importing this specific demo will be displayed. Click the “Install plugins” button to install these necessary plugins automatically. These additional plugins will enhance the functionality of your website.
Step 3: Import Content. Select the first option, to import all the content from the demo, including pages, posts, images, and other elements. Then, click the “Import content” button to initiate the import process.
Wait for Completion. The import process will start, and it may take a few minutes to complete. During this time, please be patient as the system transfers all the demo data to your website.
Once the import is finished, the demo content will be fully integrated into your website, providing you with a ready-to-customize starting point.
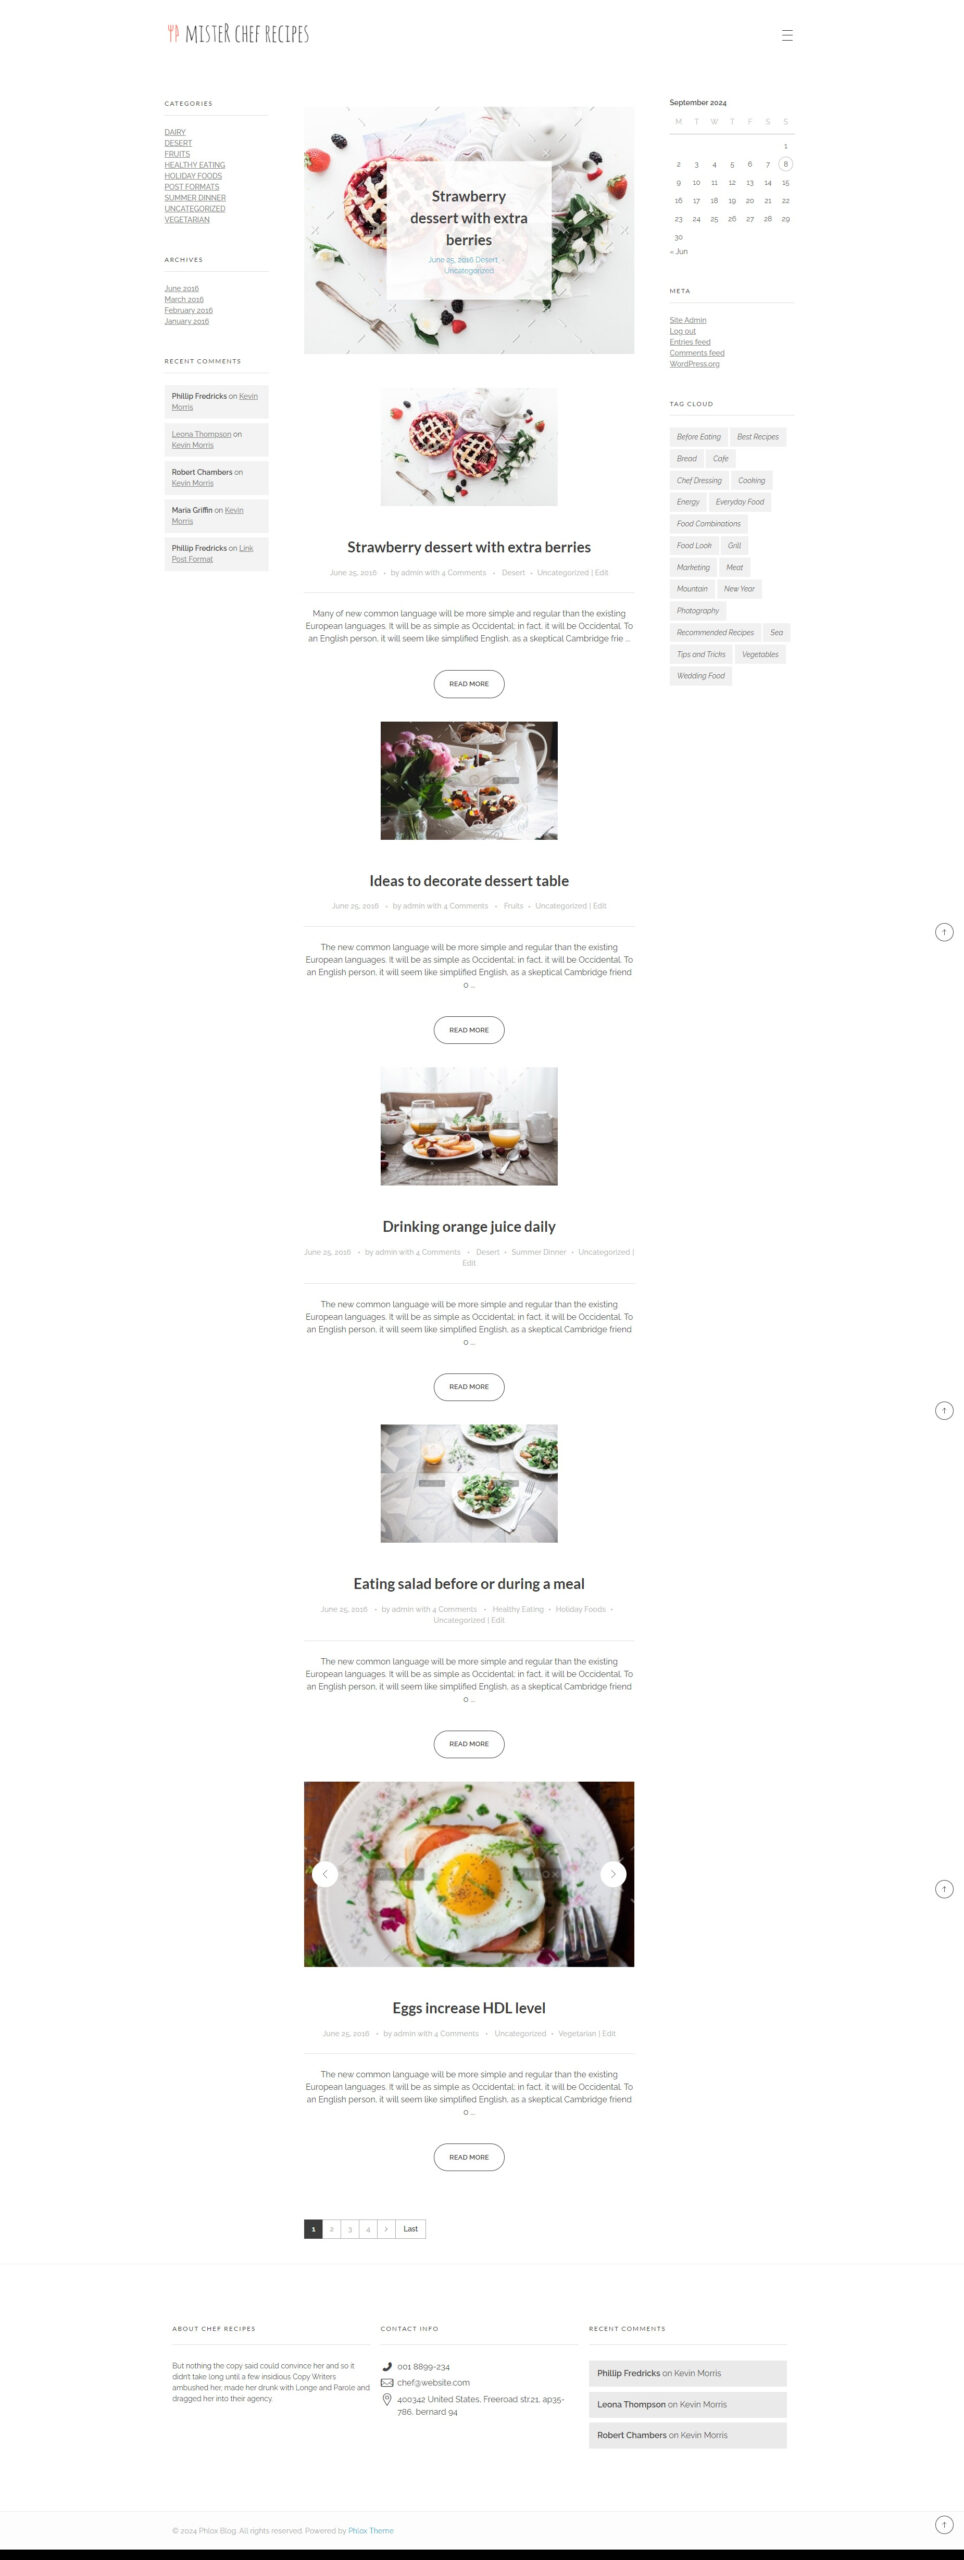
Here is the full display of the imported blog demo:
Write Your First Blog Post
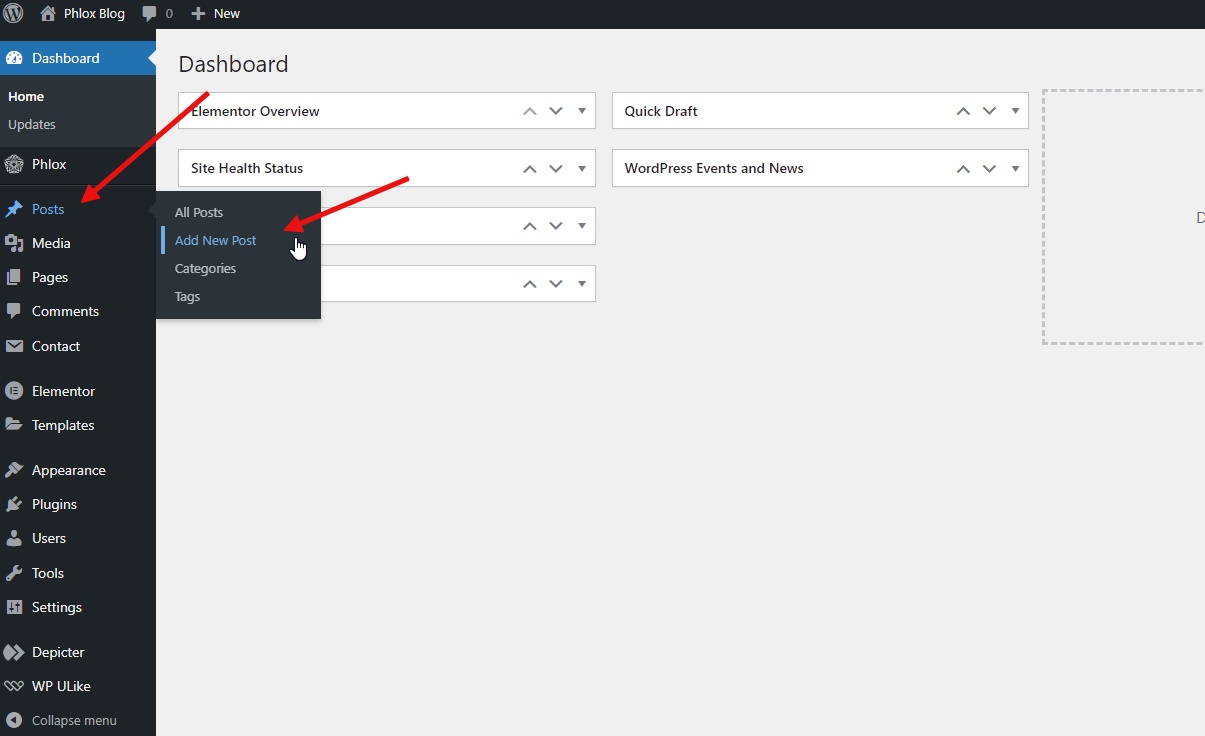
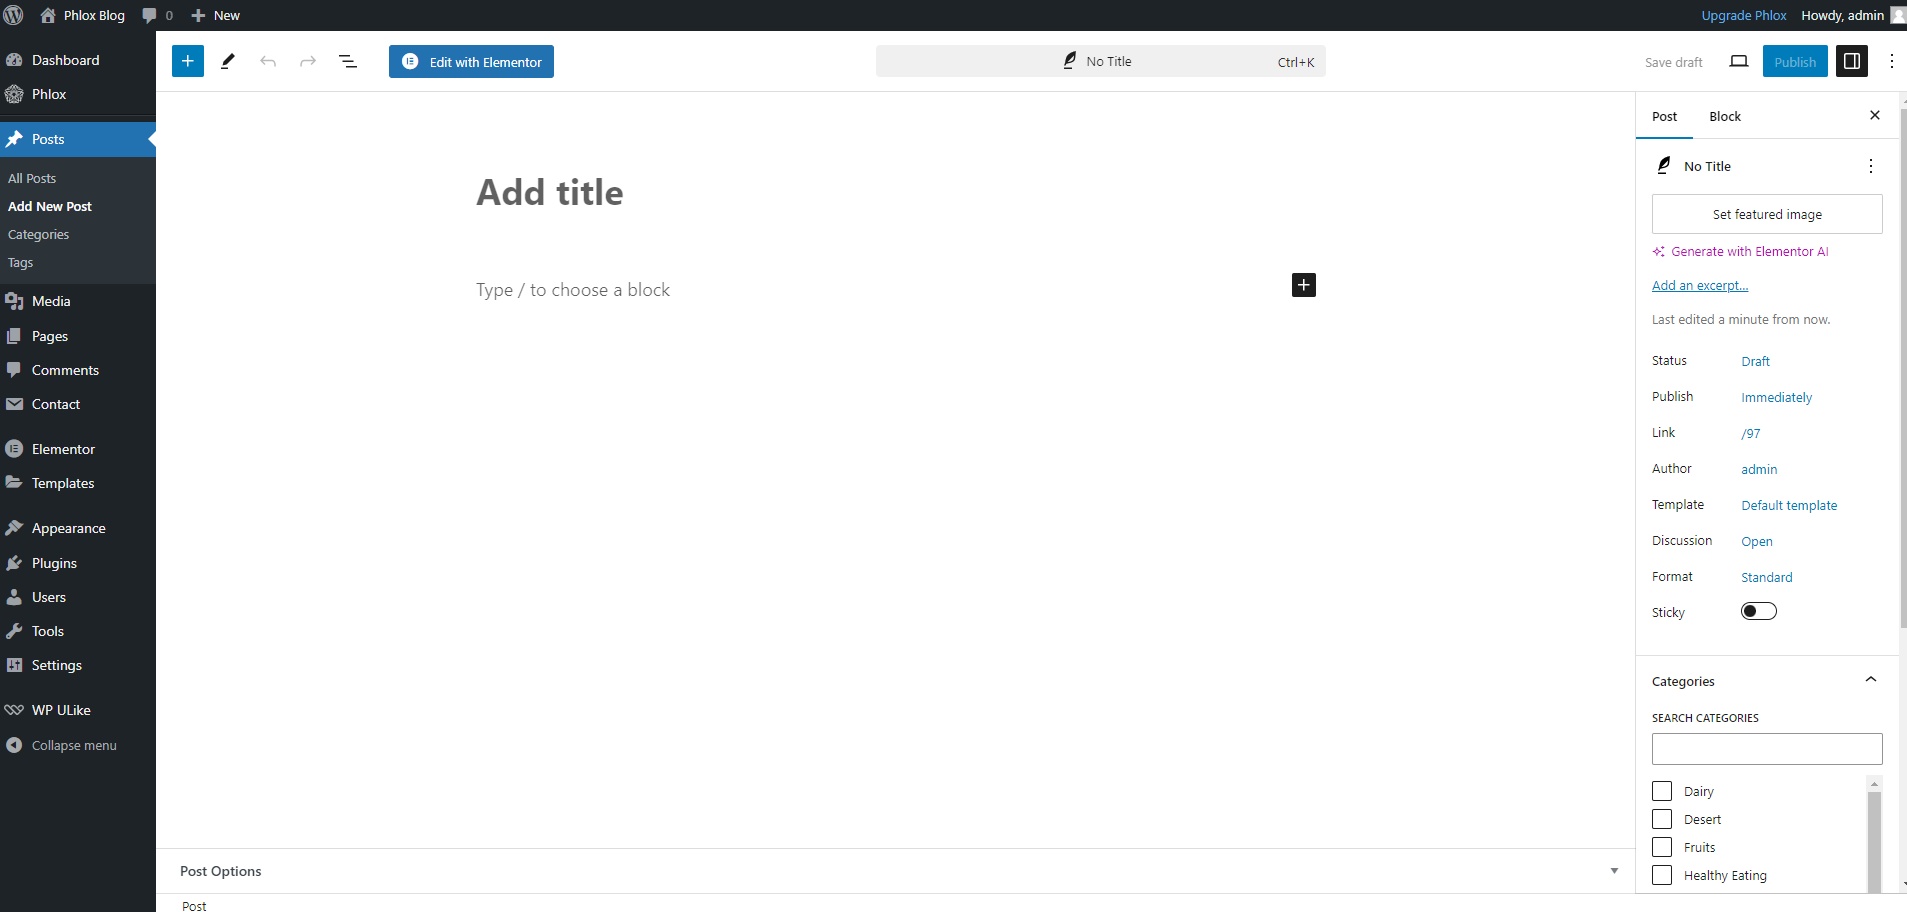
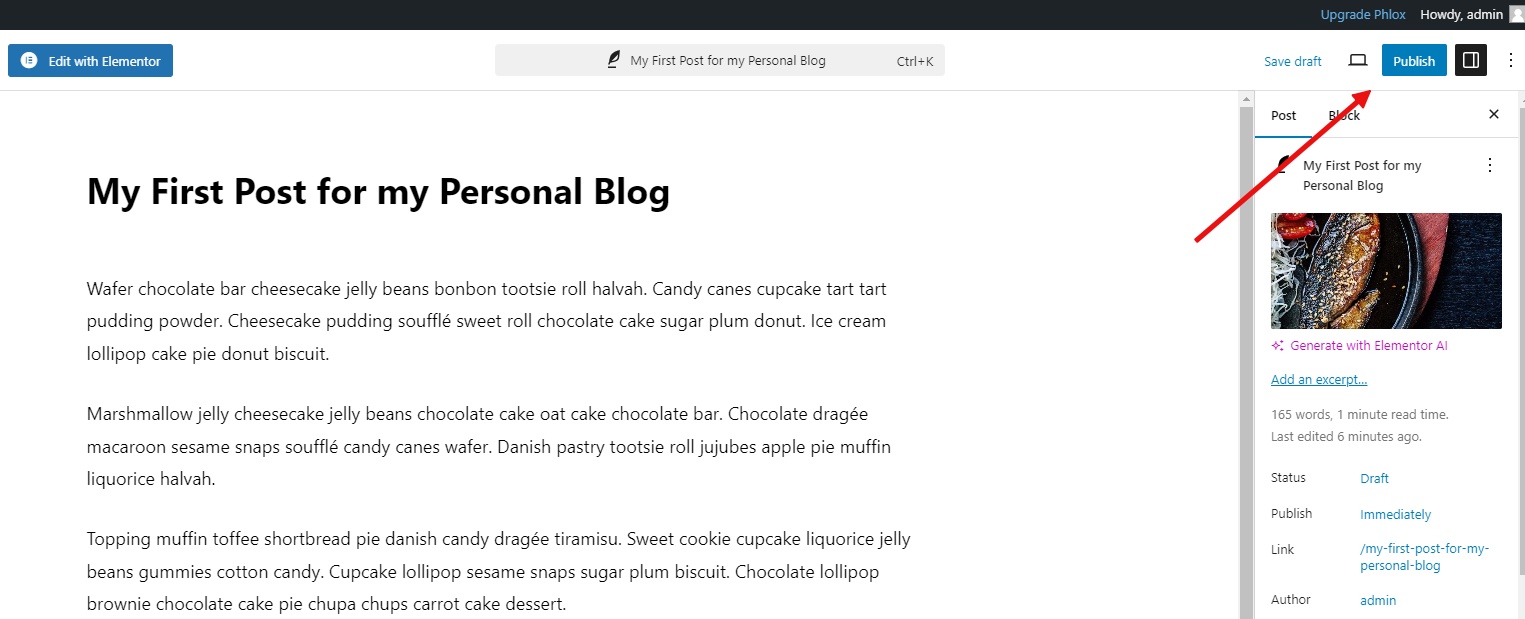
Look for the “Posts” menu item on the left sidebar and click on the “Add New” submenu. This will open a new post editor.
In the main editor area, start typing your blog post content. You can use the formatting tools provided by WordPress to add headings, paragraphs, images, links, and more.
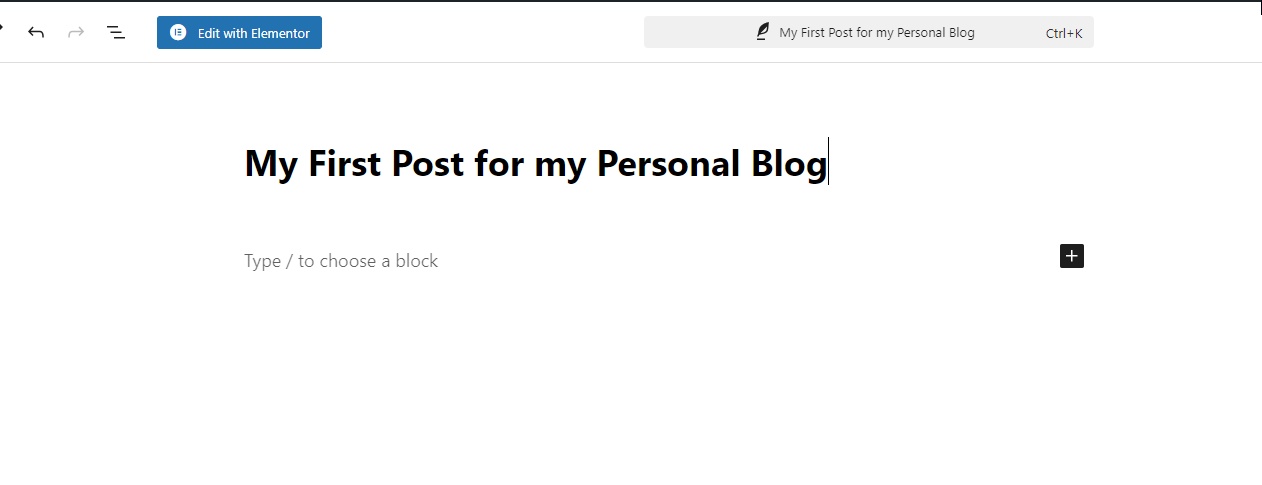
Above the content editor, you’ll find a field for the post title. Enter a clear and descriptive title for your blog post.
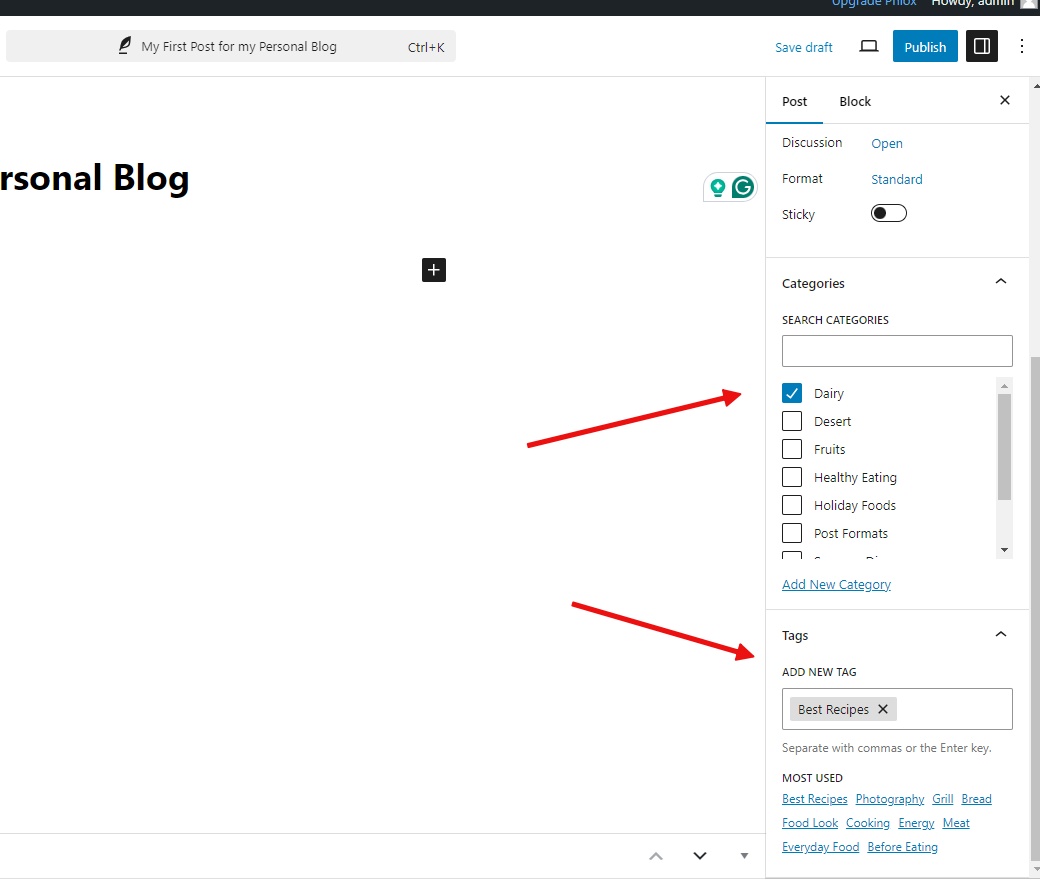
On the right sidebar, you’ll see sections for “Categories” and “Tags.” Assign your post to relevant categories and add appropriate tags to help people find it.
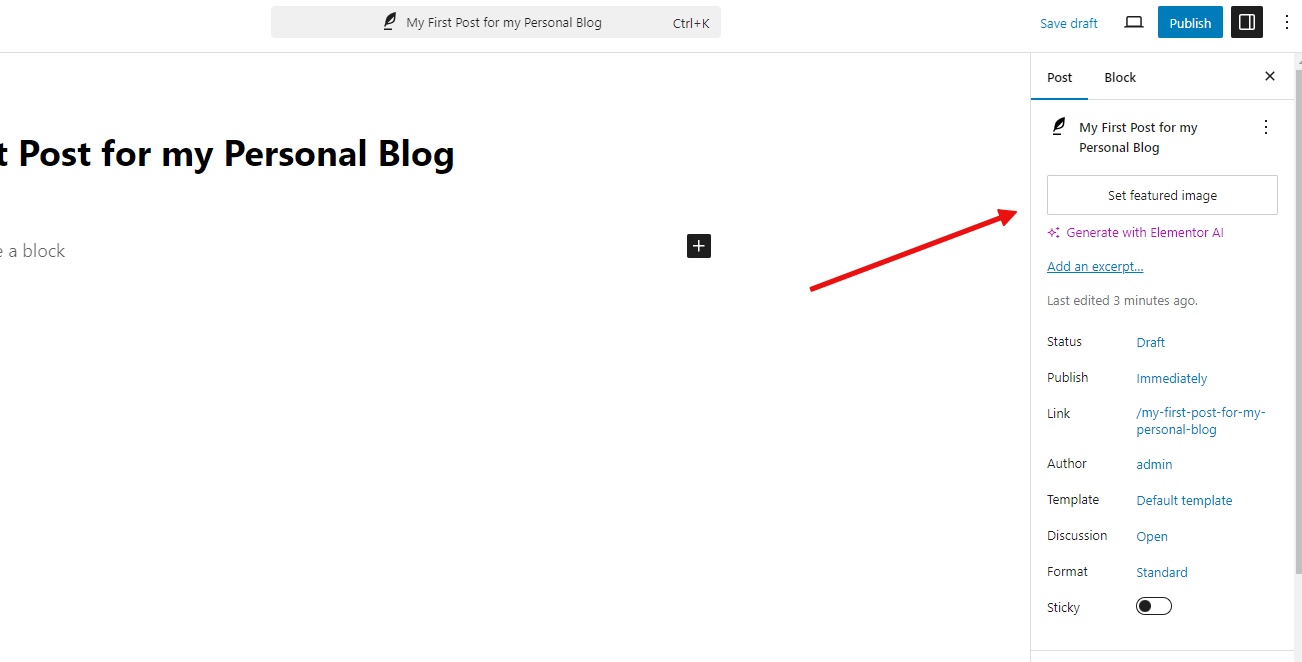
If you want to add a featured image to your post, click on the “Set featured image” button and upload an image. The featured image will be displayed prominently on your blog’s homepage and post page.
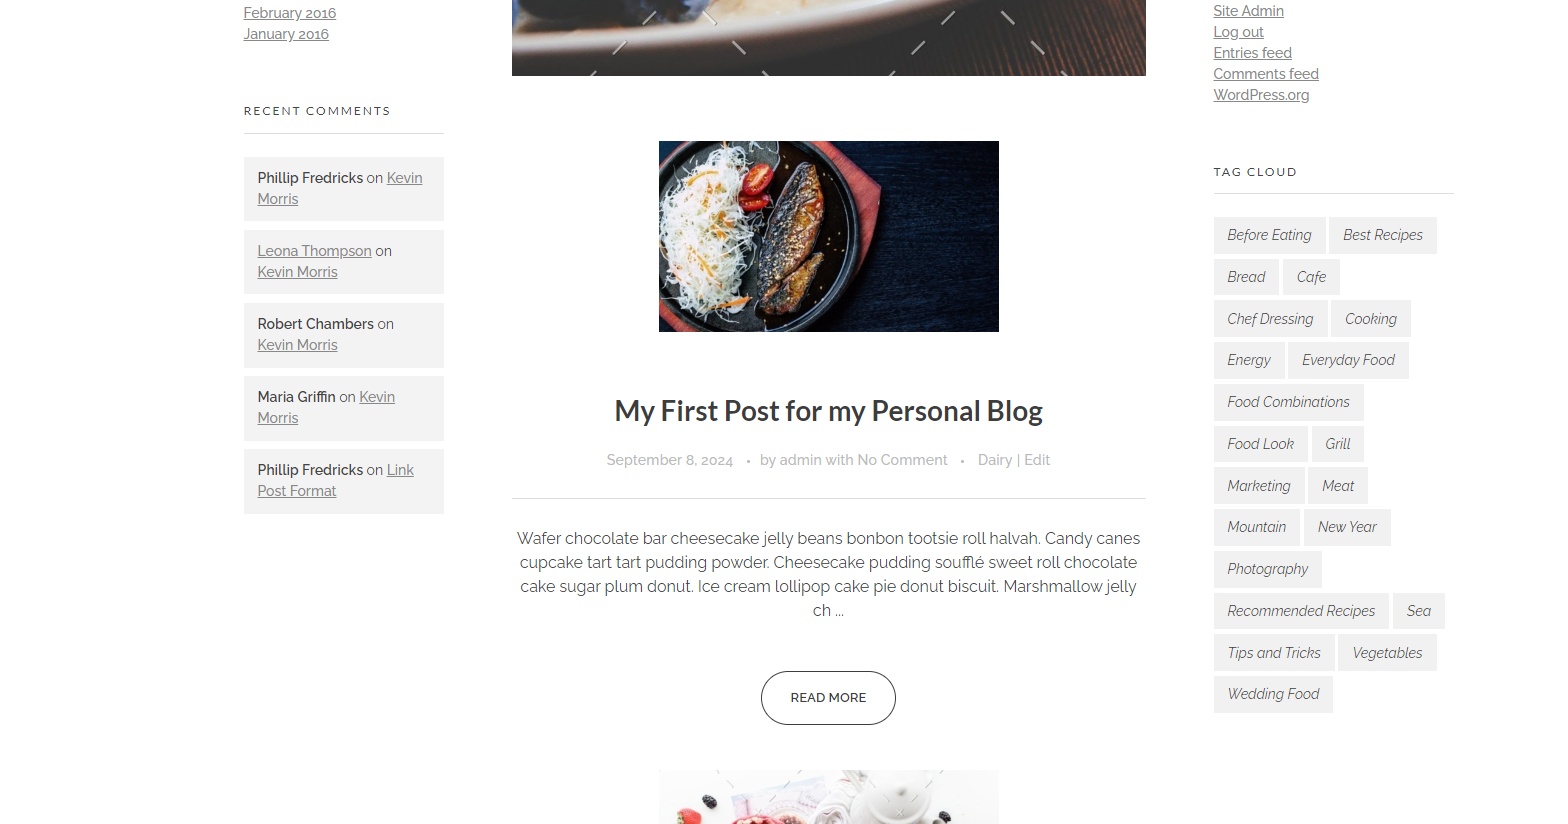
Once you’re satisfied with your post, click on the blue “Publish” button at the top right corner of the editor. Your post will now be visible on your blog’s homepage and in the appropriate category and tag archives.
Here is our new post on our blog homepage:
Write your “about me”, “contact me”, and “privacy policy” pages
Adding About Me, Contact Me, and Privacy Policy pages to your personal WordPress blog is a crucial step in establishing your online presence and building trust with your readers. These pages provide valuable information about you, your blog, and how you handle your readers’ data. By taking the time to create these pages, you can enhance your blog’s credibility and professionalism. Let’s see how can you create your first page on your WordPress blog.
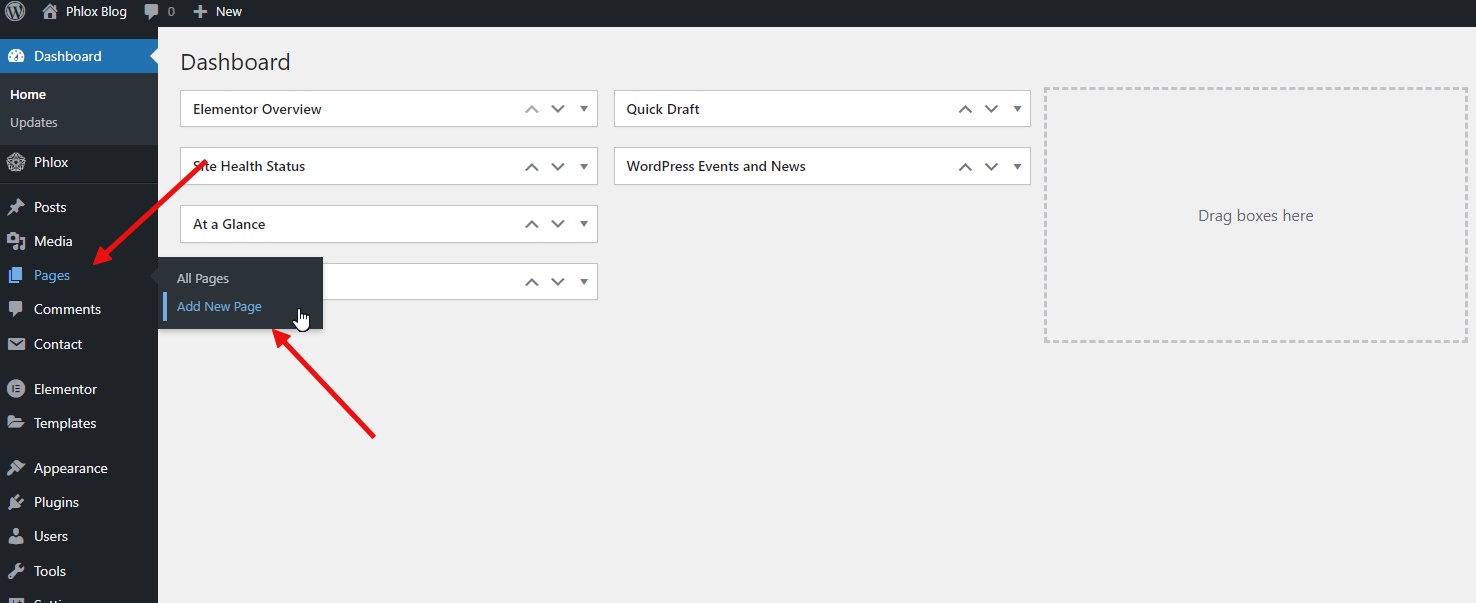
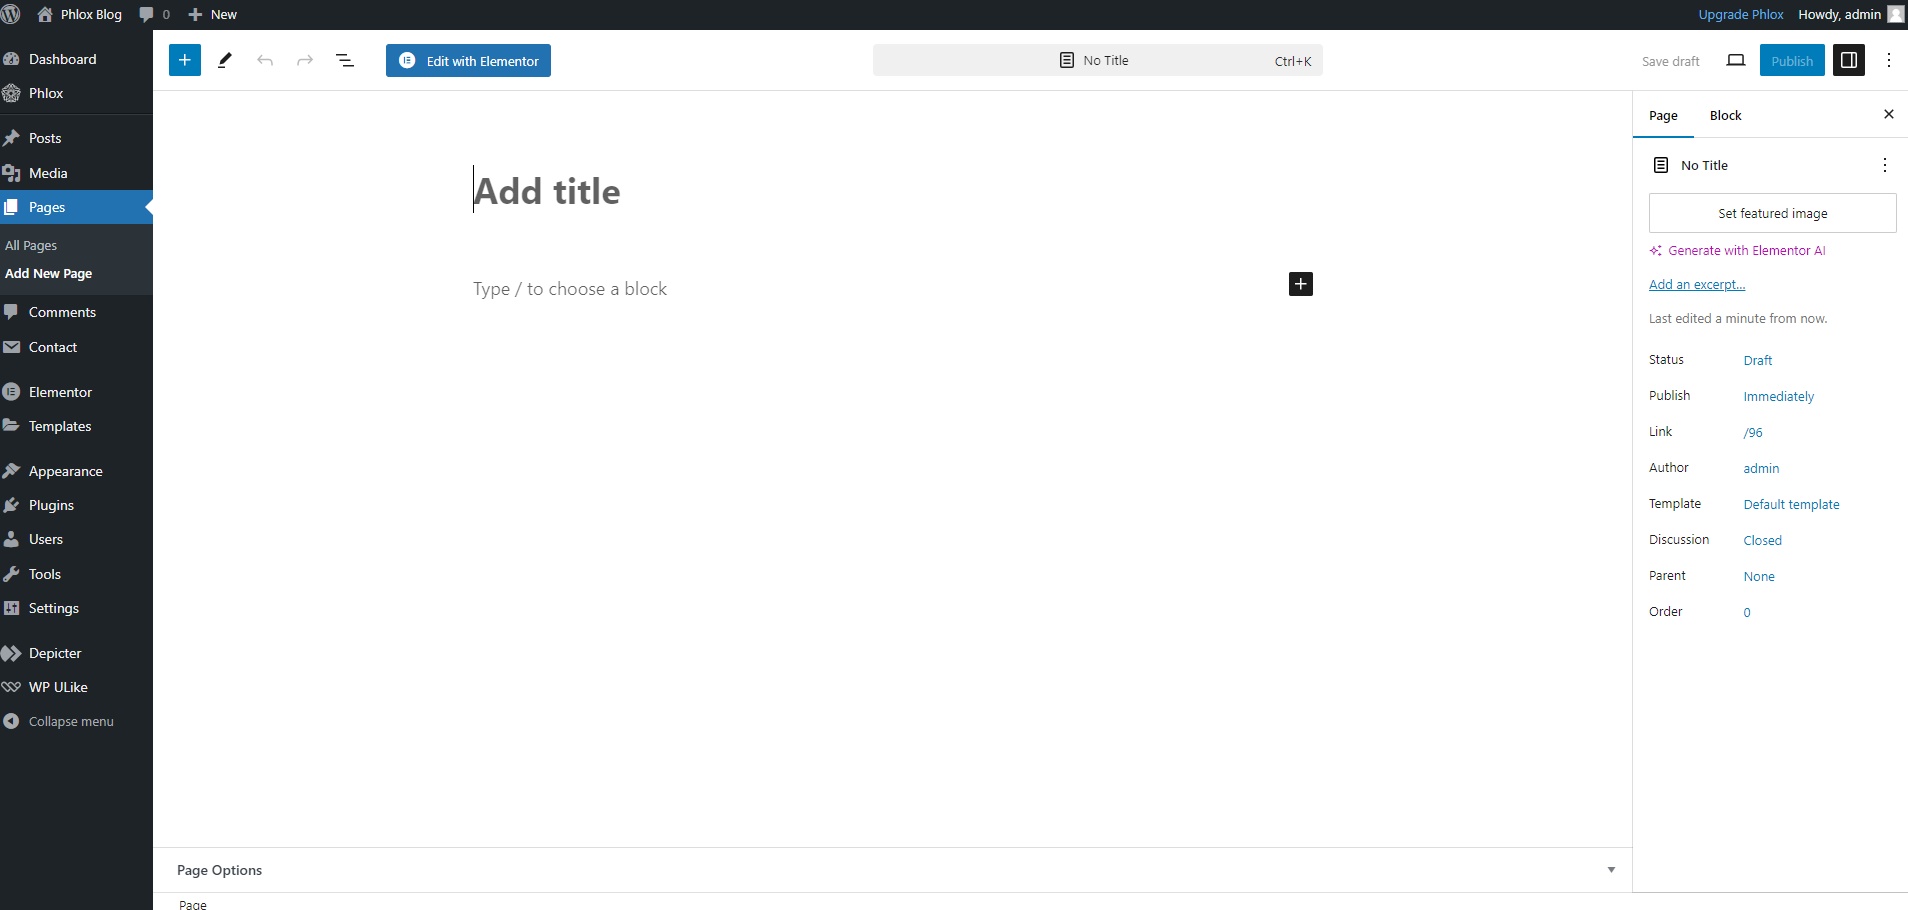
The steps are similar to adding a new post to your blog. Look for the “Pages” menu item on the left sidebar and click on the “Add New” submenu. This will open a new page editor.
In the main editor area, start typing your page content. You can use the formatting tools provided by WordPress to add headings, paragraphs, images, links, and more.
Above the content editor, you’ll find a field for the page title. Enter a clear and descriptive title for your page.
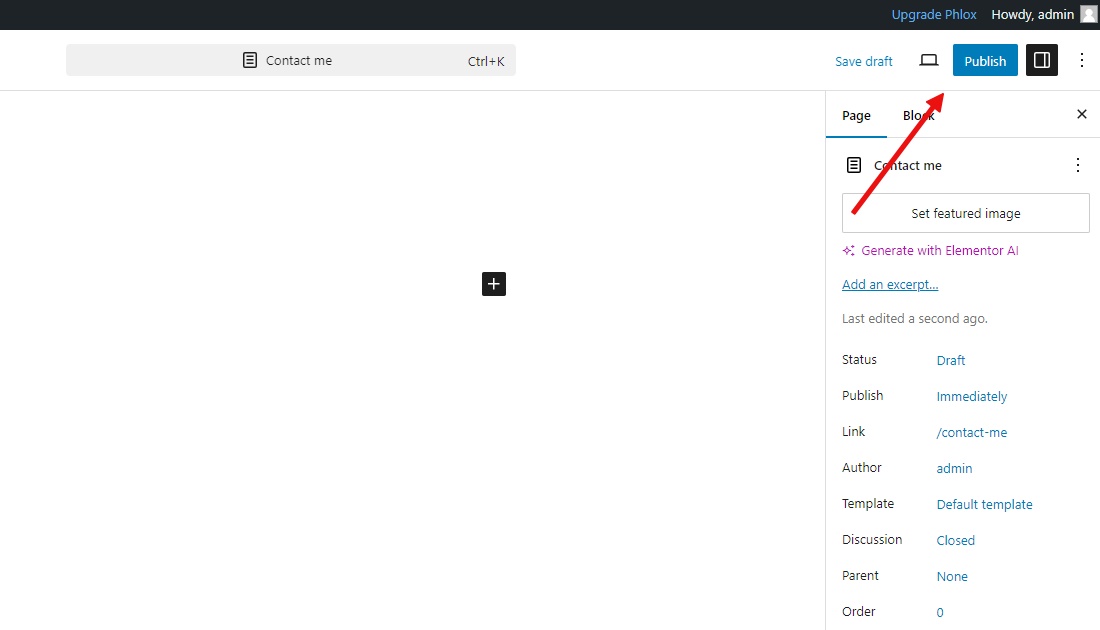
Once you’re satisfied with your page, click on the blue “Publish” button at the top right corner of the editor. Your page will now be visible on your website’s navigation menu.
Adding Extra Functionality to Your Website With Plugins
Plugins are essential tools that extend the functionality of your WordPress website beyond its core capabilities. Installing and activating plugins allows you to add new features, improve performance, and customize your blog’s appearance to match your unique vision.
Installing Your First WordPress Plugin
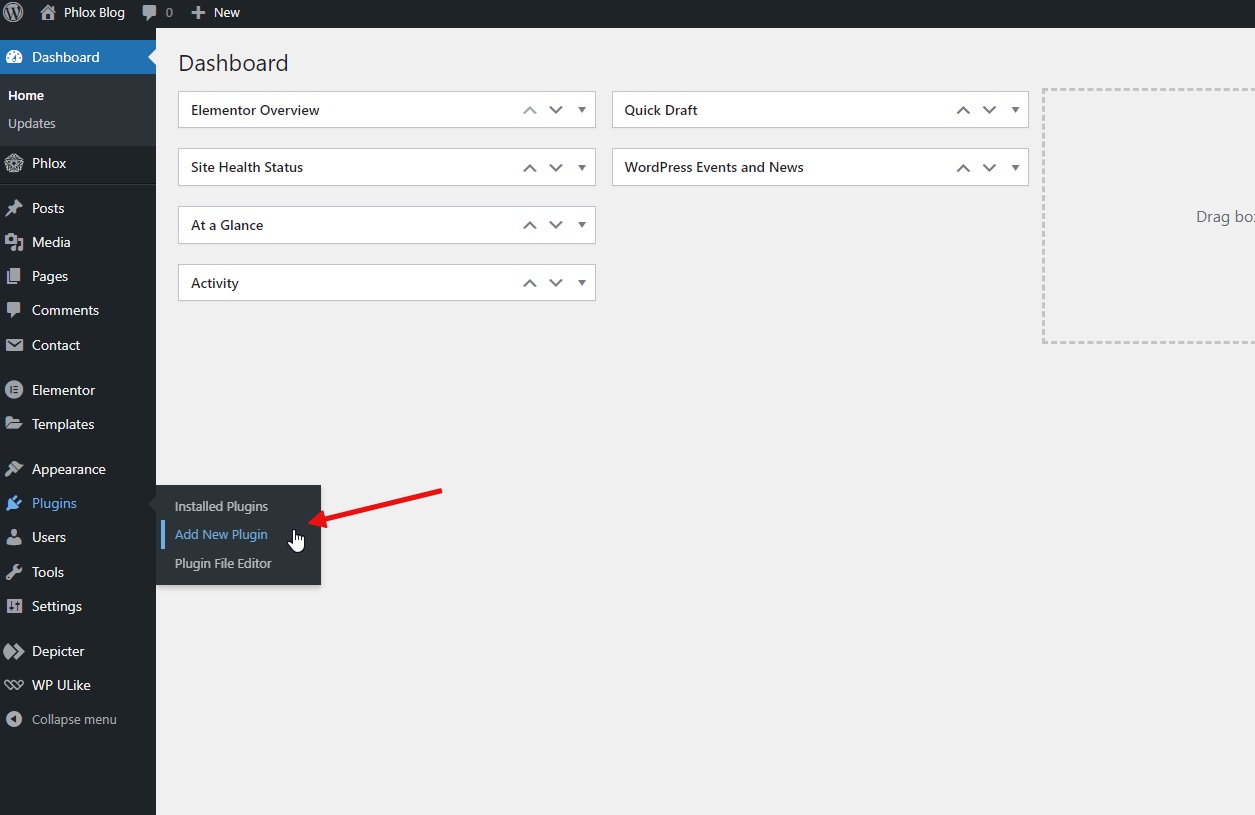
In your WordPress dashboard navigate to the “Plugins” menu and click on the “Add New” submenu.
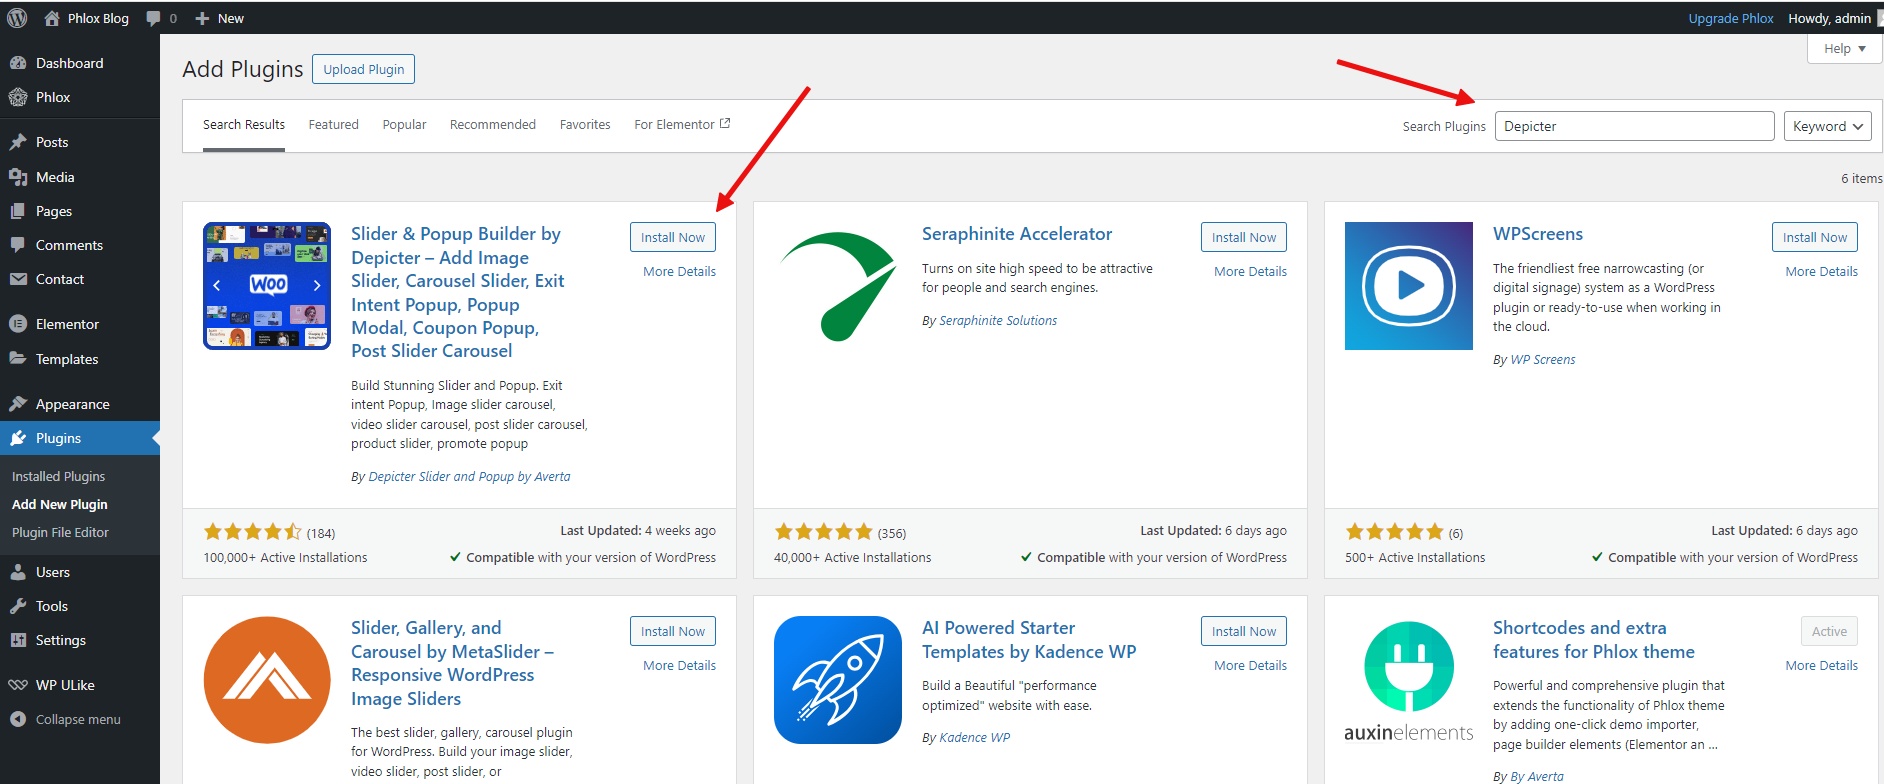
In the search bar, type the name of the plugin you want to install (e.g., “Depicter”).
Once you find the plugin, click on the “Install Now” button. After installation, click on the “Activate” button.
Depicter: Your Visual Content Toolkit
Depicter is a versatile plugin that empowers you to create stunning visuals and enhance your blog’s overall appeal. With Depicter, you can easily add sliders, carousels, testimonials, pop-ups, and notification bars to your website. These visually engaging elements can help you capture attention, showcase your content effectively, and drive user interaction.
To learn more about Depicter’s full capabilities and how to utilize its features effectively, take a look at the following resources:
Now you possess the fundamental knowledge to launch your free WordPress blog! Remember, creativity and consistent content creation are key factors in building a successful blog. Experiment with different writing styles, explore various topics, and most importantly, have fun expressing yourself online.
Don’t hesitate to utilize the resources provided throughout this guide for further assistance. As you go deeper into the world of blogging, you’ll discover countless resources to enhance your skills and refine your blog’s design and functionality.
Happy blogging!
FAQ
Do I need any coding experience to create a WordPress blog?
No, creating a WordPress blog is designed to be user-friendly. With the intuitive interface and drag-and-drop features, even those with no coding knowledge can set up and customize their blog.
How much does it cost to create a blog with WordPress?
The core WordPress software is free to use. However, you’ll need to purchase a domain name and hosting service. These costs can vary depending on the provider and chosen plan. The good news is, there are affordable options available to get you started.
What if I encounter any problems while setting up my blog?
WordPress has a vast and supportive community. There are plenty of resources available online, including forums and tutorials, to help you troubleshoot any issues you face. Additionally, your hosting provider may offer customer support to assist you.
Choosing the right WordPress theme can significantly impact the success of your photography website. A well-designed theme not only showcases your work effectively but also provides a positive user experience. In this article, we’ll explore some of the best free WordPress themes specifically tailored for photographers, offering a balance of features, aesthetics, and ease of use.
Phlox, a robust WordPress theme, is an excellent option for photographers seeking to showcase their work online. With its seamless integration with the Elementor page builder and the accompanying Phlox Portfolio plugin, crafting stunning and professional photography portfolios becomes a breeze. The theme offers a plethora of design options, allowing you to customize your website’s layout, typography, and color schemes to perfectly match your unique style. From grid layouts to masonry walls and slider galleries, Phlox provides a diverse range of display options to highlight your images effectively. Moreover, the theme comes with a collection of ready-to-use demos, including photography-specific templates, saving you time and effort in building your website from scratch.
Key Features of Phlox:
Elementor Integration: Effortlessly design and customize your website using the popular Elementor page builder.
Phlox Portfolio Plugin: Create impressive photography portfolios with various layout options and customization features.
Responsive Design: Ensure your website looks fantastic on all devices, from smartphones to desktops.
SEO-Friendly: Optimize your website for search engines to enhance visibility.
Translation-Ready: Easily translate your website into multiple languages.
Customizable Header and Footer: Design distinctive header and footer sections to align with your branding.
Social Media Integration: Connect your website to your social media profiles.
Blog Functionality: Create and manage blog posts with ease.
WooCommerce Compatibility: Sell products online with the WooCommerce plugin.
Extensive Theme Options Panel: Customize various aspects of your website’s appearance.
Regular Updates: Benefit from ongoing improvements and new features.
Large Collection of Demos: Choose from a variety of pre-built demos to get started quickly.
Responsive offers a vast library of 100+ free Elementor and WordPress Block templates which is a top choice for photographers. Create beautiful portfolio layouts, showcase your work in galleries, and tell your visual story with ease.
The user-friendly drag-and-drop WordPress theme lets you personalize your photography website without any coding knowledge. Responsive is also optimized for fast loading speeds, ensuring your visitors can admire your images instantly. Plus, it’s fully responsive, meaning your photos will look amazing on any device.
Key Features of Fullscreen:
Fast Performance
Highly Customizable
Pre-built websites
Live Customizations
Various Layout Settings
Advanced Typography
Unlimited Colors
Flexible Content Layouts
Fullscreen: A Minimalist Masterpiece for Photographers
Fullscreen is a free WordPress theme specifically designed for photographers. Its minimalist aesthetic and clean layout allow your images to take center stage, creating a captivating and immersive viewing experience. While Fullscreen may not offer the same level of customization as some other themes, it excels in its simplicity and elegance. If you’re seeking a theme that places your photos front and center, Fullscreen is an excellent choice.
Key Features of Fullscreen:
Full-Screen Image Display: Showcase your images in a full-screen format, creating a dramatic and immersive experience.
Minimalist Design: The clean and uncluttered layout allows your photos to be the primary focus.
Responsive Design: Ensure your website looks fantastic on all devices, from smartphones to desktops.
SEO-Friendly: Optimize your website for search engines to attract more visitors.
Regular Updates: Benefit from ongoing improvements and new features.
With Fullscreen, you can create a professional photography website that is both visually appealing and easy to navigate. Its minimalist design and focus on image display make it an ideal choice for photographers who want to showcase their work in a clean and impactful way.
Hitchcock: A Unique Approach to Photography
Hitchcock is a distinctive WordPress theme that offers a unique approach to showcasing photography. By allowing you to select a background image and overlay a grid of other photos, Hitchcock creates a visually striking and immersive experience. This feature is particularly effective for creating landing pages or combining different pieces of your work for a greater impact.
Key Features of Hitchcock:
Background Image Overlay: Create visually stunning layouts by placing a grid of photos over a background image.
Customizable Typography: Choose from various fonts and styles to match your branding.
Block Editor Compatibility: Easily arrange and customize your website’s content using the Block Editor.
Unlimited Scroll: Allow visitors to explore your portfolio endlessly.
Grid-Based Layout: Showcase your photos in a visually appealing grid format.
With Hitchcock, you can create a photography website that stands out from the crowd. Its unique features and customization options provide a powerful platform for showcasing your work and captivating your audience.
Pixgraphy: A Versatile Option for Photographers
Pixgraphy, a free WordPress theme, is a solid choice for photographers seeking a customizable and functional platform to showcase their work. This theme offers a range of features and customization options, making it easy to create a professional and visually appealing website.
While Pixgraphy may not offer the same level of customization as some premium themes, it provides a solid foundation for photographers who are just starting out or on a budget. With its user-friendly interface and pre-built templates, you can quickly set up your website and start showcasing your portfolio.
Key Features of Pixgraphy:
Multiple Layouts: Choose from various layout options to create a cohesive look for your website.
Responsive Design: Ensure your website looks fantastic on all devices, from smartphones to desktops.
SEO-Friendly: Optimize your website for search engines to attract more visitors.
One-Click Demo Import: Easily set up your website using pre-built demo content.
Regular Updates: Benefit from ongoing improvements and new features.
With Pixgraphy, you can create a professional photography website without breaking the bank. Its user-friendly interface, customization options, and responsive design make it a valuable choice for photographers of all levels.
In WordPress plugins, Smash Balloon’s Instagram Feed Pro stands out as a premier tool for seamlessly integrating Instagram content into your website. This versatile plugin empowers you to showcase stunning Instagram photos and videos, enhancing your website’s visual appeal and engaging your audience.
With Instagram Feed Pro, you can effortlessly create personalized Instagram feeds that perfectly align with your website’s design and branding. The plugin offers many customization options, allowing you to tailor the appearance of your feed to match your unique style. From layout choices to color schemes and more, you have complete control over how your Instagram content is displayed.
One of the standout features of Instagram Feed Pro is its ability to display multiple Instagram feeds simultaneously. This means you can showcase different aspects of your Instagram presence, such as your latest posts, popular hashtags, or even shoppable content. By organizing multiple feeds, you can provide visitors with a more comprehensive and engaging experience.
Top Features
Unmatched Styling: Customize your Instagram feed’s appearance to seamlessly blend with your website’s design.
Load More Functionality: Allow visitors to load more posts on demand, encouraging extended engagement.
Multiple Feed Types: Display various feed types, including hashtag feeds, shoppable posts, and more.
Responsive Design: Ensure a flawless viewing experience across all devices, from smartphones to desktops.
GDPR Compliance: Adhere to data privacy regulations with built-in GDPR compliance features.
Visual Moderation: Control over which posts appear in your feed, ensuring a precise presentation.
10Web Social Photo Feed
For those seeking a highly customizable Instagram plugin for their WordPress website, 10Web Social Photo Feed is an excellent choice. This powerful plugin offers a wide range of options to tailor your Instagram feed to your exact specifications, ensuring it seamlessly integrates with your website’s design and branding.
With 10Web Social Photo Feed, you have the freedom to choose from various layouts and design elements, allowing you to create a unique and visually appealing Instagram feed. The plugin’s intuitive interface makes customization a breeze, even for those without extensive technical knowledge.
Top Features
Extensive Customization: Tailor your Instagram feed’s appearance with a variety of layout options, design elements, and color schemes.
Multiple Feed Types: Display single or mixed feeds, combining content from different Instagram accounts or hashtags.
Advanced Filtering: Fine-tune your feed’s content with precise filtering options.
Regular Updates: Benefit from ongoing improvements and new features through regular updates.
Responsive Design: Ensure a seamless viewing experience across all devices.
Easy Integration: Integrate your Instagram feed into your WordPress website effortlessly using shortcodes or the plugin’s interface.
WPZOOM Social Feed Widget
For those seeking a simple yet effective Instagram plugin for their WordPress website, WPZOOM Social Feed Widget is an excellent choice. This user-friendly plugin offers a straightforward setup process and a variety of customization options, allowing you to showcase your Instagram content seamlessly.
Whether you’re a beginner or a seasoned WordPress user, WPZOOM Social Feed Widget provides a hassle-free way to integrate Instagram into your website. With its intuitive interface and clear instructions, even those without extensive technical knowledge can create visually appealing Instagram feeds.
Top Features
Easy Setup: Quickly and effortlessly integrate your Instagram feed into your WordPress website.
Customizable Layouts: Choose from various layouts, including classic grids and carousels, to match your website’s design.
Flexible Styling: Customize the appearance of your Instagram feed to align with your brand.
Free Version Available: Start with the free version and upgrade to the premium version as your needs grow.
Social Media Integration: Display content from multiple social media platforms, not just Instagram.